# Quickstart

Screendesk is an all-in-one video solution for customer support teams of all sizes. Screendesk has all the features you need to request, send, and share screen recordings.

<figure><img src="/files/zJZNcA6jpAGOu31aC46f" alt=""><figcaption></figcaption></figure>

With Screendesk you can:

* Request screen recordings from customers directly from within your favorite helpdesk.
* Edit and send professional looking videos to explain feautres.
* Upload and send existing videos from the video library.
* Embed videos in your support documentation.

<a href="https://app.screendesk.io/users/sign_up" class="button primary">Sign Up</a> <a href="/pages/dtuTWmEmYD3W1zPCQ3G9" class="button secondary">Account Setup</a>

### Request recordings from anywhere

Pick the workflow you want. Each card links to the full setup guide.

<table data-view="cards"><thead><tr><th>Method</th><th>Best for</th><th data-hidden data-card-target data-type="content-ref"></th><th data-hidden data-card-cover data-type="image">Cover image</th></tr></thead><tbody><tr><td>Helpdesk integrations</td><td>Request inside Zendesk, Intercom, Freshdesk, HelpScout, Jira, HubSpot.</td><td><a href="/spaces/fW6XSzJSKsNyZnOkSJPt/pages/4L48v2iv3fo2BgLA6vRF#from-helpdesk-integrations">/spaces/fW6XSzJSKsNyZnOkSJPt/pages/4L48v2iv3fo2BgLA6vRF#from-helpdesk-integrations</a></td><td><a href="/files/Lk4eynpal8mZTLrd3XtA">/files/Lk4eynpal8mZTLrd3XtA</a></td></tr><tr><td>Contact forms and widgets</td><td>Let customers submit a recording with their first request.</td><td><a href="/spaces/fW6XSzJSKsNyZnOkSJPt/pages/4L48v2iv3fo2BgLA6vRF#from-contact-forms-and-widgets">/spaces/fW6XSzJSKsNyZnOkSJPt/pages/4L48v2iv3fo2BgLA6vRF#from-contact-forms-and-widgets</a></td><td><a href="/files/7AH6UTTnmSiWXFehP4eE">/files/7AH6UTTnmSiWXFehP4eE</a></td></tr><tr><td>Chat and messaging</td><td>Send a recording link while chatting live.</td><td><a href="/spaces/fW6XSzJSKsNyZnOkSJPt/pages/4L48v2iv3fo2BgLA6vRF#from-chat-and-live-messaging">/spaces/fW6XSzJSKsNyZnOkSJPt/pages/4L48v2iv3fo2BgLA6vRF#from-chat-and-live-messaging</a></td><td><a href="/files/ai5CYXpv9qdRpehE02fj">/files/ai5CYXpv9qdRpehE02fj</a></td></tr><tr><td>Direct links</td><td>Use anywhere: email, SMS, Slack, social, KB articles.</td><td><a href="/spaces/fW6XSzJSKsNyZnOkSJPt/pages/4L48v2iv3fo2BgLA6vRF#from-direct-links">/spaces/fW6XSzJSKsNyZnOkSJPt/pages/4L48v2iv3fo2BgLA6vRF#from-direct-links</a></td><td><a href="/files/Rx1E3d9cHChJqJtEk7OG">/files/Rx1E3d9cHChJqJtEk7OG</a></td></tr><tr><td>Embedded on your website</td><td>Always-on “Record your screen” button for self-serve.</td><td><a href="/spaces/fW6XSzJSKsNyZnOkSJPt/pages/4L48v2iv3fo2BgLA6vRF#embedded-on-your-website">/spaces/fW6XSzJSKsNyZnOkSJPt/pages/4L48v2iv3fo2BgLA6vRF#embedded-on-your-website</a></td><td><a href="/files/gg4FxD4v9eapdmj1qN1b">/files/gg4FxD4v9eapdmj1qN1b</a></td></tr></tbody></table>

### Discover Screendesk

<table data-view="cards"><thead><tr><th></th><th></th><th data-hidden data-card-target data-type="content-ref"></th><th data-hidden data-card-cover data-type="image">Cover image</th></tr></thead><tbody><tr><td>Connect Helpdesk</td><td>Request, send, and share videos directly from within your favorite helpdesk</td><td><a href="/pages/YbOTAubUyxI5uiS61yaV">/pages/YbOTAubUyxI5uiS61yaV</a></td><td><a href="/files/Lk4eynpal8mZTLrd3XtA">/files/Lk4eynpal8mZTLrd3XtA</a></td></tr><tr><td>Console Logs</td><td>Automatically capture errors, network requests, and reproduction steps</td><td><a href="/pages/xgEwVOsu3jC2HqDfPbxk">/pages/xgEwVOsu3jC2HqDfPbxk</a></td><td><a href="/files/AUkAAgEbEvL6kxL5aSZh">/files/AUkAAgEbEvL6kxL5aSZh</a></td></tr><tr><td>Hide Sensitive Data</td><td>Blur sensitive data like credit card details and personal information</td><td><a href="/pages/ioYfHjO96dw7QiKyYBlg">/pages/ioYfHjO96dw7QiKyYBlg</a></td><td><a href="/files/f4uZuZM1EmuFpweSwlok">/files/f4uZuZM1EmuFpweSwlok</a></td></tr><tr><td>Security</td><td>Choose who can view and edit your recordings</td><td><a href="/pages/D3QFqdZS7mBzulgH92E7">/pages/D3QFqdZS7mBzulgH92E7</a></td><td><a href="/files/KUtmDx07pQkYkrbh3Mud">/files/KUtmDx07pQkYkrbh3Mud</a></td></tr><tr><td>Customization</td><td>Change the look and feel of your recorder to match your Brand</td><td><a href="/pages/IFI0I9X1zVzedlFxfC7k">/pages/IFI0I9X1zVzedlFxfC7k</a></td><td><a href="/files/O4EhHPEZrlyotm0l7pVz">/files/O4EhHPEZrlyotm0l7pVz</a></td></tr><tr><td>User Management</td><td>Recreate your internal organization within Screendesk</td><td><a href="/pages/LcGvsIfwYx0FZKlfG5Tc">/pages/LcGvsIfwYx0FZKlfG5Tc</a></td><td><a href="/files/1sqD3LjdRIZfyalqWYFo">/files/1sqD3LjdRIZfyalqWYFo</a></td></tr></tbody></table>


# Admin Guide

Set up your Screendesk workspace: connect integrations, customize branding, install the script, and invite teammates.

You can get started with Screendesk within minutes. Follow the steps outlined below to start receiving, sending recordings, as well as starting a live screen sharing session.

1. Make sure that you have a Screendesk account. You can sign up at <https://app.screendesk.io/users/sign_up>.
2. Connect Screendesk to one of our supported ticketing system. We already integrate with [Zendesk](https://app.screendesk.io/integrations), [Intercom](https://app.screendesk.io/integrations), [Help Scout](https://app.screendesk.io/integrations), [Gist](https://docs.screendesk.io/gist/screen-recording) and [Freshdesk](https://docs.screendesk.io/freshdesk/getting-started).
3. Add a Screendesk button to your contact forms and widget ([Zendesk](https://docs.screendesk.io/zendesk/zendesk-forms), [Intercom](https://docs.screendesk.io/intercom/getting-started/messenger), [Freshdesk](https://docs.screendesk.io/freshdesk/freshdesk-portal), [Gist](https://docs.screendesk.io/integrations/gist)).
4. Customize your recorder to match your brand [here](https://app.screendesk.io/appearance) and live screen sharing sessions rooms [here](https://app.screendesk.io/settings-live-screensharing).
5. Add our code snippet to your website to automatically capture console logs [here](https://app.screendesk.io/screen-recorder).
6. [Invite](https://app.screendesk.io/members) your colleagues to join your account.
7. That's it! Check the demo below.

{% @arcade/embed url="<https://app.arcade.software/share/CVtvz0yayYKwDNlge6y3>" flowId="CVtvz0yayYKwDNlge6y3" %}


# Request recording from anywhere

Collect customer recordings via helpdesk, forms, chat, direct links, or embedded buttons.

Screendesk gives you multiple ways to collect screen recordings from customers wherever they interact with your team. Whether you're working inside a helpdesk ticket, chatting live with a customer, or reaching out by email, you can request a recording in seconds — and the customer can submit one without installing anything.

### Overview

You can collect recordings through any combination of these channels:

* **Helpdesk integrations** — Request recordings with one click inside Zendesk, Intercom, Freshdesk, Freshservice, HelpScout, Jira, or HubSpot
* **Contact forms and widgets** — Let customers attach a recording when they submit a support request
* **Chat and messaging** — Send recording links directly in live conversations
* **Direct links** — Share a universal recorder URL via email, SMS, or any channel
* **Embedded buttons** — Add a "Record your screen" button to your website or help center

<table data-view="cards"><thead><tr><th>Method</th><th>Best for</th><th data-hidden data-card-target data-type="content-ref"></th><th data-hidden data-card-cover data-type="image">Cover image</th></tr></thead><tbody><tr><td>Helpdesk integrations</td><td>Request inside tickets, inboxes, and sidebars.</td><td><a href="/spaces/fW6XSzJSKsNyZnOkSJPt/pages/4L48v2iv3fo2BgLA6vRF#from-helpdesk-integrations">/spaces/fW6XSzJSKsNyZnOkSJPt/pages/4L48v2iv3fo2BgLA6vRF#from-helpdesk-integrations</a></td><td><a href="/files/Lk4eynpal8mZTLrd3XtA">/files/Lk4eynpal8mZTLrd3XtA</a></td></tr><tr><td>Contact forms and widgets</td><td>Capture recordings at ticket creation time.</td><td><a href="/spaces/fW6XSzJSKsNyZnOkSJPt/pages/4L48v2iv3fo2BgLA6vRF#from-contact-forms-and-widgets">/spaces/fW6XSzJSKsNyZnOkSJPt/pages/4L48v2iv3fo2BgLA6vRF#from-contact-forms-and-widgets</a></td><td><a href="/files/7AH6UTTnmSiWXFehP4eE">/files/7AH6UTTnmSiWXFehP4eE</a></td></tr><tr><td>Chat and messaging</td><td>Send a link live during a conversation.</td><td><a href="/spaces/fW6XSzJSKsNyZnOkSJPt/pages/4L48v2iv3fo2BgLA6vRF#from-chat-and-live-messaging">/spaces/fW6XSzJSKsNyZnOkSJPt/pages/4L48v2iv3fo2BgLA6vRF#from-chat-and-live-messaging</a></td><td><a href="/files/ai5CYXpv9qdRpehE02fj">/files/ai5CYXpv9qdRpehE02fj</a></td></tr><tr><td>Direct links</td><td>Use anywhere: email, SMS, Slack, social, KB.</td><td><a href="/spaces/fW6XSzJSKsNyZnOkSJPt/pages/4L48v2iv3fo2BgLA6vRF#from-direct-links">/spaces/fW6XSzJSKsNyZnOkSJPt/pages/4L48v2iv3fo2BgLA6vRF#from-direct-links</a></td><td><a href="/files/Rx1E3d9cHChJqJtEk7OG">/files/Rx1E3d9cHChJqJtEk7OG</a></td></tr><tr><td>Embedded on your website</td><td>Always-on button for self-serve submissions.</td><td><a href="/spaces/fW6XSzJSKsNyZnOkSJPt/pages/4L48v2iv3fo2BgLA6vRF#embedded-on-your-website">/spaces/fW6XSzJSKsNyZnOkSJPt/pages/4L48v2iv3fo2BgLA6vRF#embedded-on-your-website</a></td><td><a href="/files/gg4FxD4v9eapdmj1qN1b">/files/gg4FxD4v9eapdmj1qN1b</a></td></tr></tbody></table>

Every method funnels recordings into the same Screendesk dashboard. Recordings are automatically linked to the right ticket, conversation, or customer — no manual work required.

{% hint style="info" %}
Customers never need to install software or create an account. The recorder runs directly in their browser.
{% endhint %}

***

### From Helpdesk Integrations

The fastest way to collect recordings during an active support conversation. A Screendesk button appears inside your helpdesk, so agents can request recordings without leaving the ticket.

**Supported Platforms**

| Platform                               | Where the Button Appears           | Source                                   |
| -------------------------------------- | ---------------------------------- | ---------------------------------------- |
| **Zendesk** (Support, Chat, Messaging) | Right sidebar app panel            | Ticket, chat, or messaging thread        |
| **Intercom** (Messenger and Inbox)     | App panel and conversation toolbar | Messenger home or inbox conversation     |
| **Freshdesk** (Tickets and Chat)       | Right sidebar apps panel           | Ticket reply or chat window              |
| **Freshservice**                       | Right sidebar apps panel           | IT service ticket                        |
| **HelpScout**                          | Right sidebar app icon             | Conversation reply                       |
| **Jira Service Management**            | Issue panel                        | Customer portal request or general issue |
| **HubSpot**                            | Ticket sidebar                     | Support ticket                           |

**How It Works**

{% stepper %}
{% step %}

#### Open the Conversation

Navigate to the customer ticket, chat, or conversation where you need a recording.
{% endstep %}

{% step %}

#### Click the Screendesk Button

Find the **Screendesk** app in your helpdesk interface (usually in the right sidebar or toolbar). Click **"Request Recording"**.
{% endstep %}

{% step %}

#### Customize and Send

A pre-formatted message with a recording link is added to your reply. Edit the message to give the customer context about what to record, then send.
{% endstep %}

{% step %}

#### Recording Arrives Automatically

When the customer submits their recording, it appears directly in the ticket or conversation — no manual linking needed.
{% endstep %}
{% endstepper %}

{% hint style="info" %}
Each integration also supports **sending recordings** (agent-to-customer) and **sharing from your library**. See the integration-specific pages for details.
{% endhint %}

**What Customers See**

Customers receive a message like:

> "To help us understand the issue, please record your screen: **\[Start Recording]**"

Clicking the link opens the Screendesk recorder in their browser. Their email and ticket ID are pre-filled, so they just record and submit.

**After Submission**

Recordings attach to the right place automatically:

* **Zendesk** — Appears as an internal comment with embedded player
* **Intercom** — Sent as a message in the conversation thread
* **Freshdesk** — Added as a reply to the ticket
* **Freshservice** — Added as a reply to the service ticket
* **HelpScout** — Created as a draft reply in the conversation (ready for agent review)
* **Jira** — Added as a comment on the issue
* **HubSpot** — Added as a note on the ticket

For detailed setup and platform-specific instructions, see Request Recording from Helpdesk Integrations.

***

### From Contact Forms and Widgets

Let customers include a screen recording when they submit a support request — before an agent is even involved. This gives your team visual context from the very first message.

**Zendesk Form and Widget**

Add a **"Record your screen"** button directly to your Zendesk contact form or web widget. Customers click the button, record the issue, and submit their form — the recording is attached to the ticket automatically.

{% stepper %}
{% step %}

#### Install the Form Integration

Go to **Settings** → **Integrations** → **Zendesk** and follow the form setup instructions.
{% endstep %}

{% step %}

#### Add the Button to Your Form

Insert the Screendesk recording button into your Zendesk form or web widget. You can customize the button background color to match your brand.
{% endstep %}

{% step %}

#### Customers Record Alongside Their Request

When a customer fills out your contact form, they can optionally click the recording button to capture their screen. The recording is submitted along with the form.
{% endstep %}
{% endstepper %}

**Intercom Messenger**

Add a **"Record your screen"** option to your Intercom Messenger home screen. Customers can initiate a recording before or during a conversation.

1. Navigate to **Settings** → **Integrations** → **Intercom**
2. Enable the Messenger home integration
3. A **"Record your screen"** card appears in the Messenger home for customers
4. Customers click to record, and the recording is linked to their conversation

{% hint style="info" %}
You can customize the call-to-action text that appears on the button. Go to **Settings** → **Integrations** → **Intercom** → **Customize Messenger text**.
{% endhint %}

For setup walkthroughs, see the Zendesk integration and Intercom integration pages.

***

### From Chat and Live Messaging

During a live chat conversation, you can send a recording request link in real time. This works across all supported chat platforms.

**How It Works**

1. While chatting with a customer, click the **Screendesk** button in your chat interface
2. Select **"Request Recording"**
3. A message with the recording link is inserted into the chat
4. Press Enter to send — the customer can click and record immediately

**Supported Chat Platforms**

* **Zendesk Chat** and **Zendesk Messaging**
* **Intercom Messenger**
* **Freshdesk Chat** (Freshchat)

Recordings submitted from chat are linked to the conversation automatically, so the full context — chat messages and screen recording — lives in one place.

***

### From Direct Links

Share a universal recording link with anyone, through any channel. This is the most flexible option — it works independently of any helpdesk integration.

**Where to Find Your Link**

1. Go to **Settings** → **Recorder**
2. Find the **"Share your recorder"** section
3. Copy the URL

Your link looks like this:

```
https://app.screendesk.io/recordings/new?ak=YOUR_ACCOUNT_KEY&key=YOUR_USER_KEY
```

**Where to Use It**

You can share this link anywhere:

* **Email** — Paste it in a support reply or proactive outreach
* **SMS or text** — Send a short message with the link for mobile-first customers
* **Slack, Teams, or internal chat** — Share with colleagues or customers in shared channels
* **Social media DMs** — Send privately to customers who reach out on Twitter/X, LinkedIn, etc.
* **Knowledge base articles** — Include it in troubleshooting guides

{% hint style="danger" %}
**Never share your recorder link publicly** (social media posts, public forums, blog comments). It contains your account and user keys. For public channels, direct customers to message you privately first.
{% endhint %}

**Adding Context with URL Parameters**

Append parameters to pre-fill information and track where recordings come from:

| Parameter | Purpose                   | Example                 |
| --------- | ------------------------- | ----------------------- |
| `ce`      | Pre-fill customer email   | `&ce=jane@example.com`  |
| `tid`     | Link to a ticket ID       | `&tid=TICKET-4521`      |
| `cid`     | Link to a conversation ID | `&cid=conv_abc123`      |
| `src`     | Track the request source  | `&src=onboarding-email` |

**Combined example:**

```
https://app.screendesk.io/recordings/new?ak=abc123&key=xyz789&ce=jane@example.com&tid=TICKET-4521&src=onboarding-email
```

This means you can create purpose-specific links for different workflows — one for onboarding emails, another for escalation follow-ups, another for proactive outreach — and track which channels drive the most recordings.

{% hint style="info" %}
Each team member has their own unique link. Recordings submitted through your link are attributed to you as the requester.
{% endhint %}

For detailed guidance on sending direct links, email templates, and follow-up strategies, see Request Recording from Dashboard.

***

### Embedded on Your Website

Add a persistent recording button to your website, help center, or web application so customers can submit recordings at any time — without going through a support form or waiting for an agent.

**Use Cases**

* **Help center** — Add a "Record your issue" button on troubleshooting pages
* **Product pages** — Let users report bugs directly from your app
* **Contact page** — Offer recording as an alternative to filling out a long form
* **Error pages** — Give users a way to show you exactly what went wrong

**How It Works**

Embed the Screendesk recorder as a button or iframe on your site. When a customer clicks the button, the recorder opens in a new window (or inline, depending on configuration). After recording, the submission lands in your Screendesk dashboard.

You can pass URL parameters to capture page context (current URL, user ID, session ID) so recordings arrive with useful metadata.

For setup instructions, see Embed Recorder Widget.

***

### Choosing the Right Method

Different situations call for different collection methods. Here's a quick guide:

{% columns %}
{% column %}
**Best for Speed**

**Helpdesk integration** — One-click request from inside a ticket or chat. No context switching.

**Chat messaging** — Send a recording link in real time during a live conversation.
{% endcolumn %}

{% column %}
**Best for Scale**

**Contact forms** — Collect recordings from the first message, before an agent is involved.

**Embedded buttons** — Let any visitor record an issue without contacting support.
{% endcolumn %}
{% endcolumns %}

{% columns %}
{% column %}
**Best for Flexibility**

**Direct links** — Works anywhere: email, SMS, Slack, social media, knowledge base articles.
{% endcolumn %}

{% column %}
**Best for Context**

**URL parameters** — Pre-fill customer email, ticket IDs, and source tracking on any link.
{% endcolumn %}
{% endcolumns %}

You can use multiple methods simultaneously. For example, your team might request recordings from Zendesk tickets during active conversations, embed a recording button on your help center for self-service, and share direct links in onboarding emails.

***

### What Every Recording Includes

Regardless of how it's collected, every recording captures:

* **Screen recording** — Video of the customer's screen, window, or browser tab
* **Browser and OS** — Automatically detected (e.g., Chrome 120, macOS 14.2)
* **Device information** — Screen resolution, device type
* **Console logs** — JavaScript errors and warnings (if enabled)
* **Customer email** — If required or pre-filled via URL parameter

Recordings submitted through helpdesk integrations also include the ticket or conversation ID, so they're automatically linked to the right support case.

For details on captured data, see System Information Captured and Console Logs Captured.


# Request a recording

What customers and agents see when recording and viewing submissions

Screendesk makes it easy for customers to share screen recordings with your support team — no software installation required. Customers record directly in their browser, and the recording is automatically delivered to the right ticket or conversation in your helpdesk.

This page walks through the experience from both sides: what your customer sees, and what your support agent sees.

### How it works for customers

When a customer is asked to share a screen recording, they receive a link that opens the Screendesk recorder directly in their browser. The entire process takes under a minute and requires no downloads, plugins, or account creation.

**Step-by-step customer flow**

{% stepper %}
{% step %}
**Open the recording link**

The customer clicks a link provided by your support agent — either in a helpdesk ticket, a chat message, or on your website. The Screendesk recorder opens in their browser.

{% hint style="info" %}
The recording link works in all modern browsers. No installation or sign-up is required.
{% endhint %}

<figure><img src="https://3820804400-files.gitbook.io/~/files/v0/b/gitbook-x-prod.appspot.com/o/spaces%2FfW6XSzJSKsNyZnOkSJPt%2Fuploads%2FTb1r6WbXDaSgK1sfF6Dm%2FCleanShot%202026-02-10%20at%2015.57.51%402x.png?alt=media&#x26;token=c6407aa1-ca46-417a-ac9f-22707fd8a30b" alt=""><figcaption></figcaption></figure>
{% endstep %}

{% step %}
**Choose recording options**

Before recording begins, the customer can toggle:

* **Microphone** — turn on to include an audio narration alongside the screen recording. This helps provide verbal context about the issue.

This is optional

<figure><img src="https://3820804400-files.gitbook.io/~/files/v0/b/gitbook-x-prod.appspot.com/o/spaces%2FfW6XSzJSKsNyZnOkSJPt%2Fuploads%2F7t2pRyRWQgwUmCPTvAf4%2FCleanShot%202026-02-10%20at%2015.59.03%402x.png?alt=media&#x26;token=9e877baf-1987-4313-84a9-02898e19a9d3" alt=""><figcaption></figcaption></figure>
{% endstep %}

{% step %}
**Select what to share**

After clicking **Start Recording**, the browser prompts the customer to choose what to capture:

* **Entire screen** — records everything visible on the selected display
* **Application window** — records a single application window
* **Browser tab** — records a specific browser tab

The customer picks the option that best shows their issue, then confirms.

<figure><img src="https://3820804400-files.gitbook.io/~/files/v0/b/gitbook-x-prod.appspot.com/o/spaces%2FfW6XSzJSKsNyZnOkSJPt%2Fuploads%2FMjdpAXtuzcOgZibP3BBn%2FCleanShot%202026-02-10%20at%2016.00.04%402x.png?alt=media&#x26;token=59a261fc-8e2a-46cd-838a-f7acf18085d7" alt=""><figcaption></figcaption></figure>
{% endstep %}

{% step %}
**Record the issue**

A brief countdown (3… 2… 1…) plays before recording starts, giving the customer a moment to prepare. They then demonstrate the issue on screen while optionally narrating over the microphone.

{% hint style="info" %}
The countdown can be disabled by an admin in **Settings → Recorder**. See Customize Recorder Options for details.
{% endhint %}

<figure><img src="https://3820804400-files.gitbook.io/~/files/v0/b/gitbook-x-prod.appspot.com/o/spaces%2FfW6XSzJSKsNyZnOkSJPt%2Fuploads%2FneHChGqnk5Q6Vbqnw1sj%2FCleanShot%202026-02-10%20at%2016.00.30%402x.png?alt=media&#x26;token=5db35ad0-3625-48c2-9190-1997b5ff2e50" alt=""><figcaption></figcaption></figure>
{% endstep %}

{% step %}
**Stop and submit**

When finished, the customer clicks **Stop Recording**. Depending on your workspace settings, they may be asked to provide:

* **Email address** — so your team can follow up (configurable as required or optional)
* **Title** — a short summary of the issue (configurable as required or optional)
* **Description** — additional written context about the problem (always optional)

The customer clicks **Submit** and sees a confirmation that the recording has been received.

<figure><img src="https://3820804400-files.gitbook.io/~/files/v0/b/gitbook-x-prod.appspot.com/o/spaces%2FfW6XSzJSKsNyZnOkSJPt%2Fuploads%2Fg4TdyokT2ED8TMVDC9hB%2FCleanShot%202026-02-10%20at%2016.01.00%402x.png?alt=media&#x26;token=65d1fae3-80c6-40ed-bb10-dc91ee969142" alt=""><figcaption></figcaption></figure>
{% endstep %}
{% endstepper %}

{% hint style="success" %}
The recording, along with any comments, is automatically sent to the correct support ticket or conversation — no manual file sharing needed.
{% endhint %}

### How it works for support agents

Support agents interact with Screendesk directly from within their helpdesk tool. There's no need to switch between applications — requesting a recording and viewing the result both happen in the same workflow.

**Requesting a recording**

{% stepper %}
{% step %}
**Open the Screendesk panel**

In your helpdesk (Zendesk, Intercom, Freshdesk, HelpScout, or Jira), locate the **Screendesk** button or app panel. It typically appears in the right sidebar of a ticket or conversation.
{% endstep %}

{% step %}
**Click Request Recording**

Click the **Request Recording** button. Screendesk generates a unique recording link and sends it to the customer within the current ticket or conversation.

The message text is customizable — you can personalize the wording in your Screendesk integration settings.
{% endstep %}
{% endstepper %}

**Receiving a completed recording**

When the customer finishes recording and submits, the recording is automatically linked back to the original ticket or conversation:

* An **internal note** is added to the ticket containing a link to the recording and the customer's description (if provided).
* The ticket can be **auto-tagged** with `screendesk-recording-received` so you can filter and track recordings across your queue (configurable per integration).
* If you use **Zendesk**, you can also configure a public reply to confirm receipt to the customer.

**Viewing a recording**

Click the recording link in the internal note to open it in Screendesk. The recording page gives you everything you need to understand the customer's issue at a glance.

{% tabs %}
{% tab title="Video player" %}
Watch the customer's screen recording with full playback controls. If the customer enabled their microphone, the audio narration plays alongside the video.
{% endtab %}

{% tab title="System information" %}
Screendesk automatically captures the customer's environment details:

* **Operating system** and version
* **Browser** and version
* **Screen resolution** and window size
* **Device type** (desktop, mobile, tablet)
* **Locale** and timezone
* **Network speed** and ISP
* **VPN detection**
  {% endtab %}

{% tab title="Console logs" %}
If console log capture is enabled for your workspace, this tab shows the JavaScript console output from the customer's session:

* Error, warning, info, and debug messages
* Stack traces and source file references
* Timestamps synchronized with the recording timeline

This is invaluable for diagnosing client-side bugs without asking the customer to open developer tools.
{% endtab %}

{% tab title="Network logs" %}
When the customer uses the Screendesk Chrome extension, network activity is captured alongside the recording:

* API endpoints and HTTP status codes
* Request and response headers
* Request payloads and response bodies
* Timing and resource size
* Copy-as-cURL for quick reproduction

Network logs help your team identify failing API calls or slow requests behind the issue the customer is experiencing.
{% endtab %}
{% endtabs %}

### Supported helpdesk integrations

Screendesk integrates natively with the following platforms. In each case, the agent can request recordings and receive results without leaving their helpdesk.

| Platform                               | Where Screendesk appears               | How recordings are delivered                        |
| -------------------------------------- | -------------------------------------- | --------------------------------------------------- |
| **Zendesk** (Support, Chat, Messaging) | Right sidebar app panel                | Internal note on the ticket (optional public reply) |
| **Intercom** (Messenger, Inbox)        | Messenger home panel and Inbox sidebar | Message in the conversation thread                  |
| **Freshdesk** (Tickets, Chat)          | Right sidebar app panel                | Private note on the ticket                          |
| **HelpScout**                          | Right sidebar app icon                 | Note in the conversation                            |
| **Jira Service Management**            | Right panel in issue view              | Comment on the issue                                |
| **HubSpot**                            | Support ticket panel                   | Note on the ticket                                  |

{% hint style="info" %}
Each integration supports customizable call-to-action text and auto-tagging. Configure these in **Settings → Integrations** for your connected helpdesk.
{% endhint %}

### Important details

* **No installation required** — customers record directly in their browser. No plugins, extensions, or downloads needed.
* **Recording time** — there is no hard time limit on recordings, though shorter recordings (under 5 minutes) are recommended for faster upload and review.
* **Required fields** — workspace admins can make the email and title fields required or optional in **Settings → Recorder**. See Customize Recorder Options.
* **Countdown timer** — a 3-second countdown plays before recording begins by default. This can be disabled in **Settings → Recorder**.
* **Branding** — the recorder background color, player accent color, and logo are all customizable to match your brand identity.
* **Sensitive data** — if blur is enabled, specified elements on the customer's page are automatically obscured during recording. See Blur Sensitive Data.

### Troubleshooting

<details>

<summary>Customer says the recording link doesn't work</summary>

**Cause:** Link may have expired or the browser may not support screen capture.

**Solution:** Ask the customer to try in Chrome or Edge. Confirm the link URL is correct.

</details>

<details>

<summary>Recording appears without audio</summary>

**Cause:** Customer didn't enable the microphone toggle before recording.

**Solution:** Let them know they can toggle the microphone on before clicking **Start Recording**, and re-record if needed.

</details>

<details>

<summary>No console logs appear on the recording page</summary>

**Cause:** Console log capture isn't enabled for the workspace.

**Solution:** Go to **Settings → Console Logs** and enable the feature. The widget must also be installed on the customer's site.

</details>

<details>

<summary>Recording doesn't appear in the helpdesk ticket</summary>

**Cause:** Integration may be misconfigured or the ticket ID wasn't passed correctly.

**Solution:** Check **Settings → Integrations** and verify the helpdesk connection is active. Try requesting a new recording.

</details>

<details>

<summary>Customer can't select a specific window or tab</summary>

**Cause:** Browser API limitations on certain operating systems.

**Solution:** Full screen capture is the most widely supported option. Suggest the customer try a different browser or use full screen.

</details>


# Developer tools

Capture system info, console logs, and network activity alongside recordings for faster debugging.

Developer tools add technical context to recordings. They help engineers reproduce issues faster. They also reduce back-and-forth with customers.

Use these tools when you need more than “watch the video”. Use them for bugs, performance issues, and flaky flows.

### What gets captured

**System info**

Basic environment metadata, like:

* Browser and OS
* Screen and viewport size
* Locale and timezone
* Network indicators (when available)

**Console logs**

JavaScript console output during the session, like:

* Errors and stack traces
* Warnings and debug logs
* Client-side failures that don’t show in the UI

**Network logs**

HTTP request/response activity, like:

* Fetch/XHR calls
* Status codes (4xx/5xx)
* Payloads and response bodies (when available)

{% hint style="info" %}
Network logs are typically only available for Chrome-extension captures (and other replay-style captures). Regular customer-submitted recordings usually won’t include full network logs.
{% endhint %}

### Where to find it

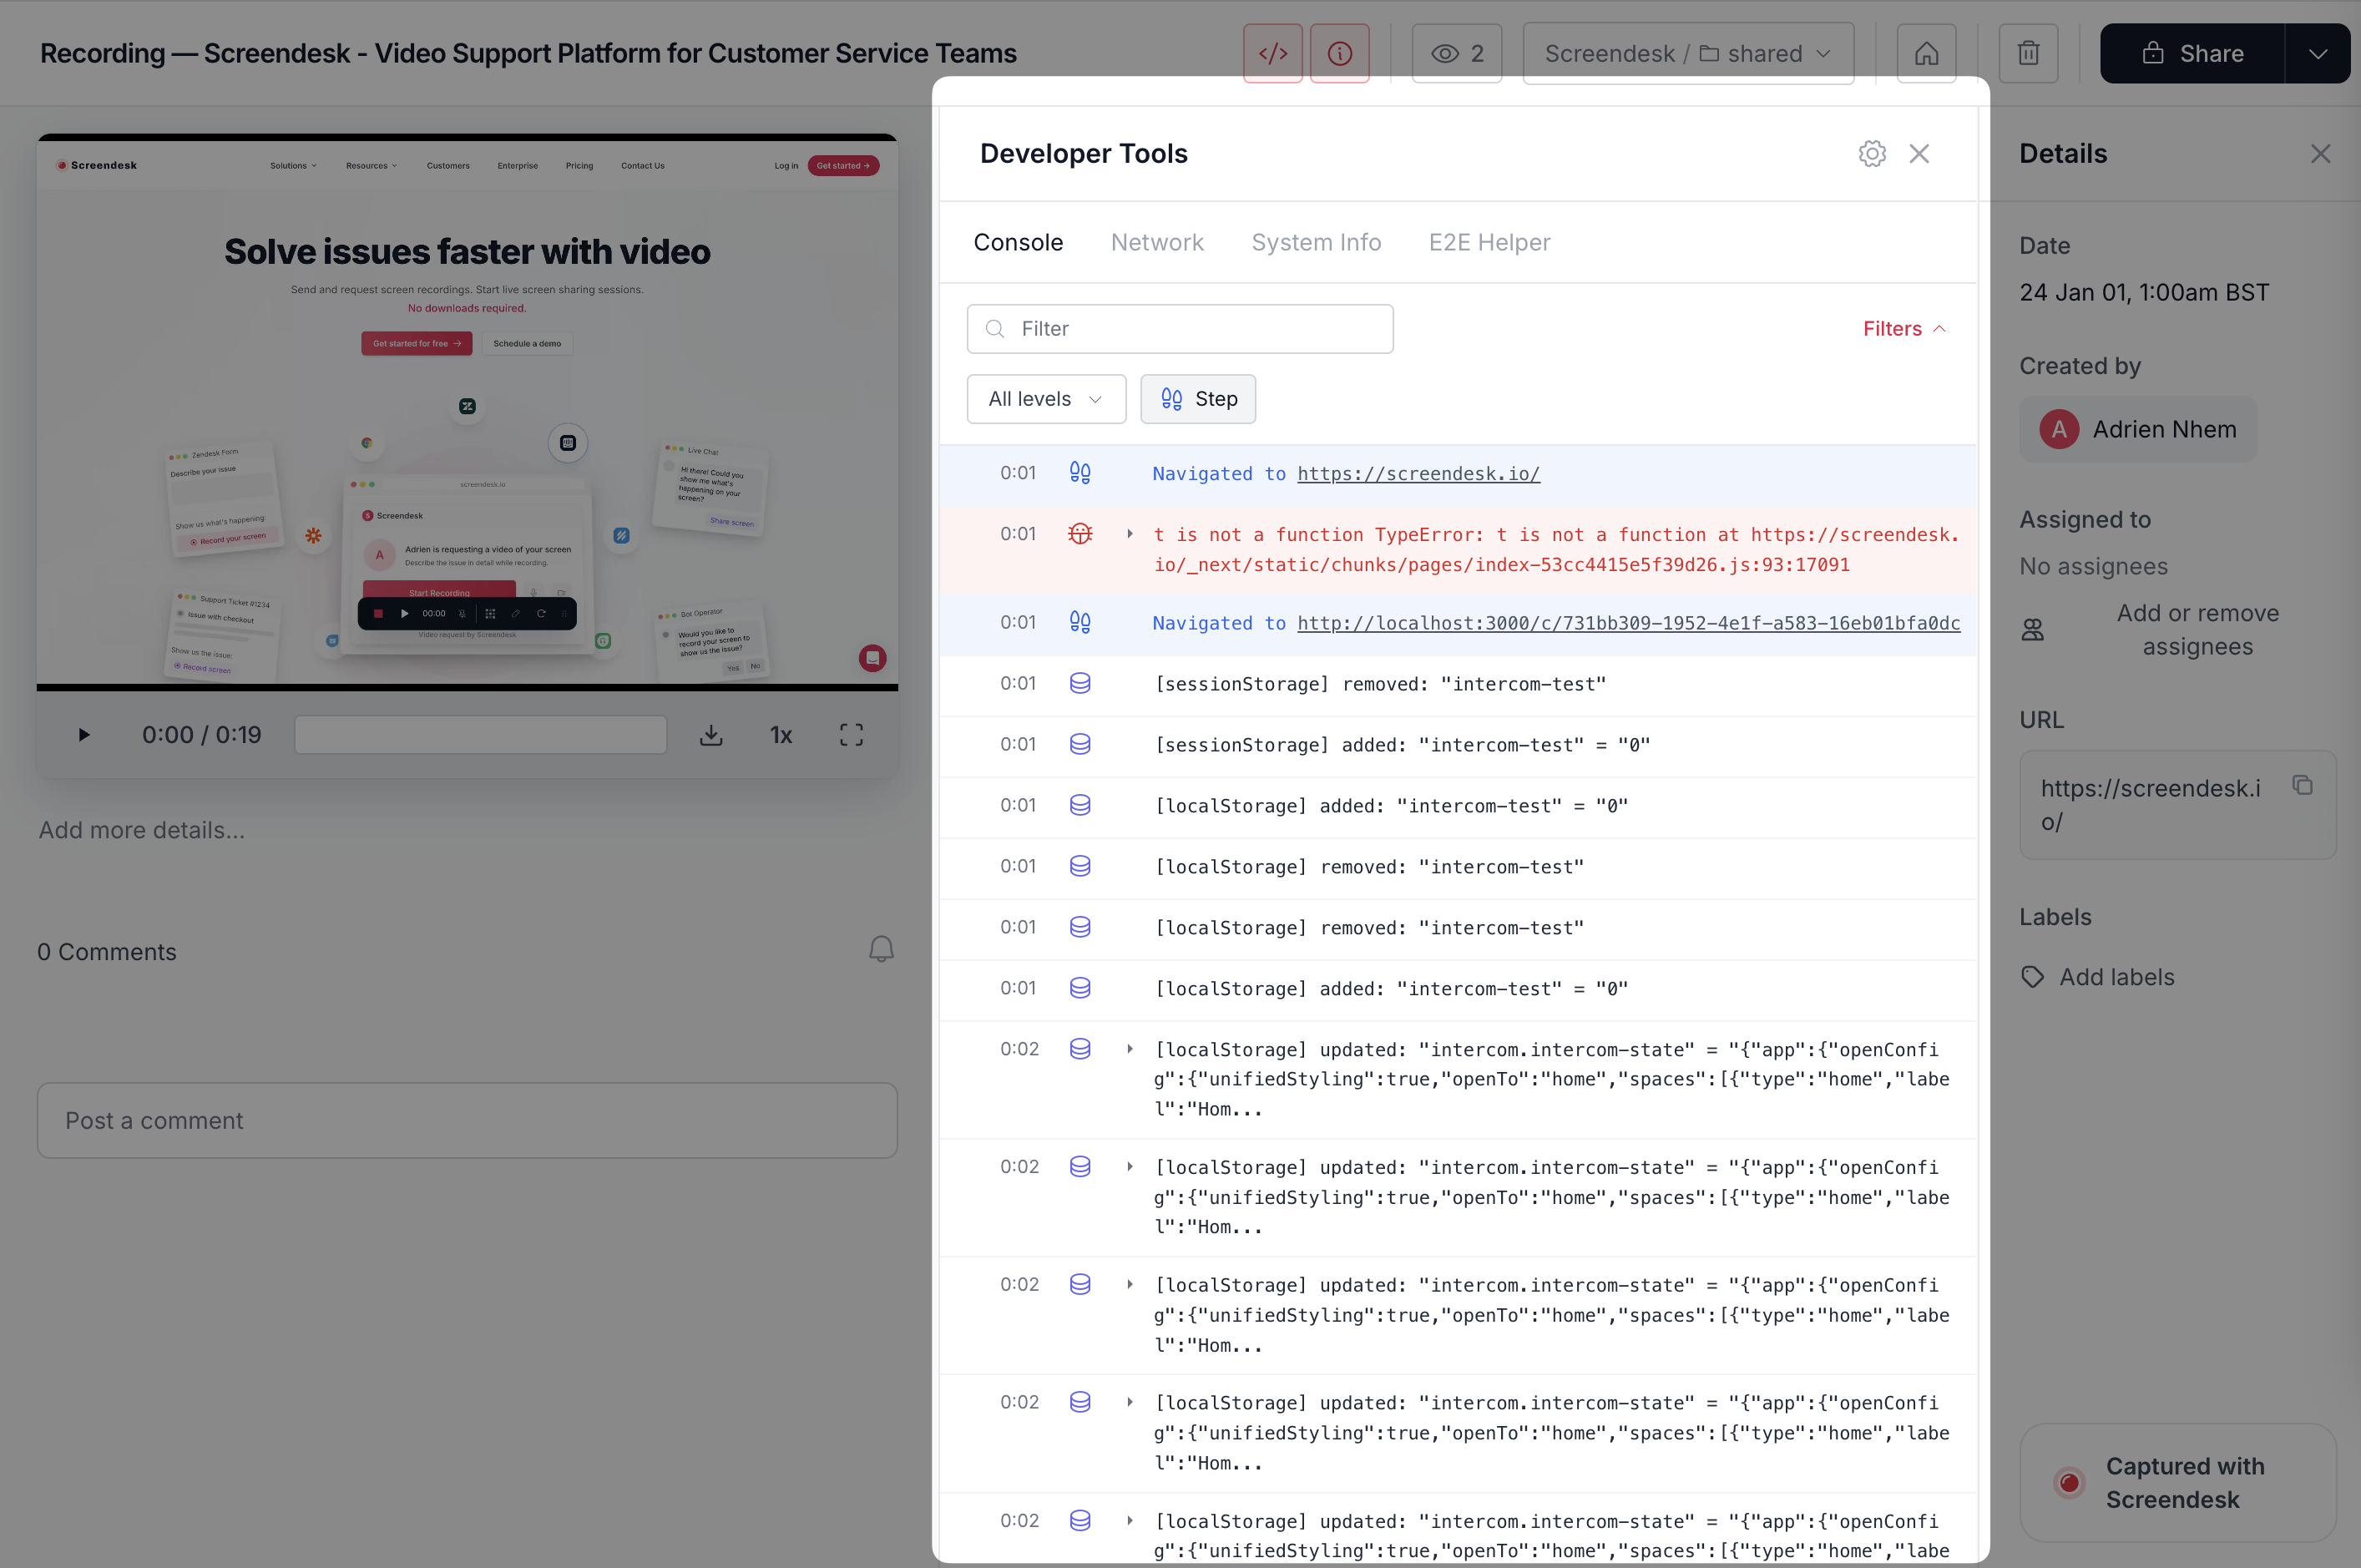
Open any recording. Look for tabs like **System Info**, **Console**, or **Network** in the recording detail view.

### Setup (recommended order)

{% stepper %}
{% step %}

#### Install the Screendesk widget

This enables widget-based capture features and CSP configuration.

Go to [Installing Screendesk script](https://docs.screendesk.io/~/revisions/pAg2d5GCwbZlpJ20UTRh/request-screen-recording/developer-tools/installing-screendesk-script).
{% endstep %}

{% step %}

#### Enable console logging (if needed)

Turn on console capture in workspace settings.

Go to [Console logs and Network](https://docs.screendesk.io/~/revisions/pAg2d5GCwbZlpJ20UTRh/request-screen-recording/developer-tools/console-logs).
{% endstep %}

{% step %}

#### Use the Chrome extension for deeper traces

For full network timelines and richer dev tooling, use the extension capture flow.

Go to [Network Logs Captured](https://docs.screendesk.io/~/revisions/pAg2d5GCwbZlpJ20UTRh/request-screen-recording/developer-tools/network-logs).
{% endstep %}
{% endstepper %}

### Guides

<table data-view="cards"><thead><tr><th>Topic</th><th data-card-target data-type="content-ref">Guide</th></tr></thead><tbody><tr><td><strong>System Info</strong><br>What metadata is captured and where it appears.</td><td></td></tr><tr><td><strong>Console logs</strong><br>Enable and review JavaScript console output during sessions.</td><td></td></tr><tr><td><strong>Network logs</strong><br>Understand what network requests are captured and where.</td><td></td></tr><tr><td><strong>Install the widget</strong><br>Add the snippet and configure CSP for capture features.</td><td></td></tr></tbody></table>


# System Info

Metadata captured with recordings and how long it is retained

When a customer submits a screen recording through Screendesk, the platform automatically captures comprehensive technical details about their system and environment. This data helps support agents quickly understand the customer's technical context without needing to ask follow-up questions.

### Where to Find System Information

System information is displayed in the recording details page, typically in a "System Info" or "Technical Details" section. This information is automatically collected when the recording is created and cannot be modified by the customer.

<figure><img src="https://3820804400-files.gitbook.io/~/files/v0/b/gitbook-x-prod.appspot.com/o/spaces%2FfW6XSzJSKsNyZnOkSJPt%2Fuploads%2Fe2kKP0jyjboOo3lhRHIu%2FCleanShot%202026-02-10%20at%2015.21.55%402x.png?alt=media&#x26;token=5dba8d02-a773-4284-9cbe-19aa029d00d1" alt=""><figcaption></figcaption></figure>

### Information Captured

**Browser Details**

**Browser Name & Version** The specific browser being used (e.g., "Chrome 120.0.6099.109"). This helps identify browser-specific issues and compatibility problems.

**Browser Engine** The underlying rendering engine (e.g., "Blink", "Gecko", "WebKit"). Useful for diagnosing rendering issues that may be engine-specific.

**Operating System**

**Operating System & Version** The customer's operating system and version number (e.g., "macOS 14.1.2", "Windows 10"). Critical for troubleshooting OS-specific behaviors and compatibility.

**Vendor** The OS manufacturer (e.g., "Apple", "Microsoft"). Provides additional context about the customer's platform.

**Device Information**

**Device Type** Whether the customer is using a desktop, mobile, or tablet device. This helps agents understand the user experience context.

**Screen Resolution** The customer's screen dimensions (e.g., "1920x1080"). Essential for understanding layout and responsive design issues.

**Window Size** The browser window dimensions at the time of recording (e.g., "1200x937"). Helps agents reproduce issues at the exact viewport size the customer was using.

**Network & Location**

**IP Address** The customer's IP address at the time of recording. Useful for security investigations and regional issue diagnosis.

**Internet Service Provider (ISP)** The customer's ISP name. Helps identify network-specific issues or regional connectivity problems.

**VPN Detection** Indicates whether the customer appears to be using a VPN connection. Important for troubleshooting access and connectivity issues.

**Network Speed (Downlink)** The customer's reported download speed. Helps diagnose performance issues related to slow connections.

**Timezone** The customer's timezone (e.g., "America/New\_York"). Useful for coordinating follow-ups and understanding when issues occurred.

**Locale** The customer's language and region settings (e.g., "en-US"). Helps identify localization and internationalization issues.

### Why This Information Matters

**Faster Issue Resolution**

By having immediate access to the customer's technical environment, support agents can:

* Quickly identify browser or OS-specific bugs
* Reproduce issues in matching environments
* Rule out environmental factors
* Provide accurate, context-aware solutions

**Better Context for Engineering Teams**

When escalating issues to engineering, this data provides:

* Complete technical specifications for bug reports
* Environment-specific reproduction steps
* Data for identifying patterns across similar configurations

**Reduced Back-and-Forth**

Support agents don't need to ask customers about their setup, which:

* Speeds up resolution time
* Reduces customer frustration
* Lowers the number of follow-up messages needed

### Privacy Considerations

All system information is collected in compliance with privacy regulations:

* Data is only visible to workspace members with appropriate permissions
* IP addresses and location data are stored securely
* Customers should be informed about data collection through your privacy policy
* System information can be redacted or removed based on your retention policies

### Common Use Cases

{% tabs %}
{% tab title="Browser Compatibility Issues" %}
A customer reports that a feature isn't working. By checking the system info, you discover they're using an older browser version that doesn't support the required feature. You can immediately provide guidance on updating their browser.
{% endtab %}

{% tab title="Performance Problems" %}
A customer complains about slow loading times. The system info shows they have a slow network connection (2 Mbps downlink). This helps you provide appropriate expectations and suggest optimizations for low-bandwidth scenarios.
{% endtab %}

{% tab title="Responsive Design Issues" %}
A customer shows layout problems in their recording. The system info reveals they're using a specific window size (1366x768) that wasn't tested. This helps your team identify and fix responsive design gaps.
{% endtab %}
{% endtabs %}


# Console logs

Capture browser console output during recordings to debug client-side errors faster.

Console logs capture what your app wrote to the browser console during the session. This is the fastest way to debug client-side failures without asking customers to open DevTools.

<figure><img src="https://3820804400-files.gitbook.io/~/files/v0/b/gitbook-x-prod.appspot.com/o/spaces%2FfW6XSzJSKsNyZnOkSJPt%2Fuploads%2FEh6TzXUzt2tyUZ1oi1Z0%2FCleanShot%202026-02-10%20at%2015.29.35%402x.png?alt=media&#x26;token=cc2a0c6e-e9e7-4d4f-8f55-9d45fc72b3ba" alt=""><figcaption></figcaption></figure>

### Availability

Console logs are captured for widget-based recordings when enabled by an admin.

You typically need:

* The Screendesk widget installed on your site
* Console logging enabled in workspace settings

{% hint style="info" %}
Console logs start capturing after you enable the feature. Older recordings won’t be backfilled.
{% endhint %}

### Enable console logs (admin)

{% stepper %}
{% step %}
**Install the widget (if needed)**

Console capture relies on the Screendesk script on your site.

See [Installing Screendesk script](https://docs.screendesk.io/~/revisions/pAg2d5GCwbZlpJ20UTRh/request-screen-recording/developer-tools/installing-screendesk-script).
{% endstep %}

{% step %}
**Turn on console capture**

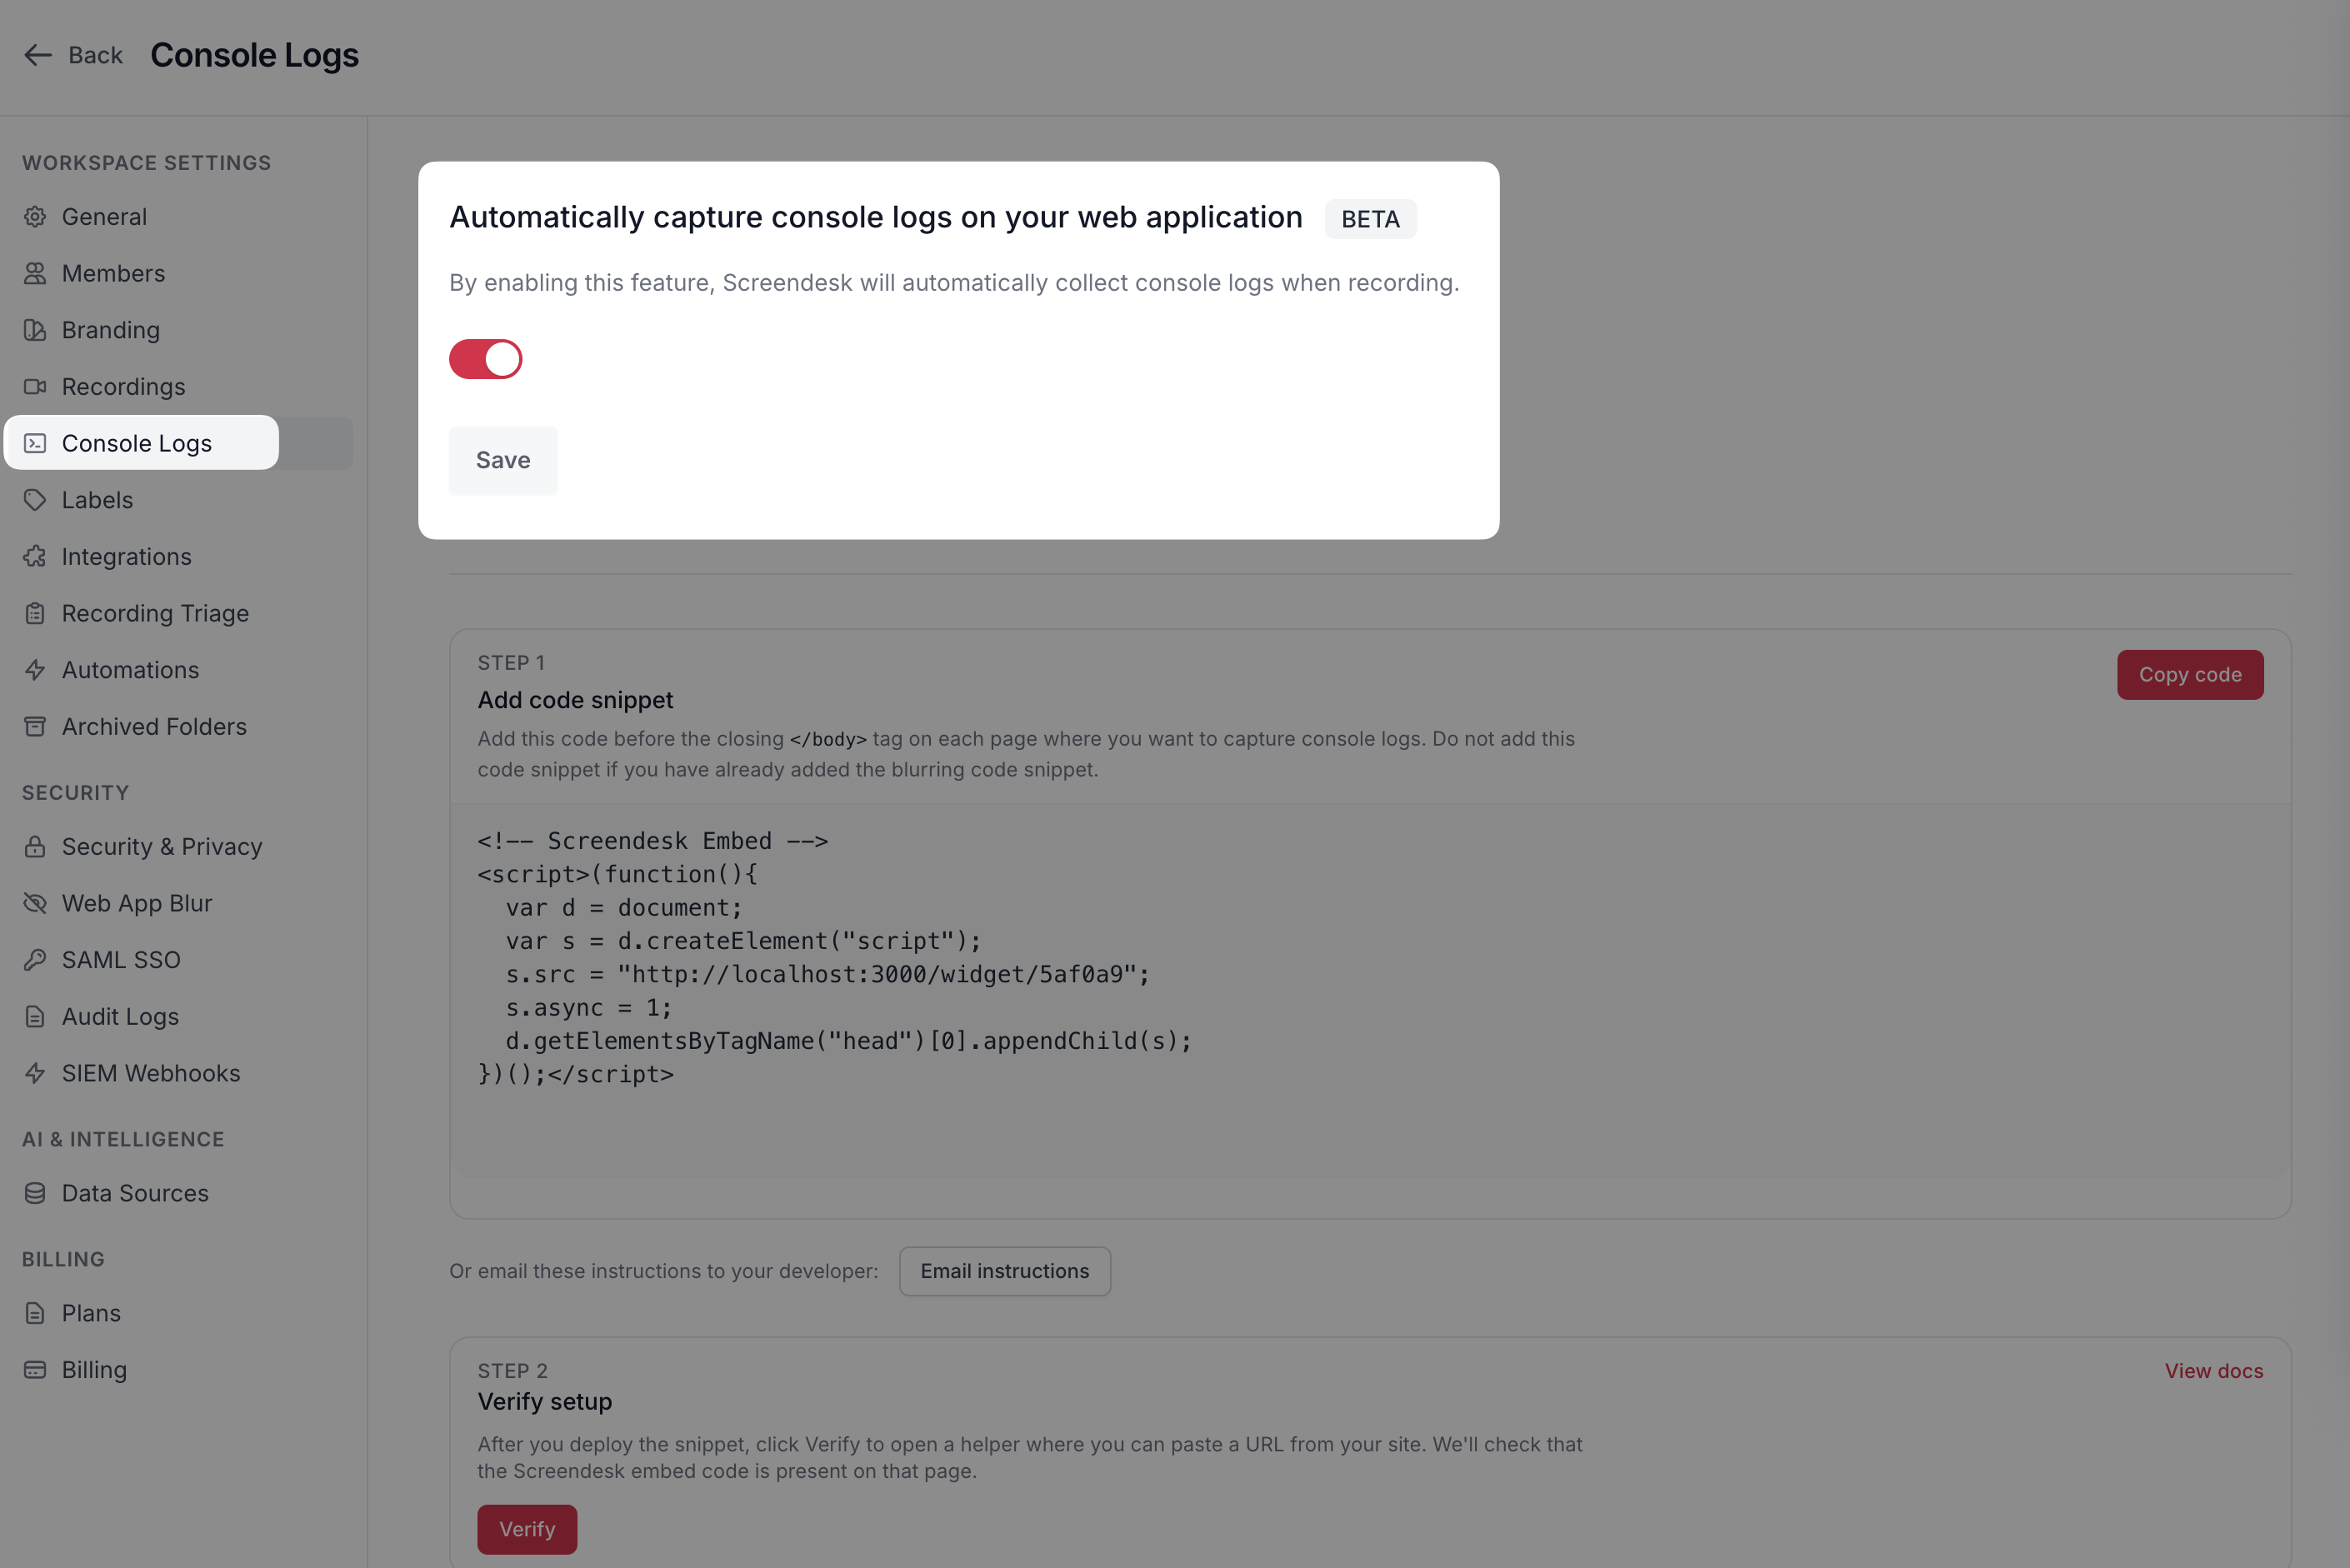
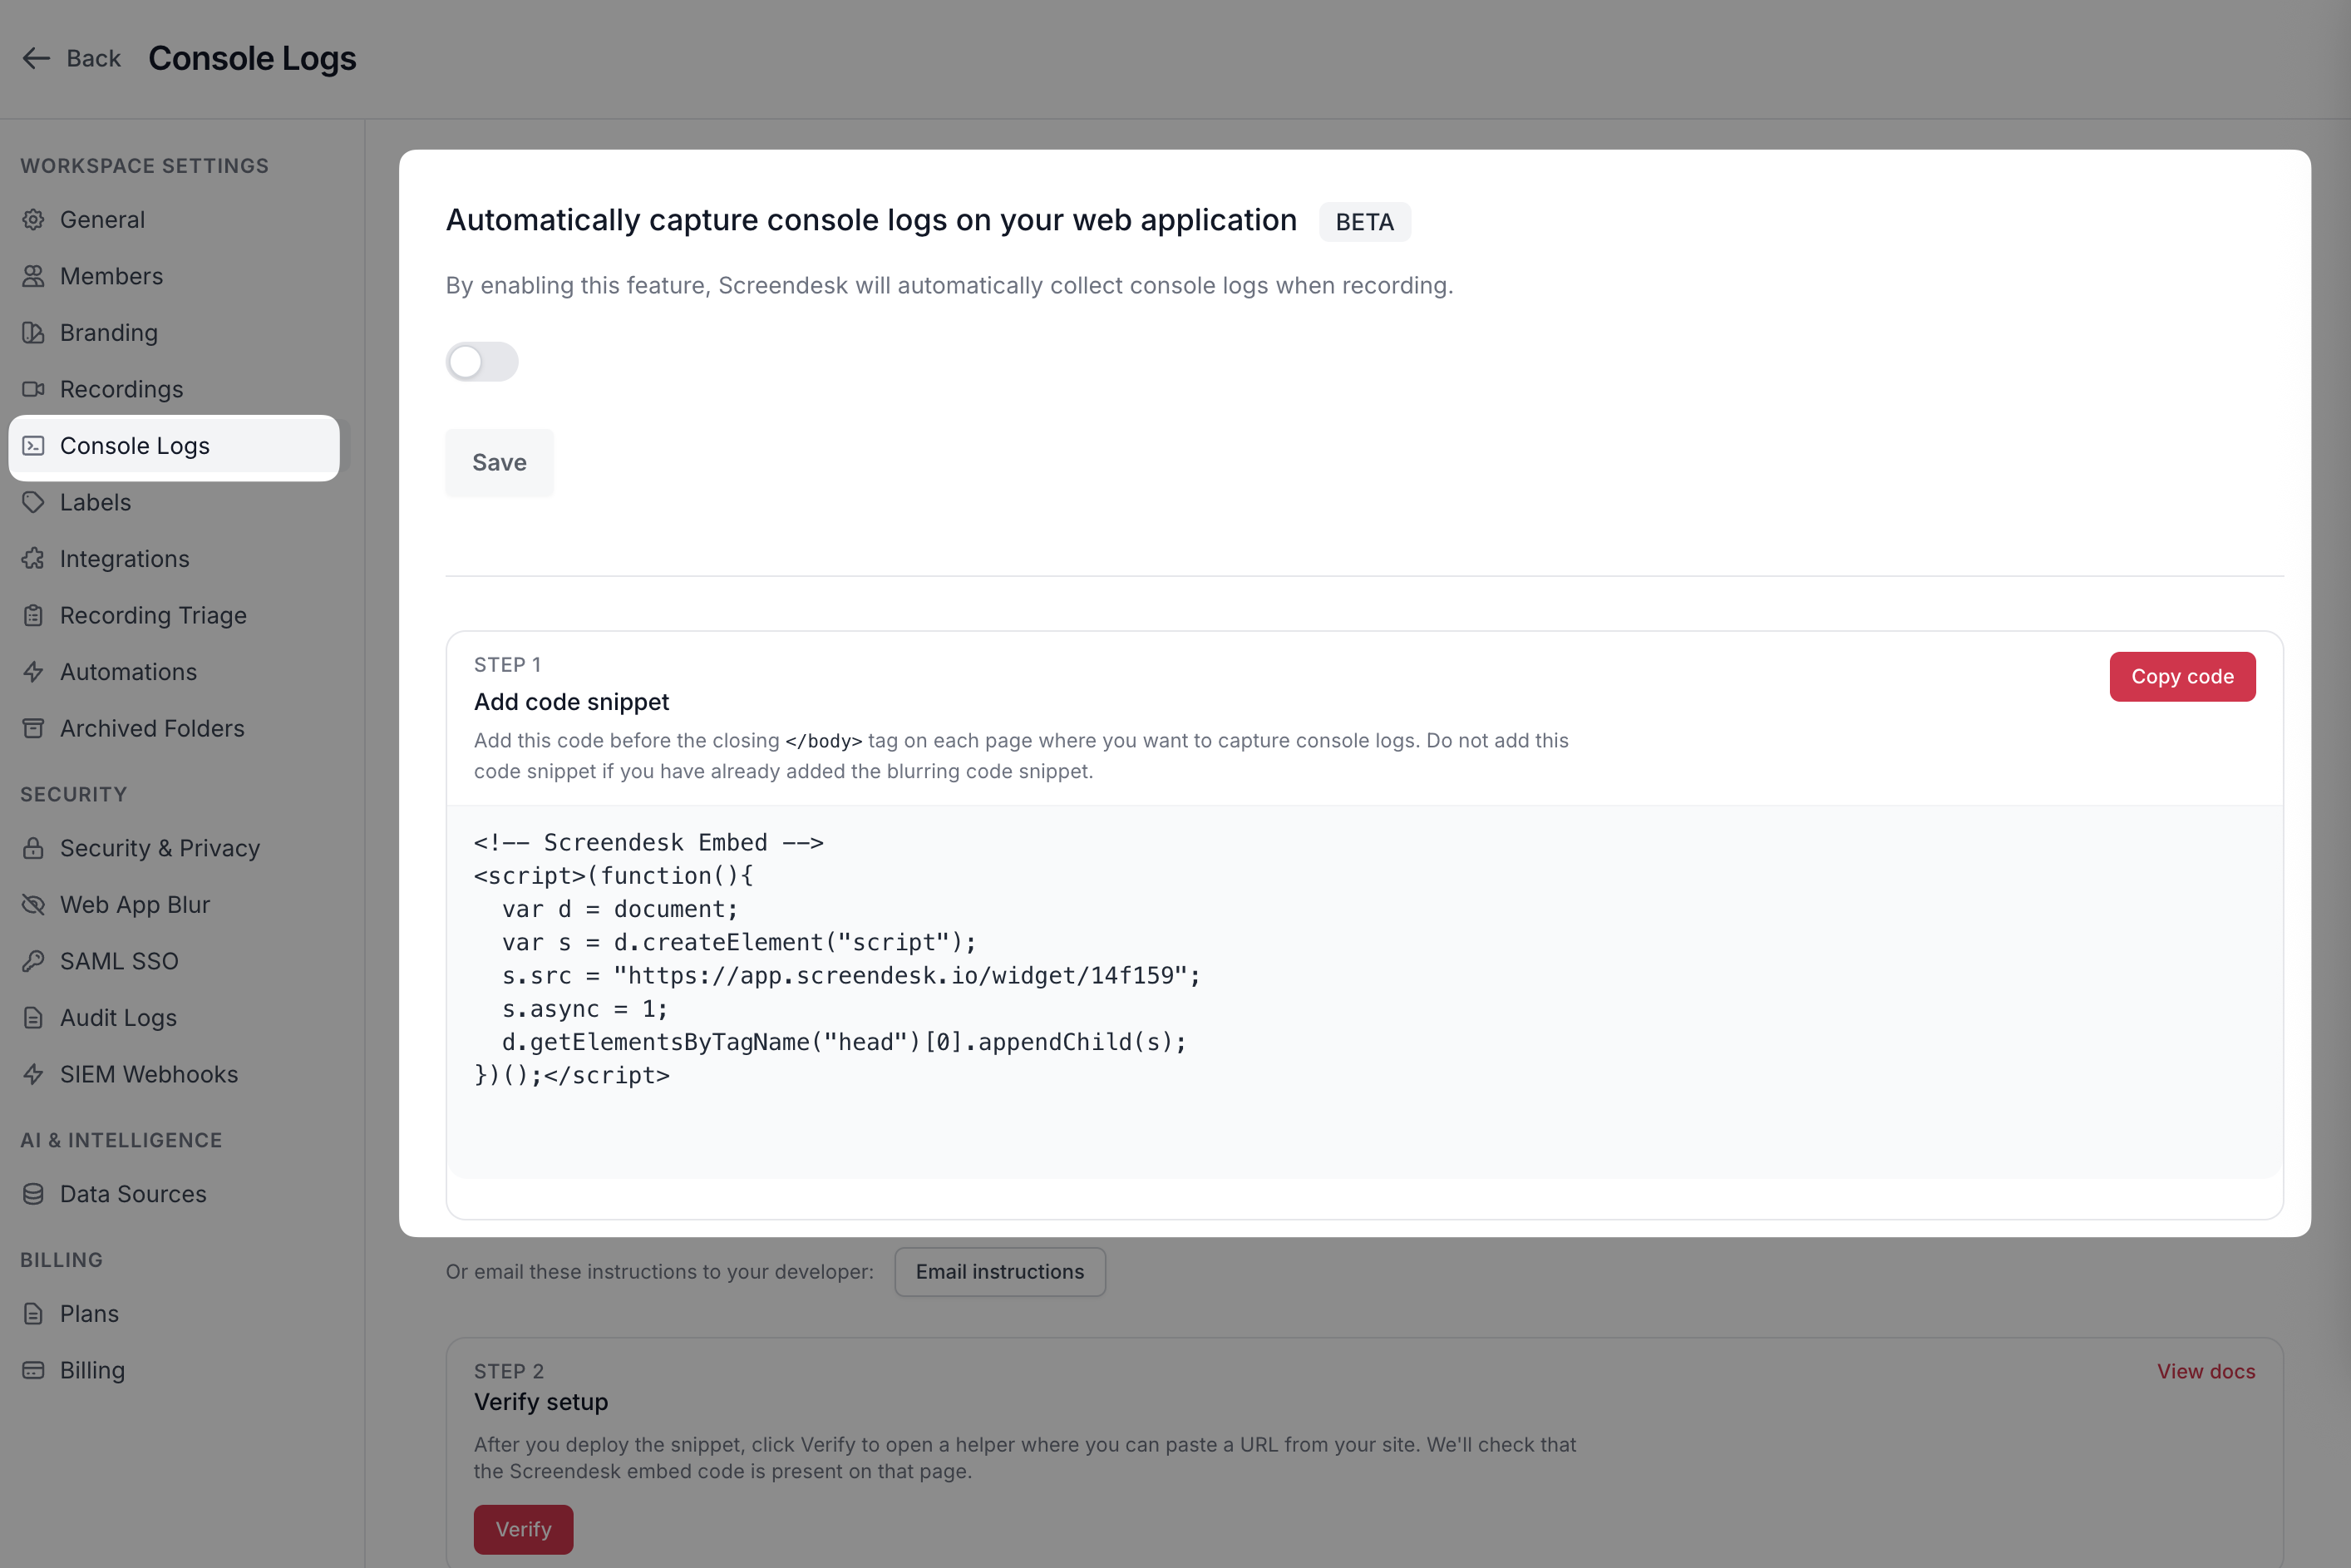
Go to **Settings → Console Logs**.

Enable **Enable Console Logs**.

<figure><img src="https://3820804400-files.gitbook.io/~/files/v0/b/gitbook-x-prod.appspot.com/o/spaces%2FfW6XSzJSKsNyZnOkSJPt%2Fuploads%2FNzBXeRj31TNcJi0DoMzT%2FCleanShot%202026-02-10%20at%2015.30.26%402x.png?alt=media&#x26;token=3a0b2725-b7eb-4ccd-a8c7-926fe81ec816" alt=""><figcaption></figcaption></figure>
{% endstep %}

{% step %}
**Verify on a test recording**

Create a new test recording. Then confirm you see a **Console** tab on the recording.
{% endstep %}
{% endstepper %}

### Where to find console logs

1. Open a recording.
2. Click the **Console** tab.
3. Use search and level filters to narrow down noise.

### How to use console logs (fast workflow)

{% stepper %}
{% step %}
**Find the first real error**

Start with **Error** entries. Ignore repeated follow-on errors at first.
{% endstep %}

{% step %}
**Correlate with the video**

Jump to the timestamp. Watch what the user did right before the error.
{% endstep %}

{% step %}
**Escalate with the right payload**

Include:

* Error message
* Stack trace
* Timestamp
* Recording link
  {% endstep %}
  {% endstepper %}

<details>

<summary>Common patterns (with examples)</summary>

**Uncaught TypeError**

```
TypeError: Cannot read properties of undefined (reading 'user')
```

Usually a frontend bug or missing data. Escalate with the stack trace.

**CORS blocked**

```
Blocked by CORS policy
```

Usually a server header or environment mismatch. Pair this with the failing request in network logs.

**Failed resource / 404**

```
Failed to load resource: the server responded with a status of 404
```

Usually a bad URL, missing asset, or wrong environment.

**Deprecation warnings**

These are rarely the direct cause. Track as tech debt unless they block the flow.

</details>

### Console logs vs. network logs

Use console logs when:

* UI breaks and you suspect frontend code
* You need stack traces and error context

Use network logs when:

* Data doesn’t load
* You need status codes, payloads, and responses

See [Network Logs](https://docs.screendesk.io/~/revisions/pAg2d5GCwbZlpJ20UTRh/request-screen-recording/developer-tools/network-logs).

### Privacy and security

{% hint style="warning" %}
Console logs can include sensitive data (tokens, IDs, and internal state). Limit access.
{% endhint %}

Recommended practices:

* Restrict access to technical roles.
* Redact secrets before sharing outside your org.
* Avoid copying full logs into public tickets.

### Troubleshooting

<details>

<summary>I don’t see a Console tab</summary>

Check these in order:

1. Console logging is enabled in **Settings → Console Logs**.
2. The Screendesk widget is installed on the page being recorded.
3. You’re testing with a new recording (no backfill).
4. Browser extensions aren’t blocking the widget.

</details>

<details>

<summary>Console logs are empty</summary>

This can be normal. Some apps don’t log anything unless there’s an error.

Try reproducing again, or add targeted logging in your app for the failing flow.

</details>

<details>

<summary>There are too many logs</summary>

Filter to **Error** first. Then search for the API endpoint or feature keyword.

If this is persistent, reduce verbose debug logs in production builds.

</details>

### Related pages

* [Network Logs](https://docs.screendesk.io/~/revisions/pAg2d5GCwbZlpJ20UTRh/request-screen-recording/developer-tools/network-logs)
* [System Info](https://docs.screendesk.io/~/revisions/pAg2d5GCwbZlpJ20UTRh/request-screen-recording/developer-tools/system-info)
* [Installing Screendesk script](https://docs.screendesk.io/~/revisions/pAg2d5GCwbZlpJ20UTRh/request-screen-recording/developer-tools/installing-screendesk-script)


# Network Logs

Inspect HTTP requests and responses captured with extension and replay sessions to debug API and loading issues.

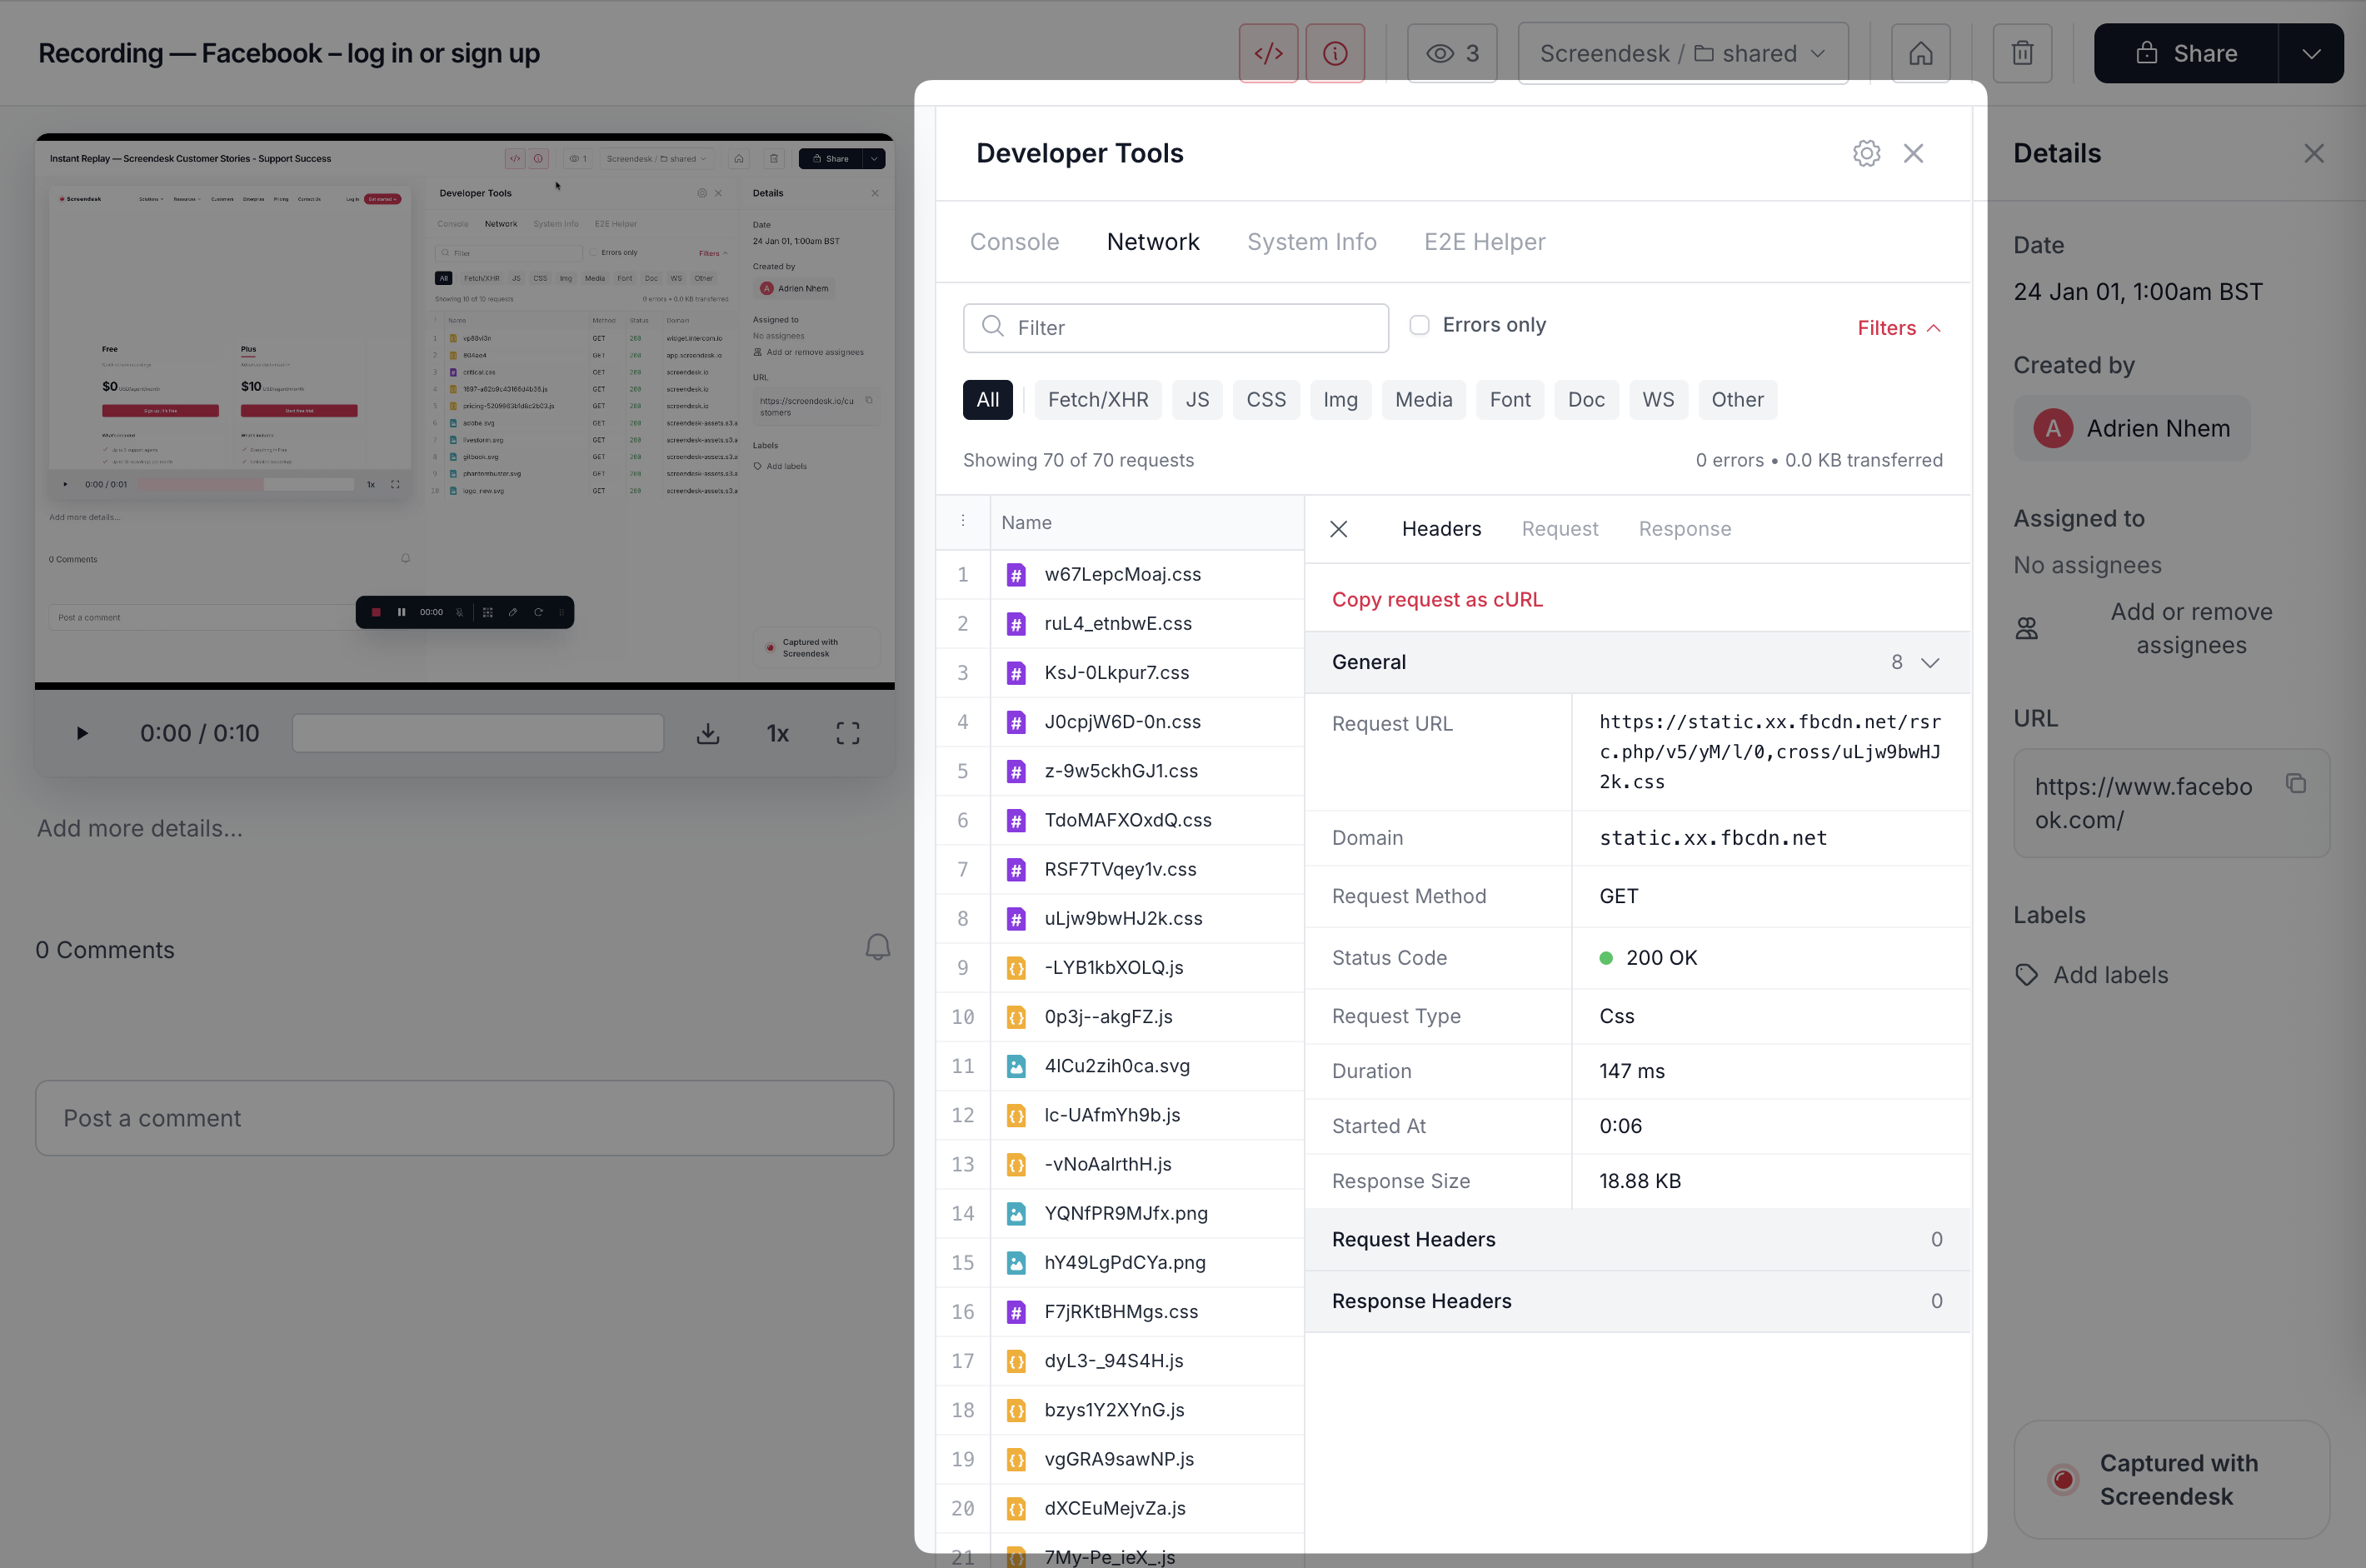
Network logs show what your app sent and received during a session. Use them to debug API failures, auth issues, and slow pages.

<figure><img src="https://3820804400-files.gitbook.io/~/files/v0/b/gitbook-x-prod.appspot.com/o/spaces%2FfW6XSzJSKsNyZnOkSJPt%2Fuploads%2FXnroftiyakZ7PFZVwPra%2FCleanShot%202026-02-10%20at%2015.33.04%402x.png?alt=media&#x26;token=80152670-a0f9-4298-8857-8801952c72bf" alt=""><figcaption></figcaption></figure>

### Availability

Network logs are only available for certain capture types:

* ✅ Chrome extension recordings
* ✅ Replay-style captures (for example, Instant Replay)
* ✅ Standard customer-submitted recordings

{% hint style="info" %}
If you don’t see a **Network** tab, the recording type likely doesn’t support network capture.
{% endhint %}

### What gets captured

You can expect to see:

* Fetch/XHR requests
* Page navigations and redirects
* Static assets (JS, CSS, images, fonts)
* Third-party requests (analytics, CDNs)
* WebSocket connections (when present)

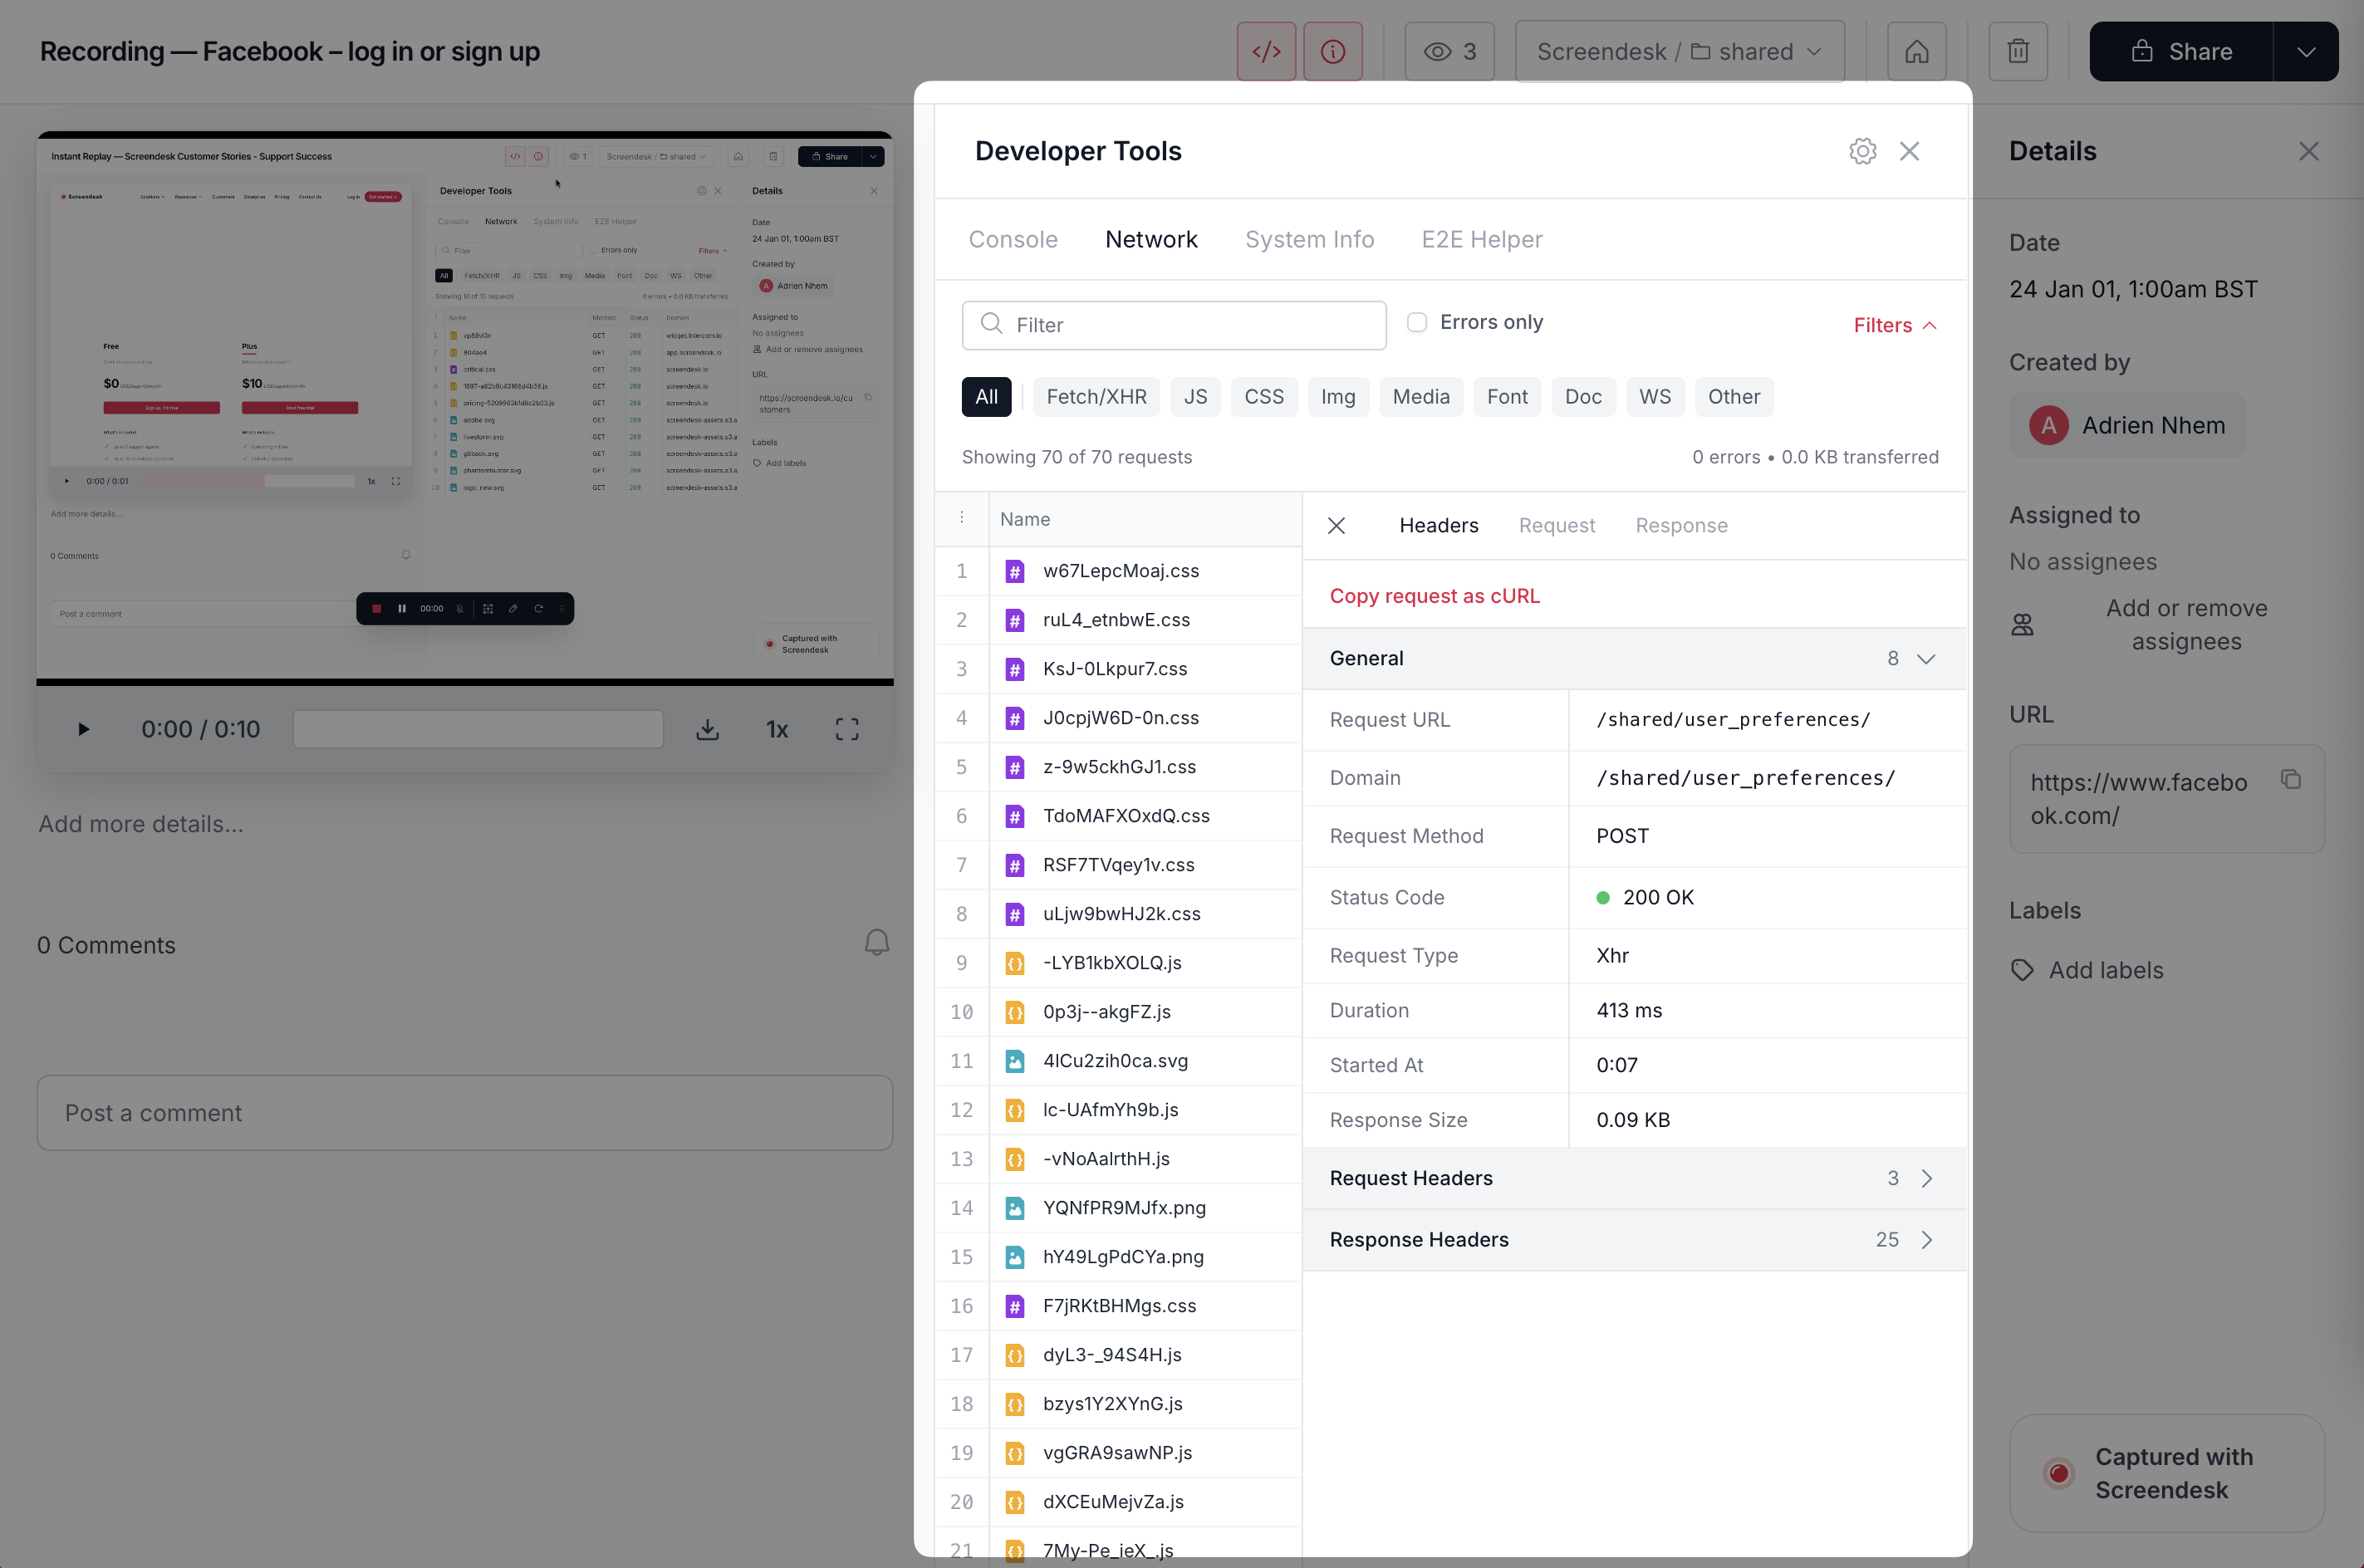
Per request, you typically get URL, method, status, timing, and a waterfall. You may also see headers, payload, and response data.

### Where to find it

{% stepper %}
{% step %}
**Open the recording**

Open the recording or capture in Screendesk.
{% endstep %}

{% step %}
**Open the Network tab**

Click **Network** in the developer tools panel.

<figure><img src="https://3820804400-files.gitbook.io/~/files/v0/b/gitbook-x-prod.appspot.com/o/spaces%2FfW6XSzJSKsNyZnOkSJPt%2Fuploads%2FzmimaOLEa4rnx4gvEzOJ%2FCleanShot%202026-02-10%20at%2015.41.06%402x.png?alt=media&#x26;token=43eb208d-821f-41aa-93d3-1ab753c6a926" alt=""><figcaption></figcaption></figure>
{% endstep %}

{% step %}
**Filter to what matters**

Start with **XHR/Fetch**. Then enable **Errors only** if needed.
{% endstep %}
{% endstepper %}

### How to use network logs (fast workflow)

{% stepper %}
{% step %}
**Find the failing request**

Look for `4xx`, `5xx`, or `Failed`.
{% endstep %}

{% step %}
**Inspect details**

Check **Headers**, then **Payload**, then **Response**.
{% endstep %}

{% step %}
**Copy and reproduce**

Use **Copy as cURL** to reproduce outside the browser.

```bash
curl 'https://api.example.com/users/12345' \
  -H 'Authorization: Bearer [REDACTED]' \
  -H 'Content-Type: application/json'
```

{% endstep %}
{% endstepper %}

<details>

<summary>Common status codes and what to do</summary>

**`0` / Failed**

Usually CORS, blocked requests, timeouts, or a dropped connection.

Check console logs for CORS errors. Check system info for VPN/network hints.

**`401` Unauthorized**

Token missing or expired. Session issues are common.

Ask the user to log out/in. Check auth refresh logic.

**`403` Forbidden**

Auth is present. Permission is not.

Check roles, entitlements, and feature flags.

**`404` Not Found**

Bad URL or missing resource.

Check routing, environment (staging vs prod), and ID validity.

**`5xx` Server error**

Usually an engineering escalation.

Include URL, payload, response body, and timestamp in the ticket.

</details>

### Privacy and security

{% hint style="danger" %}
Network logs can include sensitive data. Treat them like production logs.
{% endhint %}

Be careful with auth headers, cookies, and PII in payloads/responses.

Recommended practices:

* Restrict access to technical roles.
* Redact tokens before sharing externally.
* Avoid screenshots of raw headers/payloads.

### Limitations

* Large request bodies may be truncated.
* File uploads can show as `[Binary Data]`.
* Some third-party requests may omit bodies due to browser restrictions.
* Static assets can appear, but the full body might not be stored.

### Related pages

* [Console logs and Network](https://docs.screendesk.io/~/revisions/pAg2d5GCwbZlpJ20UTRh/request-screen-recording/developer-tools/console-logs)
* [System Info](https://docs.screendesk.io/~/revisions/pAg2d5GCwbZlpJ20UTRh/request-screen-recording/developer-tools/system-info)


# Installing Screendesk script

Embed the Screendesk widget on your site and configure CSP for the script.

### Install the Widget

The Screendesk widget is a lightweight JavaScript snippet you add to your website. Once installed, it powers features like customer screen recordings, console log capture, and sensitive data blurring — all without any visible UI changes to your site.

{% hint style="info" %}
You need to be a **workspace admin** to access your widget code snippet. The snippet is the same for all widget-powered features (console logs, blur, recordings).
{% endhint %}

#### Overview

The widget loads a small script from Screendesk's servers using your workspace's unique identifier. It runs asynchronously so it won't slow down your page, and all its code is isolated to avoid conflicts with your existing JavaScript.

Once installed, the widget enables whichever features you've turned on in your workspace settings — there's no need to add separate snippets for each feature.

#### Finding your widget snippet

Your widget snippet is available in your Screendesk dashboard wherever a widget-powered feature is configured.

{% stepper %}
{% step %}
**Open a widget-powered feature**

Navigate to any feature that uses the widget, for example **Settings → Console Logs** or **Settings → Blur**.

<figure><img src="https://3820804400-files.gitbook.io/~/files/v0/b/gitbook-x-prod.appspot.com/o/spaces%2FfW6XSzJSKsNyZnOkSJPt%2Fuploads%2FZLZLo98LKRzP8h6BDsZM%2FCleanShot%202026-02-10%20at%2015.25.51%402x.png?alt=media&#x26;token=d454e2a7-d4d4-4019-8432-9168d1737849" alt=""><figcaption></figcaption></figure>
{% endstep %}

{% step %}
**Copy the snippet**

In **Step 1: Add code snippet**, you'll see your personalized embed code. Click the copy button to copy it to your clipboard.

The snippet looks like this:

```html
<!-- Screendesk Embed -->
<script>
(function(){
  var d = document;
  var s = d.createElement("script");
  s.src = "https://app.screendesk.io/widget/abc123";
  s.async = 1;
  d.getElementsByTagName("head")[0].appendChild(s);
})();
</script>
```

The `abc123` portion is your workspace's unique widget ID. It's generated automatically when your workspace is created.
{% endstep %}
{% endstepper %}

#### Adding the snippet to your website

Insert the script tag just before the closing `</body>` tag of your HTML. This ensures that the script loads after all elements on the page have been rendered.

```html
<!DOCTYPE html>
<html>
<head>
  <title>Your Website</title>
</head>
<body>
  <!-- Your page content -->

  <!-- Screendesk Embed -->
  <script>
  (function(){
    var d = document;
    var s = d.createElement("script");
    s.src = "https://app.screendesk.io/widget/abc123";
    s.async = 1;
    d.getElementsByTagName("head")[0].appendChild(s);
  })();
  </script>
</body>
</html>
```

{% hint style="warning" %}
Replace `abc123` with your actual widget ID from the dashboard. The snippet won't work with a generic ID.
{% endhint %}

**Why place it before `</body>`?**

Placing the script at the end of the body ensures two things. First, all DOM elements are fully loaded, which allows the widget to correctly bind event listeners and interact with page elements. Second, using `async = 1` means the script loads without blocking the rest of your page from rendering, so your visitors won't notice any delay.

#### Verifying installation

After adding the snippet to your site, you can confirm it's working directly from the Screendesk dashboard.

{% stepper %}
{% step %}
**Go to the verification step**

In the same settings page where you found the snippet (e.g., **Settings → Console Logs**), look for **Step 2: Verify setup**.
{% endstep %}

{% step %}
**Enter your website URL**

Type or paste the URL of a page where you added the snippet.
{% endstep %}

{% step %}
**Run the check**

Click **Verify**. Screendesk will fetch your page and confirm whether the widget snippet is present. You'll see a success or failure message.
{% endstep %}
{% endstepper %}

{% hint style="success" %}
If verification succeeds, your widget is installed correctly and ready to use.
{% endhint %}

### Content Security Policy (CSP)

If your website uses Content Security Policy headers, you'll need to update your CSP directives so the Screendesk widget can load and communicate properly.

#### Required CSP directives

Add the following to your existing CSP header or meta tag:

```html
<meta http-equiv="Content-Security-Policy" content="
  script-src 'self' 'unsafe-inline' https://app.screendesk.io;
  connect-src 'self' https://app.screendesk.io wss://socket.screendesk.io;
  style-src 'self' 'unsafe-inline';
">
```

#### What each directive does

| Directive     | Value                        | Why it's needed                                                               |
| ------------- | ---------------------------- | ----------------------------------------------------------------------------- |
| `script-src`  | `'unsafe-inline'`            | The widget uses inline JavaScript to dynamically create and load its script   |
| `script-src`  | `https://app.screendesk.io`  | Allows loading the main widget script from Screendesk's servers               |
| `connect-src` | `https://app.screendesk.io`  | Allows API requests to Screendesk for transmitting captured data              |
| `connect-src` | `wss://socket.screendesk.io` | Allows WebSocket connections for real-time communication during live sessions |
| `style-src`   | `'unsafe-inline'`            | Required for the widget's blur overlay and UI styles                          |

#### Stricter CSP with nonces

If your security policy requires you to avoid `'unsafe-inline'`, use a nonce-based approach instead. Generate a unique random nonce on each page load and reference it in both the CSP header and the script tag:

```html
<!-- Add nonce to your CSP -->
<meta http-equiv="Content-Security-Policy" content="
  script-src 'self' 'nonce-YOUR_RANDOM_NONCE' https://app.screendesk.io;
  connect-src 'self' https://app.screendesk.io wss://socket.screendesk.io;
">

<!-- Add the same nonce to the script -->
<script nonce="YOUR_RANDOM_NONCE">
(function(){
  var d = document;
  var s = d.createElement("script");
  s.src = "https://app.screendesk.io/widget/abc123";
  s.async = 1;
  d.getElementsByTagName("head")[0].appendChild(s);
})();
</script>
```

{% hint style="info" %}
Replace `YOUR_RANDOM_NONCE` with a cryptographically random value generated by your server on each request. The nonce must match between the CSP header and the script tag.
{% endhint %}

#### Testing your CSP configuration

After updating your CSP, open your browser's developer console (**F12 → Console**) and reload the page. If you see any errors mentioning "Content Security Policy" or "refused to load", adjust your directives accordingly.

### How the widget works

The widget script is designed to be safe, performant, and isolated from your application code. Here's what happens under the hood.

#### Loading behavior

The script is wrapped in an Immediately Invoked Function Expression (IIFE), which means all its variables and functions are scoped privately. Nothing leaks into your global namespace or conflicts with your existing code.

It loads asynchronously (`async = 1`), so it never blocks page rendering. The browser downloads and executes the widget in the background while your page continues loading normally.

#### What the widget enables

Depending on which features you've activated in your workspace settings, the widget can perform the following:

* **Console log capture** — overrides default console methods (`log`, `warn`, `error`) to capture and transmit logs to Screendesk, giving your support team visibility into client-side issues.
* **Network request monitoring** — overrides `fetch` and `XMLHttpRequest` to log request and response details, helping diagnose API-related problems.
* **Sensitive data blurring** — applies a blur style to elements matching CSS selectors you've configured, obscuring sensitive information during recordings.
* **Event tracking** — listens for focus, blur, click, script errors, and unhandled promise rejections to build a complete picture of the user's session.
* **Real-time communication** — uses WebSocket connections for live features like cobrowsing and live video calls.
* **Browser fingerprinting** — collects browser and device details to generate a unique session identifier (no personal data is collected).

#### Session and state management

The widget uses `sessionStorage` to maintain session-level state that doesn't persist after the user closes their tab. Some features, such as the blur overlay, use `localStorage` to synchronize state across tabs — for example, ensuring that blur remains active when a user opens a new tab on your site. No cookies are created by the widget.

### Security and privacy

Screendesk takes several measures to protect your users' data:

* **Scoped execution** — all code runs inside an IIFE, preventing any interaction with your application's global variables or functions.
* **Header redaction** — sensitive headers like `Authorization` are automatically redacted before network request data is transmitted. For example, if a request includes an `Authorization` header, the widget replaces its value with `[REDACTED]`.
* **Minimal storage footprint** — the widget uses `sessionStorage` for session data and `localStorage` only where cross-tab synchronization is required (e.g., blur state). No cookies are set.
* **Asynchronous loading** — the widget never blocks your page or degrades the user experience.

### Troubleshooting

<details>

<summary>The verification check fails</summary>

Make sure the snippet is placed in the HTML source of the page (not injected by another script after page load). The verification tool fetches your page's raw HTML and searches for the widget URL. If the snippet is added dynamically by a tag manager, it may not appear in the initial HTML response.

Also confirm you're checking the correct URL — the page you enter must be the exact page where the snippet is installed.

</details>

<details>

<summary>Console logs or blur features aren't working</summary>

The widget only activates features that are enabled in your workspace settings. Check **Settings → Console Logs** or **Settings → Blur** and make sure the relevant toggle is turned on.

Also verify that your plan includes the feature you're trying to use — some features require a specific plan tier.

</details>

<details>

<summary>I see CSP errors in the browser console</summary>

Your Content Security Policy is blocking the widget. Add the required directives described in the CSP section above. The most common missing directives are `'unsafe-inline'` in `script-src` and `wss://socket.screendesk.io` in `connect-src`.

</details>

<details>

<summary>The widget conflicts with my existing JavaScript</summary>

This is unlikely because the widget runs inside an IIFE with fully scoped variables. If you're experiencing issues, check whether another script on your page is also overriding `console` methods or `fetch` / `XMLHttpRequest`. In rare cases, the order of script loading can matter — try moving the Screendesk snippet to be the last script on the page.

</details>

<details>

<summary>I added the snippet but nothing visible changed on my site</summary>

That's expected. The widget doesn't add any visible UI elements to your page. It works silently in the background, enabling features like console log capture and data blurring. To confirm it's working, use the verification tool in your dashboard or check your browser's network tab for requests to `app.screendesk.io`.

</details>


# Send to apps

Create Linear, GitHub, and Jira issues from a recording.

Turn a recording into an issue without losing context. Screendesk creates the issue and keeps a visible link on the recording.

Use **Send to apps** when a recording becomes a bug, task, or investigation for your engineering team.

{% hint style="info" %}
This section covers the manual **Send to app** action. If you want automatic issue creation, use folder automations instead.
{% endhint %}

### Choose an app

<table data-view="cards"><thead><tr><th>App</th><th data-card-target data-type="content-ref">Guide</th></tr></thead><tbody><tr><td>Linear — create issues with team, project, status, assignee, and labels.</td><td><a href="/spaces/fW6XSzJSKsNyZnOkSJPt/pages/tU8jtoxDQRycM4f4SWbp">/spaces/fW6XSzJSKsNyZnOkSJPt/pages/tU8jtoxDQRycM4f4SWbp</a></td></tr><tr><td>GitHub — create issues in a repository with labels, assignees, and milestones.</td><td><a href="/spaces/fW6XSzJSKsNyZnOkSJPt/pages/BWNO2SdeTHE8gzn6iSkH">/spaces/fW6XSzJSKsNyZnOkSJPt/pages/BWNO2SdeTHE8gzn6iSkH</a></td></tr><tr><td>Jira — create issues with project, issue type, priority, and labels.</td><td><a href="/spaces/fW6XSzJSKsNyZnOkSJPt/pages/uDHmDTxBLMhf2bV7RDNY">/spaces/fW6XSzJSKsNyZnOkSJPt/pages/uDHmDTxBLMhf2bV7RDNY</a></td></tr></tbody></table>

### How it works

{% stepper %}
{% step %}

### Connect your app

Each teammate connects apps from **Profile > Integrations**. Screendesk uses that person's account and permissions in the destination app.
{% endstep %}

{% step %}

### Open the recording

Open the recording you want to share. Then click **Send to app**.
{% endstep %}

{% step %}

### Create the issue

Choose the destination app. Review the title and description. Fill in the app-specific fields. Then create the issue.
{% endstep %}
{% endstepper %}

### Before you start

* Connect the app from **Profile > Integrations**.
* Make sure you can edit the recording.
* Make sure your connected account has access to the target project or repository.

### What Screendesk sends

Every created issue includes:

* A direct link to the recording
* The source website URL, when available
* Device and browser information
* The recording timestamp in UTC
* A link back to developer information in Screendesk

Anything you type in the description appears before the generated Screendesk context.

### Permissions

You must be able to edit the recording to use **Send to app**. Watch-only users cannot connect personal app accounts or create issues.


# Linear

Create Linear issues from recordings with team, project, and workflow fields.

Create a Linear issue from any recording you can edit. The issue includes a link back to Screendesk and the context your team needs to investigate fast.

{% hint style="info" %}
This page covers the manual **Send to app** action. Folder automations are separate: automations create issues automatically when recordings enter a folder.
{% endhint %}

### Before you start

* Connect Linear from **Profile > Integrations**.
* Make sure your Linear account can access the target team.
* Make sure you can edit the recording.

### Connect Linear

Linear is connected from your personal Screendesk profile. Each teammate sends issues with their own Linear account.

1. In Screendesk, open **Profile > Integrations**.
2. Find **Linear**.
3. Click **Connect**.
4. Approve Screendesk on Linear's authorization screen.
5. Return to Screendesk. Linear now appears in the connected apps list.

If you open the **Send to app** menu before connecting Linear, choose **Connect Linear** from the menu and complete the same authorization flow.

### Create the issue

{% stepper %}
{% step %}

### Open the recording

Open the recording in Screendesk. Then click **Send to app**.
{% endstep %}

{% step %}

### Choose Linear

Select **Linear issue**. If Linear is your only connected app, the main button may say **Send to Linear**.
{% endstep %}

{% step %}

### Fill in the fields

Review the title and description. Choose a **Team**. Then add any optional fields you need.
{% endstep %}

{% step %}

### Create the issue

Click **Create issue**. Screendesk adds the Linear issue link to the recording.
{% endstep %}
{% endstepper %}

The issue link stays visible even if Linear is disconnected later.

### Available fields

| Field        | Required | Notes                                                       |
| ------------ | -------: | ----------------------------------------------------------- |
| Title        |      Yes | Used as the Linear issue title.                             |
| Description  |      Yes | Your notes are added above the Screendesk context.          |
| Team         |      Yes | Determines where the issue is created.                      |
| Project      |       No | Available projects update after you choose a team.          |
| Parent issue |       No | Link the new issue under an existing Linear issue.          |
| Priority     |       No | Maps to Linear priority values.                             |
| Assignee     |       No | Available members update after you choose a team.           |
| Status       |       No | Available workflow statuses update after you choose a team. |
| Labels       |       No | Available labels update after you choose a team.            |

### What Screendesk adds

Every issue includes:

* A direct link to the recording
* The source website URL, when available
* Device and browser information
* The recording timestamp in UTC
* A link back to developer information in Screendesk

Anything you type in the description appears before the generated Screendesk context.

### Customize the form

Click **Edit fields** in the Linear modal to show or hide optional fields. Required fields stay visible. Your field preferences are saved to your Linear connection and apply the next time you send to Linear.

### Permissions

You must be able to edit the recording to use **Send to app**. Watch-only users cannot connect personal app accounts or send recordings to Linear.

Workspace admins can remove Linear from the workspace from **Profile > Integrations**. This disconnects Linear for everyone in the workspace, but existing Linear issue links stay on their Screendesk recordings.

### Troubleshooting

<details>

<summary>Linear is not in the Send to app menu</summary>

Open **Profile > Integrations** and connect Linear. If the button is missing entirely, confirm that you can edit the recording.

</details>

<details>

<summary>Linear asks you to reconnect</summary>

Reconnect Linear from **Profile > Integrations**. This can happen if Linear revokes the token or the connection expires.

</details>

<details>

<summary>Teams, projects, members, statuses, or labels do not load</summary>

Reconnect Linear and make sure your Linear account has access to the workspace, team, and fields you want to use.

</details>


# GitHub

Create GitHub issues from recordings with repository, labels, assignees, and milestone fields.

Create a GitHub issue from any recording you can edit. The issue includes a direct link back to Screendesk and the context engineers need right away.

{% hint style="info" %}
This page covers the manual **Send to app** action. Folder automations are separate: automations create issues automatically when recordings enter a folder.
{% endhint %}

### Before you start

* Connect GitHub from **Profile > Integrations**.
* Make sure your GitHub account can access the target repository.
* Make sure you can edit the recording.

### Connect GitHub

GitHub is connected from your personal Screendesk profile. Each teammate sends issues with their own GitHub account and repository permissions.

1. In Screendesk, open **Profile > Integrations**.
2. Find **GitHub**.
3. Click **Connect**.
4. Approve Screendesk on GitHub's authorization screen.
5. Return to Screendesk. GitHub now appears in the connected apps list.

If you open the **Send to app** menu before connecting GitHub, choose **Connect GitHub** from the menu and complete the same authorization flow.

### Create the issue

{% stepper %}
{% step %}

### Open the recording

Open the recording in Screendesk. Then click **Send to app**.
{% endstep %}

{% step %}

### Choose GitHub

Select **GitHub issue**. If GitHub is your only connected app, the main button may say **Send to GitHub**.
{% endstep %}

{% step %}

### Fill in the fields

Choose a **Repository**. Review the title and description. Then add any optional fields you want.
{% endstep %}

{% step %}

### Create the issue

Click **Create issue**. Screendesk adds the GitHub issue link to the recording.
{% endstep %}
{% endstepper %}

The issue link stays visible even if GitHub is disconnected later.

### Available fields

| Field       | Required | Notes                                                   |
| ----------- | -------: | ------------------------------------------------------- |
| Title       |      Yes | Used as the GitHub issue title.                         |
| Description |      Yes | Your notes are added above the Screendesk context.      |
| Repository  |      Yes | Determines where the issue is created.                  |
| Labels      |       No | Available labels come from the selected repository.     |
| Assignees   |       No | Available assignees come from the selected repository.  |
| Milestone   |       No | Available milestones come from the selected repository. |

### What Screendesk adds

Every issue includes:

* A direct link to the recording
* The source website URL, when available
* Device and browser information
* The recording timestamp in UTC
* A link back to developer information in Screendesk

Anything you type in the description appears before the generated Screendesk context.

### Permissions

You must be able to edit the recording to use **Send to app**. Watch-only users cannot connect personal app accounts or send recordings to GitHub.

Workspace admins can remove GitHub from the workspace from **Profile > Integrations**. This disconnects GitHub for everyone in the workspace, but existing GitHub issue links stay on their Screendesk recordings.

### Troubleshooting

<details>

<summary>GitHub is not in the Send to app menu</summary>

Open **Profile > Integrations** and connect GitHub. If the button is missing entirely, confirm that you can edit the recording.

</details>

<details>

<summary>GitHub asks you to reconnect</summary>

Reconnect GitHub from **Profile > Integrations**. This can happen if GitHub revokes the token or the connection expires.

</details>

<details>

<summary>Repositories, labels, assignees, or milestones do not load</summary>

Reconnect GitHub and make sure your GitHub account has access to the repository and fields you want to use.

</details>


# Jira

Create Jira issues from recordings with project, issue type, priority, and labels.

Create a Jira issue from any recording you can edit. The issue includes a link back to Screendesk and the context your team needs to reproduce and prioritize the problem.

{% hint style="info" %}
This page covers the manual **Send to app** action. Folder automations are separate: automations create issues automatically when recordings enter a folder.
{% endhint %}

### Before you start

* Connect Jira from **Profile > Integrations**.
* Make sure your Jira account can access the target site and project.
* Make sure you can edit the recording.

### Connect Jira

Jira is connected from your personal Screendesk profile. Each teammate sends issues with their own Jira account and project permissions.

1. In Screendesk, open **Profile > Integrations**.
2. Find **Jira**.
3. Click **Connect**.
4. Approve Screendesk on Atlassian's authorization screen.
5. Return to Screendesk. Jira now appears in the connected apps list.

If you open the **Send to app** menu before connecting Jira, choose **Connect Jira** from the menu and complete the same authorization flow.

### Create the issue

{% stepper %}
{% step %}

### Open the recording

Open the recording in Screendesk. Then click **Send to app**.
{% endstep %}

{% step %}

### Choose Jira

Select **Jira issue**. If Jira is your only connected app, the main button may say **Send to Jira**.
{% endstep %}

{% step %}

### Fill in the fields

Choose a **Project** and **Issue type**. Review the title and description. Then add any optional fields you need.
{% endstep %}

{% step %}

### Create the issue

Click **Create issue**. Screendesk adds the Jira issue link to the recording.
{% endstep %}
{% endstepper %}

The issue link stays visible even if Jira is disconnected later.

### Available fields

| Field       | Required | Notes                                              |
| ----------- | -------: | -------------------------------------------------- |
| Title       |      Yes | Used as the Jira issue summary.                    |
| Description |      Yes | Your notes are added above the Screendesk context. |
| Project     |      Yes | Determines where the issue is created.             |
| Issue type  |      Yes | Available issue types update by project.           |
| Priority    |       No | Available priorities come from Jira.               |
| Labels      |       No | Labels are added to the created Jira issue.        |

### What Screendesk adds

Every issue includes:

* A direct link to the recording
* The source website URL, when available
* Device and browser information
* The recording timestamp in UTC
* A link back to developer information in Screendesk

Anything you type in the description appears before the generated Screendesk context.

### Permissions

You must be able to edit the recording to use **Send to app**. Watch-only users cannot connect personal app accounts or send recordings to Jira.

Workspace admins can remove Jira from the workspace from **Profile > Integrations**. This disconnects Jira for everyone in the workspace, but existing Jira issue links stay on their Screendesk recordings.

### Troubleshooting

<details>

<summary>Jira is not in the Send to app menu</summary>

Open **Profile > Integrations** and connect Jira. If the button is missing entirely, confirm that you can edit the recording.

</details>

<details>

<summary>Jira asks you to reconnect</summary>

Reconnect Jira from **Profile > Integrations**. This can happen if Atlassian revokes the token or the connection expires.

</details>

<details>

<summary>Projects, issue types, priorities, or labels do not load</summary>

Reconnect Jira and make sure your Jira account has access to the site, project, and issue fields you want to use.

</details>


# Branding & customization

Customize branding for the recorder, share pages, and live rooms

Make Screendesk feel native to your product. Customize what customers see when they record, watch, or join a live session.

Use the pages below to adjust branding, language, and small UX details.

{% hint style="info" %}
Some customization options are plan-gated (for example, white labeling). Each page calls out availability.
{% endhint %}

### What you can customize

* Recorder UI (logo, colors, required fields)
* White label (remove “Powered by Screendesk”)
* Recorder UX details (countdown, displayed name)
* Recorder language and locale fallback

### Guides

<table data-view="cards"><thead><tr><th>Topic</th><th data-card-target data-type="content-ref">Guide</th></tr></thead><tbody><tr><td><strong>Customize recorder</strong><br>Logo, required fields, and brand colors in the recorder UI.</td><td><a href="/spaces/fW6XSzJSKsNyZnOkSJPt/pages/LSppNBgEdk2AQpnSF0w3">/spaces/fW6XSzJSKsNyZnOkSJPt/pages/LSppNBgEdk2AQpnSF0w3</a></td></tr><tr><td><strong>Remove Screendesk logo (white label)</strong><br>Remove “Powered by Screendesk” from customer-facing views.</td><td><a href="/spaces/fW6XSzJSKsNyZnOkSJPt/pages/M94SrTWTHNGx3ia0RMb2">/spaces/fW6XSzJSKsNyZnOkSJPt/pages/M94SrTWTHNGx3ia0RMb2</a></td></tr><tr><td><strong>Disable countdown</strong><br>Start recording immediately without the pre-record timer.</td><td><a href="/spaces/fW6XSzJSKsNyZnOkSJPt/pages/1RKnH2z3GzJ6KsAJFMi9">/spaces/fW6XSzJSKsNyZnOkSJPt/pages/1RKnH2z3GzJ6KsAJFMi9</a></td></tr><tr><td><strong>Set name alias in recorder</strong><br>Control the “request from …” name shown in integrations.</td><td><a href="/spaces/fW6XSzJSKsNyZnOkSJPt/pages/kN5wAqGAEy6IEf9T1idJ">/spaces/fW6XSzJSKsNyZnOkSJPt/pages/kN5wAqGAEy6IEf9T1idJ</a></td></tr><tr><td><strong>Internationalization</strong><br>Supported recorder UI languages and fallback behavior.</td><td><a href="/spaces/fW6XSzJSKsNyZnOkSJPt/pages/ahZMtDL3VJEEAZIdXbaX">/spaces/fW6XSzJSKsNyZnOkSJPt/pages/ahZMtDL3VJEEAZIdXbaX</a></td></tr></tbody></table>

### Related

<table data-view="cards"><thead><tr><th>Topic</th><th data-card-target data-type="content-ref">Guide</th></tr></thead><tbody><tr><td><strong>Customize live rooms</strong><br>Logo and colors for live video call rooms.</td><td><a href="/spaces/fW6XSzJSKsNyZnOkSJPt/pages/q402WglC81iKvXo87Jhy">/spaces/fW6XSzJSKsNyZnOkSJPt/pages/q402WglC81iKvXo87Jhy</a></td></tr></tbody></table>


# Remove Screendesk logo

Remove Screendesk branding from the recorder and share pages

Screendesk's white label feature allows you to remove "Powered by Screendesk" branding and customize the screen recorder interface with your own company logo and colors. This creates a seamless, branded experience for your customers.

### What is White Labeling?

White labeling removes third-party branding from the customer-facing recorder interface, replacing it with your own brand identity. When enabled, your customers see:

* **No "Powered by Screendesk" text** in the recorder or player

This makes it appear as if the screen recording functionality is a native part of your application rather than a third-party tool.

### Feature Availability

{% hint style="info" %}
White labeling is available on **Pro** and **Enterprise** plans. Upgrade your subscription to access this feature.
{% endhint %}

Check your current plan in **Settings** > **Billing** to see if white labeling is included.

### Enabling White Label

**Step 1: Access Branding Settings**

{% stepper %}
{% step %}

#### Navigate to Branding

Go to **Settings** > **Branding** in your Screendesk workspace.
{% endstep %}

{% step %}

#### Find White Label Toggle

Look for the **"Remove Screendesk Branding"** or **"Enable White Label"** toggle.

<figure><img src="https://3820804400-files.gitbook.io/~/files/v0/b/gitbook-x-prod.appspot.com/o/spaces%2FfW6XSzJSKsNyZnOkSJPt%2Fuploads%2FLkhyDB7Ss0ix1v9ujYu3%2FCleanShot%202026-02-09%20at%2016.43.51%402x.png?alt=media&#x26;token=caf63c0c-d0e6-4c78-a1d4-c1bf386e867b" alt=""><figcaption></figcaption></figure>
{% endstep %}

{% step %}

#### Enable the Feature

Toggle the switch to **ON** to remove Screendesk branding.

{% hint style="warning" %}
Changes apply immediately to all new recordings. Existing recordings are not affected.
{% endhint %}
{% endstep %}
{% endstepper %}

### Frequently asked questions

<details>

<summary>Does white labeling affect existing recordings?</summary>

No. White labeling only applies to new recordings created after the feature is enabled. Existing recordings keep their original branding.

</details>

<details>

<summary>Can I white label only certain integrations?</summary>

No. White labeling applies globally to all customer-facing interfaces. You cannot selectively enable it for some integrations and not others.

</details>


# Customize recorder

Customize the screen recorder UI with your logo and brand colors.

Screendesk provides several options to customize the screen recorder experience for your customers. These settings allow you to collect necessary information, match your brand identity, and control the recording workflow.

### Require Customer Email

Force customers to provide their email address when submitting a screen recording. This ensures you can follow up with customers even if the recording is submitted anonymously.

**How to Enable**

{% stepper %}
{% step %}

#### Navigate to Recorder Settings

Go to **Settings** > **Recording** in your Screendesk workspace.

<figure><img src="https://3820804400-files.gitbook.io/~/files/v0/b/gitbook-x-prod.appspot.com/o/spaces%2FfW6XSzJSKsNyZnOkSJPt%2Fuploads%2FZoU0KZ2n1bKSdDZBhIah%2FCleanShot%202026-02-09%20at%2016.46.31%402x.png?alt=media&#x26;token=85b73414-283d-4f07-b6cb-bd2fceaa420a" alt=""><figcaption></figcaption></figure>
{% endstep %}

{% step %}

#### Enable Required Email

Find the **"Require email in the screen recorder"** toggle and turn it ON.

{% hint style="info" %}
This setting applies to all embedded recorders and integration widgets. It does not affect Chrome extension users (who are always identified).
{% endhint %}
{% endstep %}

{% step %}

#### Test the Change

Open your embedded recorder or integration widget to verify that the email field now shows as required (marked with an asterisk \*).
{% endstep %}
{% endstepper %}

### Require Recording Title

Require customers to provide a title or subject for their recording. This helps organize recordings and makes it easier for support agents to prioritize and search.

**How to Enable**

{% stepper %}
{% step %}

#### Navigate to Recorder Settings

Go to **Settings** > **Recording** in your Screendesk workspace.
{% endstep %}

{% step %}

#### Enable Required Title

Find the **"Require title in the screen recorder"** toggle and turn it ON.

<figure><img src="https://3820804400-files.gitbook.io/~/files/v0/b/gitbook-x-prod.appspot.com/o/spaces%2FfW6XSzJSKsNyZnOkSJPt%2Fuploads%2FQgoIwvHYEC8mOWfZcUj8%2FCleanShot%202026-02-10%20at%2015.16.15%402x.png?alt=media&#x26;token=78807854-fe60-41a8-8736-48394c9b42ef" alt=""><figcaption></figcaption></figure>
{% endstep %}

{% step %}

#### Verify Changes

Test your embedded recorder to confirm the title field is now marked as required.
{% endstep %}
{% endstepper %}

### Customize Recorder Colors

Match the screen recorder interface to your brand's color palette.

**Recorder Background Color**

This sets the background color of the recorder interface before and after recording.

{% stepper %}
{% step %}

#### Open color settings

Go to **Settings** > **Branding** > **Screen Recorder**.
{% endstep %}

{% step %}

#### Update the background color

Find **Recorder Background Color** and click the color picker.

Choose a color or enter a hex code.

Default: `#000000` (black).

<figure><img src="https://3820804400-files.gitbook.io/~/files/v0/b/gitbook-x-prod.appspot.com/o/spaces%2FfW6XSzJSKsNyZnOkSJPt%2Fuploads%2FAVus4RvGfpp3rLkpXZLM%2FCleanShot%202026-02-10%20at%2015.18.35%402x.png?alt=media&#x26;token=4404a19b-4bba-484e-b08d-2ab5c81c0954" alt=""><figcaption></figcaption></figure>
{% endstep %}

{% step %}

#### Save

Click **Save**.
{% endstep %}
{% endstepper %}

**Player Custom Color**

This sets the accent color used throughout the video player interface.

{% stepper %}
{% step %}

#### Open player settings

Go to **Settings** > **Branding** > **Screen Recorder**.
{% endstep %}

{% step %}

#### Pick an accent color

Find **Custom Color** (or **Accent Color**) and click the color picker.

Choose a color or enter a hex code.

Default: `#f43f5e` (rose).

<figure><img src="https://3820804400-files.gitbook.io/~/files/v0/b/gitbook-x-prod.appspot.com/o/spaces%2FfW6XSzJSKsNyZnOkSJPt%2Fuploads%2FnmUC7jJXfZz41rqPPrPv%2FCleanShot%202026-02-10%20at%2015.19.11%402x.png?alt=media&#x26;token=e63c6525-e002-4d5b-8d5c-7531abe385c0" alt=""><figcaption></figcaption></figure>
{% endstep %}

{% step %}

#### Save

Click **Save**.
{% endstep %}
{% endstepper %}

### Troubleshooting

<details>

<summary>Changes don't appear in the recorder</summary>

**Problem**: You updated settings but don't see changes.

**Solutions**:

1. **Clear browser cache**: Ctrl+Shift+Del (Windows) or Cmd+Shift+Del (Mac)
2. **Hard refresh**: Ctrl+F5 (Windows) or Cmd+Shift+R (Mac)
3. **Try incognito/private mode**: Rules out caching issues
4. **Wait a few minutes**: Changes may take time to propagate
5. **Check the right recorder**: Ensure you're testing the correct embedded instance

</details>

<details>

<summary>Email validation isn't working</summary>

**Problem**: Customers can submit recordings without valid emails even though the field is required.

**Check**:

1. Is the toggle actually ON in Settings > Recorder?
2. Are you testing the embedded recorder or Chrome extension? (Extension users are always authenticated)
3. Clear cache and try again
4. Check browser console for JavaScript errors

**Still not working?** Contact Screendesk support with:

* Screenshot of your settings
* Example recording link showing the issue
* Browser and version used for testing

</details>

<details>

<summary>Custom colors look wrong</summary>

**Problem**: Colors don't match what you selected or look different than expected.

**Common causes**:

1. **Contrast adjustment**: System auto-adjusts colors for readability
2. **Browser rendering**: Different browsers may display colors slightly differently
3. **Monitor calibration**: Your display settings affect how colors appear
4. **Hex code typo**: Double-check the hex code you entered

**Solutions**:

* Use a color picker tool to verify your hex codes
* Test on multiple devices and browsers
* Check accessibility contrast ratios (use WebAIM contrast checker)
* Consider slightly different shades if auto-adjustment is too aggressive

</details>


# Set name alias in recorder

Set an alias so recipients see the name you choose in recording requests.

The **Alias** feature allows you to customize how your name appears in video recording requests sent through integrations like Jira, Intercom, HelpScout, and others. Instead of showing your full name (first name + last name), you can set a personalized alias that will be displayed to customers and colleagues when they receive video recording requests from you.

<figure><img src="https://3820804400-files.gitbook.io/~/files/v0/b/gitbook-x-prod.appspot.com/o/spaces%2FfW6XSzJSKsNyZnOkSJPt%2Fuploads%2F8E0lKyTp9wCs3dKVv1Fw%2FCleanShot%202026-02-09%20at%2016.49.28%402x.png?alt=media&#x26;token=cfdc283b-855f-4012-896b-151103533f9e" alt=""><figcaption></figcaption></figure>

**Examples:**

* Your full name: "Jennifer Smith"
* Your alias: "Jen Smith" or "JS"
* What recipients see: "Video request from Jen Smith" instead of "Video request from Jennifer"

| When Your Alias is Used                                                                    | When Your Alias is NOT Used                                       |
| ------------------------------------------------------------------------------------------ | ----------------------------------------------------------------- |
| ✅ You have set an alias in your profile                                                    | ❌ You haven't set an alias (your first name will be used instead) |
| ✅ The request comes from supported integrations (Jira, Intercom, HelpScout, Zendesk, etc.) | ❌ The recording request is anonymous or generic                   |
| ✅ The request is personalized (not anonymous)                                              | ❌ The request comes from unsupported sources                      |

**Fallback Behavior**

If you don't set an alias, the system automatically falls back to using your first name, ensuring a seamless experience for recipients.

### Setting Up Your Alias

{% stepper %}
{% step %}
**Navigate to Your Profile**

* Click on your profile picture or name in the top navigation
* Select "Personal Settings" or "My Profile"
  {% endstep %}

{% step %}
**Access Profile Settings**

* You'll see the "My Profile" tab in your personal settings
* This page contains your account information and preferences
  {% endstep %}

{% step %}
**Locate the Alias Field**

* Find the "Alias" field below your "Full name" field
* The placeholder text reads: "Change displayed name in your recorder"
  {% endstep %}
  {% endstepper %}

### FAQ

<details>

<summary>My Alias Isn't Showing</summary>

**Check these items:**

1. Ensure you've saved your profile changes
2. Verify the request is coming from a supported integration
3. Confirm the request is personalized (not anonymous)
4. Try refreshing your browser and checking again

</details>

<details>

<summary>I Want to Remove My Alias</summary>

**To remove your alias:**

1. Go to your profile settings
2. Clear the alias field (leave it empty)
3. Save your changes
4. The system will use your first name instead

</details>

<details>

<summary>Alias Not Updating</summary>

**If changes aren't taking effect:**

1. Log out and log back in
2. Clear your browser cache
3. Contact support if the issue persists

</details>


# Disable countdown

Disable the 5-second countdown so recording starts instantly.

By default, the recorder shows a 5‑second countdown. Disable it to start recording instantly.

### When to use it

{% hint style="info" %}
This is useful for high-trust flows. Example: claims, fraud prevention, and compliance.
{% endhint %}

### Disable the countdown

{% stepper %}
{% step %}
**Open screen recorder settings**

Go to **Account settings** → **Screen recorder**.
{% endstep %}

{% step %}
**Turn off the timer**

Enable **Disable countdown timer**.

<figure><img src="https://3820804400-files.gitbook.io/~/files/v0/b/gitbook-x-prod.appspot.com/o/spaces%2FfW6XSzJSKsNyZnOkSJPt%2Fuploads%2F76DO2EioSzGVgqApY92l%2FCleanShot%202026-02-10%20at%2015.08.02%402x.png?alt=media&#x26;token=26542675-a459-4ac2-a044-0fb14813d67d" alt=""><figcaption></figcaption></figure>
{% endstep %}

{% step %}

#### Save

Click **Save**.
{% endstep %}
{% endstepper %}


# Recorder flow

Show a guided multi-step introduction to customers before the screen recorder opens.

Recorder Flow lets you show a short guided intro before the recorder opens.

Use it to explain what to record, reduce confusion, and improve submission quality.

{% hint style="info" %}
**Plan availability:** Plus and above.
{% endhint %}

***

### How it works for customers

When Recorder Flow is enabled, customers see a modal before the recorder loads.

<figure><img src="/files/WGK57EdnK47DSGB2QpRI" alt=""><figcaption><p>Recorder Flow shown before the recorder starts.</p></figcaption></figure>

The modal shows one step at a time.

Each step can contain:

* **Title**
* **Body text**
* **Optional image**

Customers move through the flow with **Next** and **Back**.

Dot indicators show how many steps remain.

On the last step, **Get Started** closes the flow and opens the recorder.

Each step also includes **Don't show this again**.

If the customer checks it, Screendesk skips the flow on future visits from the same browser.

***

### Set up Recorder Flow

{% stepper %}
{% step %}

#### Go to Recorder settings

Open **Settings** → **Recorder** in your Screendesk workspace.
{% endstep %}

{% step %}

#### Open Recorder Flow

Scroll to the **Recorder Flow** section.
{% endstep %}

{% step %}

#### Enable the flow

Turn on **Recorder Flow**.

Click **Save**.
{% endstep %}

{% step %}

#### Add your steps

Click **Add step**.

For each step, set:

* **Title** — short heading shown at the top
* **Body** — the main instruction text
* **Image** — optional screenshot or illustration

Markdown is supported in the body for basic formatting.

<figure><img src="/files/2JbP80unVvj2FgBGMviI" alt=""><figcaption><p>Each step supports text, translations, an optional image, and step navigation.</p></figcaption></figure>
{% endstep %}

{% step %}

#### Save each step

Each step has its own **Save** button.

Changes to one step do not update the others.
{% endstep %}
{% endstepper %}

You can add up to **10 steps**.

***

### What to include in each step

Good steps are short and specific.

Focus on one action per step.

Useful examples:

* explain why you need the recording
* tell the customer what screen to open
* ask them to reproduce the issue
* remind them to enable microphone audio if helpful
* show what success or failure looks like

{% hint style="success" %}
Three to five steps is usually enough.
{% endhint %}

***

### Images and formatting

Images are optional, but they help a lot.

Use them to point to the right screen, button, or workflow.

Supported image formats:

* PNG
* JPEG
* GIF
* WebP

Maximum file size: **5 MB**.

Use body text for short instructions, not long paragraphs.

***

### Translations

You can localize each step for different languages.

Locale tabs appear at the top of the step editor.

Switch to a locale and enter the translated title and body.

If a translation is empty, Screendesk falls back to English.

Supported languages:

* 🇬🇧 English
* 🇫🇷 French
* 🇪🇸 Spanish
* 🇵🇹 Portuguese
* 🇩🇪 German
* 🇳🇱 Dutch
* 🇧🇷 Brazilian Portuguese

See also [Internationalization](/request-screen-recording/branding-and-customization/internationalization).

***

### Order of steps

Customers see steps in the same order they appear in the editor.

Review the full sequence before enabling the flow for customers.

If your workspace supports reordering, move steps into the right sequence before saving.

***

### How Recorder Flow works with Privacy opt-in

If both features are enabled, Screendesk shows them in this order:

1. Privacy opt-in
2. Recorder Flow
3. Recorder

Use **Privacy opt-in** when you need an **Accept** or **Decline** decision before recording starts.

Use **Recorder Flow** when you want to guide the customer with instructions before recording starts.

See [Privacy opt-in](/security/privacy-opt-in).

***

### Disable Recorder Flow

Turn off **Recorder Flow** in **Settings** → **Recorder**.

Click **Save**.

Customers will go straight to the recorder.

Your existing steps stay saved, so you can enable the flow again later.

***

### Best practices

**Keep it short.**

Customers want to start recording quickly.

**Use screenshots.**

One image often explains faster than a paragraph.

**Write for action.**

Say exactly what the customer should do next.

**Test in a private window.**

This avoids cached preferences such as **Don't show this again**.

**Keep the experience consistent.**

Make sure your recorder branding is configured so the flow matches your workspace.

See [Customize recorder](/request-screen-recording/branding-and-customization/customize-recorder).

***

### Troubleshooting

<details>

<summary>The flow does not appear</summary>

Check these first:

* **Recorder Flow** is enabled
* at least one step is saved
* you are testing the browser-based recorder
* the customer did not previously check **Don't show this again**

Try again in a private or incognito window.

</details>

<details>

<summary>A translation is missing</summary>

If a locale field is blank, Screendesk shows the English version.

Add the translated title and body for that locale, then save the step.

</details>

<details>

<summary>An image does not display correctly</summary>

Check the file type and size.

Use PNG, JPEG, GIF, or WebP, and keep the file under 5 MB.

</details>

<details>

<summary>The flow appears for some users but not others</summary>

The **Don't show this again** preference is stored in the browser.

Users on a different browser or device may still see the flow.

</details>

***

### FAQ

<details>

<summary>Can I show different flows to different customers?</summary>

Not currently.

The same Recorder Flow is shown to everyone using that recorder configuration.

</details>

<details>

<summary>Can customers skip the flow?</summary>

Yes.

They can click **Don't show this again** to skip it on future visits from the same browser.

</details>

<details>

<summary>Does the preference sync across devices?</summary>

No.

The preference is stored locally in the browser.

If the customer switches device or clears browser data, the flow can appear again.

</details>

<details>

<summary>Does Recorder Flow apply to Chrome extension users?</summary>

No.

Recorder Flow applies to the browser-based recorder experience.

</details>

<details>

<summary>Can I use Recorder Flow instead of Privacy opt-in?</summary>

No.

Recorder Flow is informational.

It does not provide an **Accept** or **Decline** consent gate.

</details>

***

### Related pages

* [Customize recorder](/request-screen-recording/branding-and-customization/customize-recorder)
* [Disable countdown](/request-screen-recording/branding-and-customization/disable-countdown)
* [Internationalization](/request-screen-recording/branding-and-customization/internationalization)
* [Privacy opt-in](/security/privacy-opt-in)


# Internationalization

Supported recorder UI languages, automatic locale switching, and English fallback.

{% hint style="info" %}
Please email us at <support@screendesk.io> if you would like us to add additional languages.
{% endhint %}

The recorder is **translated into 7 languages** and **will automatically switch to the browser’s language**!

### Language selection and fallback

Screendesk uses the browser locale by default. It falls back to English when needed.

### Supported languages

Below is a list of language codes we currently support. We will always fallback to English if we do not support the browsers default language.

Below is the list of languages that we currently support:

* 🇺🇸 English
* 🇫🇷 French
* 🇪🇸 Spanish
* 🇵🇹 Portuguese
* 🇩🇪 German
* 🇳🇱 Dutch
* 🇧🇷 Brazilian Portuguese


# Browser compatibility

Screendesk recording runs in the browser. It uses the standard screen capture API (`getDisplayMedia`).

### Requirements

* Use a **desktop browser**.
* Allow **screen sharing** permissions when prompted.
* If you record with audio, allow **microphone** permissions.

{% hint style="warning" %}
Mobile browsers (iOS and Android) are not supported for screen recording. You can still watch shared recordings on mobile.
{% endhint %}

### Supported browsers (recommended)

Use the latest version when possible.

* **Chrome** (Windows / macOS)
* **Edge** (Windows / macOS)
* **Firefox** (Windows / macOS)
* **Safari** (macOS)

### Unsupported or unreliable environments

These often block screen sharing or required permissions:

* In-app browsers (embedded webviews inside chat apps).
* Very strict corporate browser policies.
* Privacy / ad blockers that block required scripts or cookies.

### Common limitations (browser-level)

* You must pick **what to share** (entire screen, window, or tab).
* Some browsers limit **system audio** capture.
* If the permission prompt is dismissed, you must reload to retry.

### Quick troubleshooting

If the recorder does not start:

1. Open the link in **Chrome** or **Edge** on desktop.
2. Avoid in-app browsers.
3. Disable blockers for the recording page.
4. Reload and accept the permissions prompt again.

### Reference

<details>

<summary>See the current browser support matrix</summary>

<figure><img src="https://3820804400-files.gitbook.io/~/files/v0/b/gitbook-x-prod.appspot.com/o/spaces%2FfW6XSzJSKsNyZnOkSJPt%2Fuploads%2FHWzN2IVs38Dd6FzY9RPT%2FScreenshot%202022-09-26%20at%2010.19.23.png?alt=media&#x26;token=53169956-5bb5-4180-9c33-92ec9eb6eba1" alt="Compatibility table for screen recording"><figcaption></figcaption></figure>

Source: [MDN / Can I use](https://caniuse.com/?search=displaymedia)

</details>


# Send a screen recording

Record and send a screen recording from the dashboard or your helpdesk, with audio and webcam options.

Sending video recordings lets your support team create personalized walkthroughs, step-by-step guides, and visual explanations that resolve customer issues faster than text alone. You can record directly from the Screendesk dashboard or from within your helpdesk platform.

### Recording from the Dashboard

From the Screendesk dashboard, you can create recordings that are saved to your workspace and can be shared with customers via a link.

{% stepper %}
{% step %}

#### Open the recorder

Open the recorder from the sidebar.

<figure><img src="/files/TWAOdR2OCfWpfLnR2PE1" alt=""><figcaption></figcaption></figure>
{% endstep %}

{% step %}

#### Configure your recording options

Before you start recording, choose your capture settings:

* **Microphone** — Toggle the microphone icon to include or exclude audio narration. When enabled, your voice is recorded alongside the screen capture.
* **Webcam** — Toggle the webcam icon to include a camera overlay. When enabled, a circular video of your face appears in the bottom-right corner of the recording, making your message more personal.

<figure><img src="/files/cvNX5bTCFiKXPImRhnW4" alt=""><figcaption></figcaption></figure>
{% endstep %}

{% step %}

#### Start recording

Click the **Start Recording** button. A **4-second countdown** appears on screen before capture begins, giving you time to prepare. Once the countdown completes, everything on your screen is being recorded.

{% hint style="info" %}
Your admin can disable the countdown timer in **Settings → Screen Recorder → Disable countdown** if your team prefers to start immediately.
{% endhint %}

<figure><img src="/files/qrQiFaUActFtOTHWFMb6" alt=""><figcaption></figcaption></figure>
{% endstep %}

{% step %}

#### Stop and review

Click the **Stop** button when you're finished. You'll see a preview of your recording with two options:

* **Yes** — Accept the recording and proceed to save it.
* **No / Retake** — Discard and record again.

<figure><img src="/files/aTnFviwx6tklsqKteoB8" alt=""><figcaption></figcaption></figure>
{% endstep %}

{% step %}

#### Add details and save

After accepting your recording, fill in the details:

* **Title** — A short, descriptive name for the recording.
* **Description** — Optional context about the recording's content.

<figure><img src="/files/nGg5zKXNzkGdkfTAfNzs" alt=""><figcaption></figcaption></figure>

Click **Save** to upload the recording to your workspace.

<figure><img src="/files/pfvdy8kWKYeJHN47xJ0H" alt=""><figcaption></figcaption></figure>
{% endstep %}
{% endstepper %}

Once saved, the recording is processed in the background. Screendesk automatically generates a thumbnail, converts the video for optimal playback, and creates an AI-powered transcript and summary.

### Recording from Helpdesk Platforms

Screendesk integrates directly with your helpdesk, letting you record and send videos without leaving your support workflow. The recording is automatically attached to the conversation or ticket.

{% tabs %}
{% tab title="Zendesk" %}
In the Zendesk agent workspace, use the Screendesk app in the ticket sidebar:

1. Open a ticket and locate the **Screendesk** app in the right sidebar.
2. Click **Send Recording** to open the recorder.
3. Configure your microphone and webcam options, then click **Start Recording**.
4. When finished, click **Stop**, review, and confirm.
5. The recording link is automatically posted as a **private internal note** on the ticket.

The ticket is tagged with `screendesk-recording-sent` for easy filtering and reporting.
{% endtab %}

{% tab title="Intercom" %}
From the Intercom inbox:

1. Open a conversation and look for the **Screendesk** app in the sidebar.
2. Click **Send Recording** to launch the recorder.
3. Record your screen with optional audio and webcam.
4. After confirming, the recording link is posted as an **admin note** in the conversation.

The conversation is tagged with `screendesk-recording-sent`.
{% endtab %}

{% tab title="Freshdesk" %}
In the Freshdesk agent interface:

1. Open a ticket and find the **Screendesk** app.
2. Click **Send Recording** to start.
3. Record your screen, then review and confirm.
4. The recording link is added as a **private note** on the ticket.

The ticket is tagged with `screendesk-recording-sent`.
{% endtab %}

{% tab title="HelpScout" %}
From the HelpScout mailbox:

1. Open a conversation and locate the **Screendesk** sidebar app.
2. Click **Send Recording** to open the recorder.
3. Record, review, and confirm.
4. The recording link is posted as a **conversation reply** in the thread.
   {% endtab %}

{% tab title="Jira" %}
In the Jira issue panel:

1. Open an issue and find the **Screendesk** panel.
2. Click **Send Recording** to start recording.
3. Record your screen, review, and confirm.
4. The recording link is added as a **comment** on the issue.

{% hint style="info" %}
Your Jira admin must configure the Jira API credentials in Screendesk settings for ticket updates to work.
{% endhint %}
{% endtab %}
{% endtabs %}

### Recording Options

Every recording session gives you control over what gets captured.

#### Screen capture

Screen capture is always enabled. When you start recording, your browser prompts you to choose what to share: your entire screen, a specific application window, or a browser tab. The recording captures at up to **1920×1080 resolution at 30 FPS**.

#### Microphone audio

Toggle the microphone icon before recording to include voice narration. When enabled, your audio is captured at **128 kbps** alongside the screen. This is ideal for walkthroughs where you want to explain what you're doing while showing it.

#### Webcam overlay

Toggle the webcam icon to add a circular camera feed in the bottom-right corner of your recording. The webcam captures at up to **1280×720 at 30 FPS**. This adds a personal touch and helps build rapport with customers.

{% hint style="success" %}
**Tip for support agents:** Combining screen capture with audio narration is the most effective way to explain complex workflows. Customers can follow along visually while hearing your explanation.
{% endhint %}

<figure><img src="/files/wqaUzjqGzlIceWOwxTXK" alt=""><figcaption></figcaption></figure>

#### Countdown timer

By default, a **4-second countdown** appears before recording starts, giving you time to navigate to the right screen. Admins can disable this in **Settings → Screen Recorder → Disable countdown** for teams that prefer instant recording.

### Where Sent Recordings Appear

After saving, your recording appears in the **Sent** section of the dashboard. From there you can:

* Copy the shareable link to send to customers
* Edit the title, description, or summary
* Add a call-to-action button or custom thumbnail
* Open the video editor to trim, cut, or mute sections
* Assign labels or team members
* Move to a specific folder
* Delete the recording

If you recorded from a helpdesk platform, the recording is also linked to the corresponding ticket or conversation, making it easy to find from either Screendesk or your helpdesk.

### Browser Compatibility

The screen recorder works across major browsers with format-specific optimizations:

* **Chrome** and Chromium-based browsers — Records in WebM format (VP8/Opus codecs). Best overall experience.
* **Firefox** — Records in WebM format.
* **Safari** — Records in MP4 format.

{% hint style="warning" %}
Screen recording requires browser permissions for screen sharing and, optionally, microphone and camera access. If you see a permissions error, check your browser settings to ensure Screendesk has the required access.
{% endhint %}


# Add a call-to-action

Add a clickable button on your video to drive viewers to the next step.

A call-to-action (CTA) is a clickable button that appears directly on your video during playback. Use it to guide customers to a relevant page — a knowledge base article, a signup form, a product page, or any URL you choose.

{% hint style="info" %}
Call-to-action buttons are available on **Pro** plans and during your trial period.
{% endhint %}

### Adding a Call-to-Action

Each recording supports one call-to-action button. You can add or edit it at any time after the recording is saved.

{% stepper %}
{% step %}

#### Open the recording

Navigate to the recording you want to add a CTA to and open it in the detail view.
{% endstep %}

{% step %}

#### Open the CTA editor

Click the **CTA icon** in the recording toolbar (below or alongside the video player). This opens the CTA editing modal.

<figure><img src="/files/eAV60MGuaB9j2Sm49FJq" alt=""><figcaption></figcaption></figure>
{% endstep %}

{% step %}

#### Configure the button

Fill in the CTA settings:

* **Button link (URL)** — The destination URL that opens when a viewer clicks the button. Must be a full URL (e.g., `https://help.example.com/article`).
* **Button text** — The label displayed on the button (e.g., "Learn More", "Sign Up", "View Article").
* **Location** — Where the button appears on the video. Choose from four positions:
  * Top-left
  * Top-right
  * Bottom-left
  * Bottom-right
* **Button color** — The background color of the button. Use the color picker to match your brand.
* **Button text color** — The color of the text on the button.
* **Only show at end of video** — When enabled, the button appears only after the video finishes playing. When disabled, the button is visible throughout playback.
  {% endstep %}

{% step %}

#### Preview and save

As you edit the settings, a **live preview** appears on the video thumbnail so you can see exactly how the button will look and where it will be positioned. Click **Save** when you're satisfied.
{% endstep %}
{% endstepper %}

The CTA is applied immediately. Any viewer who watches the video — whether through a direct link, an embed, or from a helpdesk — will see the button.

### Editing or Removing a CTA

To edit an existing CTA, open the same CTA editor and update any field. Your changes are saved and reflected in real time — the video player updates without requiring a page reload.

To remove a CTA, open the CTA editor and click **Delete**. The button is removed from the video immediately.

### How CTAs Appear to Viewers

When a viewer plays the video:

* If **"Only show at end of video"** is turned off, the button appears as soon as playback starts and remains visible throughout the video.
* If **"Only show at end of video"** is turned on, the button appears only when the video reaches the end.

The button is positioned in the corner you selected, with a small offset from the edge for readability. Clicking the button opens the destination URL in a **new browser tab**.

CTAs work identically on the recording share page and in embedded videos.

### Use Cases for Support Teams

{% columns %}
{% column %}

#### Deflect to Self-Service

Add a CTA linking to a knowledge base article after explaining a solution. Customers can follow up on their own.

**Example:** "Read the full guide" → links to your help center article.
{% endcolumn %}

{% column %}

#### Drive Action

Point customers to a specific page where they need to take action — update settings, fill out a form, or complete a step.

**Example:** "Update your settings" → links to the relevant settings page.
{% endcolumn %}
{% endcolumns %}

{% hint style="success" %}
**Tip for managers:** CTAs give your team a way to close the loop on every video. Instead of just explaining a solution, you can guide customers directly to where they need to go next.
{% endhint %}


# Add a custom thumbnail

Upload a custom thumbnail for a recording, or set a default thumbnail for your workspace.

Thumbnails are the first thing viewers see before pressing play. By default, Screendesk auto-generates a thumbnail from your video, but you can upload a custom image to make your recordings look more polished and professional — especially when sharing with customers.

{% hint style="info" %}
Custom thumbnails are available on **Plus** plans and above, and during your trial period.
{% endhint %}

### How Thumbnails Work

Screendesk uses a priority system to determine which thumbnail to display:

1. **Custom thumbnail on the recording** — If you upload a thumbnail directly to a recording, it always takes priority.
2. **Account default thumbnail** — If no recording-level thumbnail is set, the account-wide default thumbnail is used (if one has been uploaded).
3. **Auto-generated thumbnail** — If neither custom option is set, Screendesk automatically generates a thumbnail from the video file.

This means you can set a branded default for all recordings and still override it on individual videos when needed.

### Setting a Custom Thumbnail on a Recording

{% stepper %}
{% step %}

#### Open the recording

Navigate to the recording you want to customize and open the detail view.
{% endstep %}

{% step %}

#### Open the thumbnail editor

Click the **thumbnail icon** in the recording toolbar to open the thumbnail editing modal.

<figure><img src="/files/EckQjR4nwqW5P6iAtEs8" alt=""><figcaption></figcaption></figure>
{% endstep %}

{% step %}

#### Upload your image

Click the file input to select an image from your computer. Accepted formats are **PNG** and **JPEG**. For best results, use an image sized **1184 × 720 pixels**.

A preview of your selected image appears in the modal so you can confirm it looks right before saving.
{% endstep %}

{% step %}

#### Save

Click **Save** to apply the custom thumbnail. The video player and all shared links update immediately — no need to refresh.
{% endstep %}
{% endstepper %}

### Removing a Custom Thumbnail

To remove a recording-level custom thumbnail and revert to the account default (or auto-generated thumbnail):

1. Open the recording and click the **thumbnail icon** in the toolbar.
2. Click **Remove** to delete the custom thumbnail.
3. The recording falls back to the next available thumbnail in the priority order.

### Setting an Account Default Thumbnail

Admins can upload a default thumbnail that applies to all recordings across the workspace. This is useful for maintaining consistent branding without having to upload a thumbnail on each recording.

{% stepper %}
{% step %}

#### Navigate to settings

Go to **Settings → Branding** in the dashboard.

<figure><img src="/files/87aCGWmspxrGduMMtR41" alt=""><figcaption></figcaption></figure>
{% endstep %}

{% step %}

#### Find the Custom Thumbnail section

Scroll down to the **Custom Thumbnail** section.
{% endstep %}

{% step %}

#### Upload your default image

Click the file input to upload your branded thumbnail. Use a **1184 × 720 pixel** PNG or JPEG image. A preview of the uploaded image appears after selection.
{% endstep %}

{% step %}

#### Save

Submit the form to apply the default thumbnail. This image is used for all recordings that don't have their own custom thumbnail.
{% endstep %}
{% endstepper %}

To remove the account default, click **Remove Thumbnail** in the same settings section.

### Where Thumbnails Appear

Custom thumbnails are displayed anywhere your video is shown:

* **Video player** — The thumbnail appears as the poster image before the viewer presses play.
* **Dashboard recording cards** — Thumbnails are shown in the recording grid on the dashboard, making it easier to visually identify recordings.
* **Embedded videos** — When you embed a recording on a website, the custom thumbnail is used as the poster image.
* **Helpdesk integrations** — When a recording link is posted to Zendesk, Intercom, Freshdesk, HelpScout, HubSpot, or Jira, the thumbnail is included in the link preview.

### Best Practices

{% hint style="success" %}
**For managers:** Setting an account default thumbnail with your company logo and branding ensures every video your team sends looks professional — even if individual agents don't upload their own thumbnails.
{% endhint %}

* **Use 1184 × 720 pixels** for the sharpest results. PNG and JPEG formats work best.
* **Include your brand** in the account default — your logo, brand colors, or a consistent template.
* **Use descriptive thumbnails** on individual recordings to help customers understand what the video covers before pressing play.
* **Keep text large and readable** since thumbnails are sometimes displayed at smaller sizes in helpdesk sidebars and recording grids.


# Video editor

How to cut, trim, or mute parts of your video

Screendesk includes a built-in video editor that lets you polish your recordings before sharing them. You can trim the start and end, cut out unwanted sections in the middle, and mute audio in specific parts — all directly in your browser, with no external software needed.

#### Opening the Editor

To open the video editor:

1. Navigate to the recording you want to edit.
2. Click the **Edit** button (scissors icon) in the recording toolbar.
3. The editor opens in a full-screen modal with a video player on top and a waveform timeline below.

The editor loads the video and displays its audio waveform, which gives you a visual representation of the sound throughout the recording. A **draggable region** (highlighted area) on the waveform lets you select the portion of the video you want to work with.

<figure><img src="https://3820804400-files.gitbook.io/~/files/v0/b/gitbook-x-prod.appspot.com/o/spaces%2FfW6XSzJSKsNyZnOkSJPt%2Fuploads%2F4TL4kmLZPKAmDmybvOMs%2FCleanShot%202026-02-09%20at%2016.23.16%402x.png?alt=media&#x26;token=4958b939-f4b4-4da1-b233-92d8878814f1" alt=""><figcaption></figcaption></figure>

#### Editing Tools

The editor provides three core actions, each operating on the selected region of the waveform.

**Trim**

Trimming keeps only the selected portion and removes everything outside it. This is the most common edit — use it to cut off the beginning where you were getting set up, or the end where you stopped sharing.

1. Drag the region handles on the waveform to select the section you want to **keep**.
2. Click the **Trim** button.
3. Everything outside the selected region is removed.

**Cut**

Cutting removes the selected portion and keeps everything else. This is useful for removing a mistake or an irrelevant section from the middle of a recording.

1. Drag the region handles to select the section you want to **remove**.
2. Click the **Cut** button.
3. The selected section is removed and the remaining parts are joined together seamlessly.

**Mute**

Muting silences the audio in the selected portion while keeping the video intact. Use this to remove background noise, a private conversation, or any audio you don't want viewers to hear.

1. Drag the region handles to select the section you want to **silence**.
2. Click the **Mute** button.
3. The audio in that range is set to zero while the video continues playing normally.

#### Working with the Timeline

The waveform timeline is your main tool for selecting regions:

* **Drag the left and right handles** of the highlighted region to adjust the selection.
* **Time indicators** on either side of the region show the exact start and end times in seconds.
* **Hover** over the waveform to see a time cursor that helps you navigate precisely.
* The **red cursor line** shows the current playback position.

You can play the video at any time to verify your selection before applying an edit.

#### Undo and Redo

Every edit is recorded in a history stack, so you can freely experiment:

* Click **Undo** to revert the last edit and restore the previous version.
* Click **Redo** to reapply an edit you just undid.

You can undo and redo multiple times, stepping back and forward through your entire edit history.

#### Saving Your Edits

When you're satisfied with the result:

1. Click **Save and Close** in the top bar or at the bottom of the editor.
2. The edited video is uploaded and saved to your recording.
3. You're redirected back to the recording detail page.

After saving, Screendesk automatically re-runs the **AI transcription and summary** on the edited video, so your transcript stays in sync with the final content.

{% hint style="info" %}
All video processing happens **in your browser** using WebAssembly. Your video data is not sent to an external server for editing — the edited result is uploaded directly to your Screendesk workspace when you save.
{% endhint %}

#### Reverting to the Original

If you want to discard all edits and go back to the original recording:

1. Open the editor.
2. Click **Revert to Original** in the top bar.
3. The edited version is removed and the recording reverts to the original video.

Reverting is permanent — the edited version is deleted. The original recording is always preserved, so you can revert at any time, even after saving multiple rounds of edits.

#### Tips for Support Teams

{% hint style="success" %}
**Quick cleanup workflow:** Record your full walkthrough without worrying about mistakes. Then open the editor, trim the setup time from the beginning, cut any pauses or errors from the middle, and mute any sections with background noise. The result is a clean, professional video in minutes.
{% endhint %}

* **Trim first, then refine.** Start by trimming the start and end to remove dead time, then make targeted cuts if needed.
* **Use mute instead of cutting** when you want to keep the visual flow but remove unwanted audio (background conversations, notifications, etc.).
* **Preview before saving.** Play through the video after each edit to make sure the result looks right.
* **Don't worry about mistakes.** The undo/redo history lets you experiment freely, and you can always revert to the original.


# Share recordings

Different methods for sharing your recordings with viewers.

### Sharing Options

Every recording in Screendesk can be shared in multiple ways. Whether you need to paste a link in a chat, embed a video on a help center page, or drop an animated GIF into an email, the Share menu gives you everything in one place.

#### Opening the Share Menu

Click the **Share** button on any recording to open the share dropdown. The dropdown is divided into two sections: **Public access** (the shareable link) and **Embed** options (website embed, GIF, and download).

<figure><img src="https://3820804400-files.gitbook.io/~/files/v0/b/gitbook-x-prod.appspot.com/o/spaces%2FfW6XSzJSKsNyZnOkSJPt%2Fuploads%2FJ99pnWGDSV5rr1xY89AA%2FCleanShot%202026-02-09%20at%2016.24.09%402x.png?alt=media&#x26;token=6a09e8a1-989c-43ab-86fb-0d143a1327d2" alt=""><figcaption></figcaption></figure>

#### Share Link

Every recording has a unique URL based on its UUID. Clicking the **Share** button copies this link to your clipboard instantly. You can paste it anywhere — email, chat, helpdesk reply, or documentation.

The share link opens the recording in a dedicated playback page that includes the video player, transcript, and any call-to-action you've configured.

**Controlling Who Can View**

For received recordings, a dropdown arrow next to the Share button opens the **Who Can View** settings:

* **Anyone with link** — The default. Anyone who has the URL can view the recording without logging in.
* **Workspace members** — Only users who are members of your Screendesk workspace can view the recording. Viewers must be logged in.

{% hint style="info" %}
The "Workspace members" option requires the **Restrict access to received recordings** feature to be enabled by your admin in **Settings → Security**. This feature is available on **Pro** plans and above.
{% endhint %}

The share button icon changes to reflect the current setting: a **globe** icon for public links, or a **lock** icon for workspace-restricted recordings.

For sent recordings, clicking the Share button also copies the link to your clipboard. The same visibility controls are available via the dropdown chevron.

**Default Share Settings**

Admins can configure the default sharing level for new recordings in **Settings → Security → Default recording share setting**. This determines whether new received recordings default to "Anyone with link" or "Workspace members".

#### Embed on a Website

Embed a recording directly on any webpage using an iframe. This is ideal for help center articles, knowledge bases, or internal wikis.

{% stepper %}
{% step %}
**Open the Share menu**

Click **Share** on the recording to open the dropdown.
{% endstep %}

{% step %}
**Copy the embed code**

In the **Embed** section, find the **Website** row and click **Copy code**.
{% endstep %}

{% step %}
**Paste into your page**

Paste the HTML snippet into your webpage's source code. The embed is responsive and automatically adjusts to fit its container.
{% endstep %}
{% endstepper %}

The embed code produces a responsive iframe with a 16:10 aspect ratio:

```html
<div style="position: relative; padding-bottom: 62.5%; height: 0;">
  <iframe
    src="https://app.screendesk.io/recordings/YOUR-UUID/embed"
    frameborder="0"
    webkitallowfullscreen
    mozallowfullscreen
    allowfullscreen
    style="position: absolute; top: 0; left: 0; width: 100%; height: 100%;">
  </iframe>
</div>
```

Embedded videos include full playback controls and display any call-to-action buttons you've configured. If your account has white-label or custom branding enabled, the embedded player reflects your brand colors.

{% hint style="info" %}
Screendesk also supports the **oEmbed** standard, which means platforms that auto-detect embeds (like Notion, Confluence, or WordPress) can automatically render a rich video preview when you paste a recording URL.
{% endhint %}

#### GIF Preview

Generate an animated GIF from your recording and copy it as a rich link — perfect for email replies, helpdesk messages, or anywhere a lightweight animated preview catches more attention than a plain text link.

{% stepper %}
{% step %}
**Open the Share menu**

Click **Share** on the recording to open the dropdown.
{% endstep %}

{% step %}
**Generate the GIF**

In the **Embed** section, find the **GIF** row. If a GIF hasn't been generated yet, click **Generate GIF**. A progress indicator shows the generation status in real time.
{% endstep %}

{% step %}
**Copy the GIF link**

Once the GIF is ready, click **Copy** next to the GIF row. This copies a **rich HTML snippet** to your clipboard that includes both the animated GIF image and a clickable link back to the full recording.
{% endstep %}
{% endstepper %}

When you paste the copied content into an email or rich text editor, recipients see the animated preview and can click through to watch the full video. The GIF is generated at **960 pixels wide at 15 FPS** with optimized colors for a good balance between quality and file size.

{% hint style="success" %}
**Tip for agents:** GIF previews are especially effective in email replies. Customers are far more likely to click through and watch your video when they can already see an animated preview of what it contains.
{% endhint %}

#### Download

Download the video file directly to your computer.

1. Open the **Share** menu.
2. In the **Embed** section, find the **Video** row and click **Download**.

The download gives you the best available version of the video: the edited version if you've made edits, the processed version if the video was converted, or the original file otherwise.

#### Sharing from Helpdesk Integrations

When you send a recording from a helpdesk platform (Zendesk, Intercom, Freshdesk, HelpScout, or Jira), the share link is automatically posted to the ticket or conversation. Customers receive the link as part of the support thread and can click through to watch the video.

The link posted to helpdesks includes the recording thumbnail in the preview, making it visually clear that a video is attached.

#### Summary

| Method            | Best for                             | What gets copied                               |
| ----------------- | ------------------------------------ | ---------------------------------------------- |
| **Share link**    | Chat, email, helpdesk replies        | Direct URL to the recording playback page      |
| **Website embed** | Help centers, knowledge bases, wikis | Responsive iframe HTML code                    |
| **GIF preview**   | Email replies, rich text messages    | Animated preview image with link to full video |
| **Download**      | Offline use, archiving, re-uploading | MP4 or WebM video file                         |


# Chrome extension

Record with the Chrome extension to draw on screen, highlight clicks, and blur sensitive content.

With the [Chrome extension](https://chromewebstore.google.com/detail/screendesk-screen-recorde/ahlekhjogfceepmgfhpbombbepcgjcao), you can create more advanced video content. You can:

* Highlight content by drawing on the screen and adding arrows or shapes
* Point to content and highlight clicks
* Blur sensitive content

<figure><img src="https://3820804400-files.gitbook.io/~/files/v0/b/gitbook-x-prod.appspot.com/o/spaces%2FfW6XSzJSKsNyZnOkSJPt%2Fuploads%2FOYXU6f9krAbYYcYPPsId%2FScreenshot%202024-09-24%20at%2015.00.46.png?alt=media&#x26;token=f0a83dcd-74d8-4e49-93f2-9bee8172a078" alt=""><figcaption></figcaption></figure>


# Troubleshooting

Solve common issues with the Screendesk Chrome extension by following these steps: restart your device, clear Chrome's cache, reinstall the extension, download troubleshooting data

If you're experiencing issues recording with the Screendesk Chrome extension, the steps below resolve the vast majority of problems. Work through them in order — most issues are fixed within the first three steps.

{% hint style="info" %}
These steps apply to the **Screendesk Chrome extension** specifically. If you're having trouble with the browser-based recorder (accessed via a shared link), see Screen Recording Experience.
{% endhint %}

#### Restart your device

System resource constraints or minor software glitches can prevent the extension from recording properly. A simple restart clears these up.

{% stepper %}
{% step %}
**Save your work**

Save any open documents or in-progress work to prevent data loss.
{% endstep %}

{% step %}
**Restart your computer**

Use your operating system's restart option (not just closing and reopening the lid). On **Windows**, click **Start → Power → Restart**. On **macOS**, click **Apple menu → Restart**.
{% endstep %}

{% step %}
**Test the extension**

Once your device has rebooted, open Chrome and try recording again. If the issue persists, continue to the next step.
{% endstep %}
{% endstepper %}

#### Clear browser cache

A corrupted cache can cause Chrome extensions to malfunction. Clearing it forces Chrome to fetch fresh data.

{% stepper %}
{% step %}
**Open Chrome settings**

Click the **three-dot menu** (⋮) in the top-right corner of Chrome, then select **Settings**.
{% endstep %}

{% step %}
**Navigate to Clear browsing data**

In the left sidebar, click **Privacy and security**, then select **Clear browsing data**.
{% endstep %}

{% step %}
**Select what to clear**

Set the **Time range** to **All time**. Check the box for **Cached images and files**. You do not need to clear cookies or browsing history.
{% endstep %}

{% step %}
**Clear and restart**

Click **Clear data**, then close and reopen Chrome. Test the extension again.
{% endstep %}
{% endstepper %}

{% hint style="warning" %}
Clearing cached images and files will not log you out of websites or delete saved passwords. It only removes temporary files that Chrome has stored locally.
{% endhint %}

#### Reinstall the Chrome extension

An outdated or improperly installed extension can cause recording failures. Reinstalling ensures you have the latest version with a clean installation.

{% stepper %}
{% step %}
**Remove the current extension**

Open Chrome and type `chrome://extensions` into the address bar. Find **Screendesk - Screen Recorder** in the list and click **Remove**. Confirm the removal when prompted.
{% endstep %}

{% step %}
**Install the latest version**

Visit the [Screendesk Chrome Extension](https://chromewebstore.google.com/detail/screendesk-screen-recorde/ahlekhjogfceepmgfhpbombbepcgjcao) page on the Chrome Web Store and click **Add to Chrome**.
{% endstep %}

{% step %}
**Sign in and test**

After installation, click the Screendesk icon in your Chrome toolbar and sign in to your account. Try recording to confirm the issue is resolved.
{% endstep %}
{% endstepper %}

#### Download data for troubleshooting

If you've worked through the steps above and still have issues, the extension can export diagnostic data that helps our support team investigate further.

{% stepper %}
{% step %}
**Open the extension menu**

Click the **Screendesk** icon in the Chrome toolbar to open the extension dropdown.
{% endstep %}

{% step %}
**Download the diagnostic file**

In the dropdown menu, click **Download data for troubleshooting**. Save the file to a convenient location on your computer.

{% hint style="info" %}
The diagnostic file includes system information (operating system, browser version, screen resolution, network speed) and extension state data. It does not include any personal browsing history or passwords.
{% endhint %}
{% endstep %}
{% endstepper %}

#### Contact support

With your diagnostic file ready, reach out to the Screendesk support team for personalized help.

{% stepper %}
{% step %}
**Open a support request**

Send an email to [**support@screendesk.io**](mailto:support@screendesk.io) or use the in-app chat accessible from the help icon in your Screendesk dashboard.
{% endstep %}

{% step %}
**Describe the issue**

Include a clear description of what's happening: what you were trying to do, what you expected, and what actually occurred. Mention which steps from this guide you've already tried.
{% endstep %}

{% step %}
**Attach the diagnostic file**

Attach the troubleshooting data file you downloaded in the previous step. This gives our team the technical details they need to diagnose the issue quickly.
{% endstep %}

{% step %}
**Wait for a response**

Our support team will analyze the data and get back to you with next steps or a resolution.
{% endstep %}
{% endstepper %}

#### Common issues at a glance

| Problem                                       | Likely cause                                    | Quick fix                                                                                           |
| --------------------------------------------- | ----------------------------------------------- | --------------------------------------------------------------------------------------------------- |
| Extension icon is greyed out                  | Extension is disabled or not properly installed | Go to `chrome://extensions` and ensure Screendesk is enabled. If not listed, reinstall it.          |
| "Permission denied" when starting a recording | Chrome blocked screen capture permissions       | When the browser prompt appears, select the screen or window you want to share and click **Allow**. |
| Recording uploads fail                        | Network connectivity issue or expired session   | Check your internet connection. Sign out and back in to refresh your session token.                 |
| Extension doesn't appear in the toolbar       | Extension is installed but hidden               | Click the **puzzle piece** icon (Extensions menu) in the Chrome toolbar and pin Screendesk.         |
| Recording has no audio                        | Microphone wasn't enabled before recording      | Toggle the **microphone** option on before clicking **Start Recording**.                            |
| Poor recording quality or lag                 | System resources are constrained                | Close unnecessary tabs and applications. Restart your device if the issue persists.                 |

#### Related pages

* Screen Recording Experience
* Customize Recorder Options
* Install the Widget


# Start a video call

Start a live video call from your helpdesk to troubleshoot with customers in real time.

Live video calls let support agents connect with customers in real time through video conferencing. This feature is ideal when you need to see what the customer is experiencing as it happens, troubleshoot complex issues together, or provide hands-on guidance through a process.

{% hint style="info" %}
If your workspace is on the Free or Plus plan, you will see an upgrade prompt when attempting to create a live session. Contact your workspace administrator to upgrade your plan.
{% endhint %}

### How live video calls work

When you start a live video call, Screendesk creates a unique video room hosted by Whereby. You receive a host link with full controls, and your customer receives a guest link to join. The session happens in the browser—no downloads or accounts required for either party.

**Key capabilities:**

* **Screen sharing** — Customers can share their screen so you can see exactly what they're seeing
* **Video and audio** — Optional webcam and microphone for face-to-face communication
* **Multi-participant** — Support multiple participants in the same session
* **Recording** — Optionally record the entire session for documentation or training (Pro and Enterprise only)
* **Integrated with helpdesk** — Create sessions directly from Zendesk, Intercom, HubSpot tickets

<figure><img src="/files/3sf7Ab98HDThfJ2axot1" alt=""><figcaption></figcaption></figure>

<figure><img src="/files/dqyVPwo4XBMSNM62ulWa" alt=""><figcaption></figcaption></figure>

### Starting a live video call

The fastest way to start a live video call is from within your helpdesk tool.

{% stepper %}
{% step %}

#### Open the Screendesk sidebar

Navigate to the ticket or conversation in your helpdesk (Zendesk, Intercom, or HubSpot). The Screendesk sidebar loads automatically.
{% endstep %}

{% step %}

#### Click "Live Screen Sharing"

In the sidebar, click the **Live Screen Sharing** button. Screendesk creates a unique video room for this session.

<figure><img src="/files/oLn9i4PWVcR1wxGP5lU4" alt=""><figcaption></figcaption></figure>
{% endstep %}

{% step %}

#### Share the link with your customer

The join link is automatically inserted into the conversation. Your customer clicks the link to join the video room instantly. You receive a separate host link with full meeting controls.
{% endstep %}

{% step %}

#### Join the session

Click your host link to enter the video room. You'll have access to recording controls, participant management, and screen sharing settings.
{% endstep %}
{% endstepper %}

### What customers experience

When a customer clicks the join link you send them:

1. **No installation required** — The video room opens directly in their browser (Chrome, Firefox, Safari, Edge all supported)
2. **Permission prompts** — Browser asks for camera/microphone permissions (they can skip these if they only want to share their screen)
3. **Join the room** — They enter the video call and can immediately see and hear you
4. **Share their screen** — Using the in-call controls, they can share their entire screen, a specific window, or a browser tab
5. **Real-time collaboration** — You both see the same screen in real time with minimal latency

{% hint style="success" %}
**Privacy note:** Customers don't need to create an account or provide personal information to join a video call. The room link expires after 30 days automatically.
{% endhint %}

### During the call

As the host, you have full control over the session:

| Control                  | Description                                           |
| ------------------------ | ----------------------------------------------------- |
| **Start/stop recording** | Begin or end the recording (if enabled by your admin) |
| **Mute audio**           | Turn your microphone on or off                        |
| **Turn off camera**      | Show or hide your webcam video                        |
| **Share your screen**    | Demonstrate solutions on your own screen              |
| **End call**             | Close the session for everyone                        |

### When to use live video calls

Live video calls are most effective in these scenarios:

#### Complex troubleshooting

When a customer describes an issue that's difficult to reproduce or understand through text and screenshots alone, a live session lets you see exactly what's happening in real time.

**Example:** A customer reports that "the submit button doesn't work," but recordings show the button working normally. In a live call, you discover they're clicking a different element that looks like a button but isn't interactive.

#### Guided walkthroughs

When you need to walk a customer through a multi-step process and want to ensure they complete each step correctly.

**Example:** Helping a new user configure advanced settings, import data, or integrate with third-party tools. You can watch them complete each step and provide immediate feedback.

#### Training sessions

When onboarding new customers or teaching them how to use advanced features of your product.

**Example:** Conducting a live product demo for an Enterprise customer, showing them how to set up workflows, configure permissions, and use advanced features.

#### Urgent issues

When a high-priority customer has a business-critical issue that needs immediate resolution.

**Example:** A customer's production system is down. A live call lets you quickly diagnose the issue, guide them through fixes, and verify the resolution immediately.

### Live calls vs. screen recordings

Not sure whether to use a live call or request a screen recording? Here's a quick comparison:

| Feature             | Live video call                           | Screen recording                            |
| ------------------- | ----------------------------------------- | ------------------------------------------- |
| **Timing**          | Real-time, synchronous                    | Asynchronous                                |
| **Best for**        | Complex issues, urgent problems, training | Simple bugs, issue reporting, documentation |
| **Customer effort** | Requires scheduling, presence             | Record and send at convenience              |
| **Agent control**   | Can guide customer in real time           | Watch after recording is submitted          |
| **Recording**       | Optional, saved automatically             | Always saved                                |
| **Privacy**         | More intrusive (requires live presence)   | Less intrusive (record when ready)          |
| **Latency**         | Minimal (live stream)                     | None (pre-recorded)                         |

{% hint style="info" %}
For a detailed comparison and decision guide, see Live screensharing VS co-browsing.
{% endhint %}

<details>

<summary>Technical requirements</summary>

#### For support agents (hosts)

* Modern web browser (Chrome, Firefox, Safari, Edge)
* Stable internet connection (minimum 2 Mbps upload speed)
* Working microphone and webcam (optional but recommended)
* Host link access (automatically provided when you create a session)

#### For customers (guests)

* Modern web browser (Chrome, Firefox, Safari, Edge)
* Stable internet connection (minimum 1 Mbps download speed)
* Microphone and webcam (optional)
* Ability to share screen (browser must support screen sharing API)

#### Browser support

Whereby rooms (which power Screendesk live video calls) are supported on:

* **Chrome** 72+ (recommended)
* **Firefox** 68+
* **Safari** 12.1+
* **Edge** 79+ (Chromium-based)

Mobile browsers have limited support. Desktop browsers provide the best experience.

</details>

### Privacy and security

#### Data handling

* Video streams are end-to-end encrypted using WebRTC
* Room links expire automatically after 30 days
* Only participants with the room link can join
* Recordings (if enabled) are stored in your Screendesk workspace according to your data retention settings

#### Customer consent

When recording is enabled, participants see a clear indicator that the session is being recorded. Your workspace administrator can configure whether recording starts automatically or requires manual action.

<figure><img src="/files/58pLJwHz04XrXh5RdvBL" alt=""><figcaption></figcaption></figure>

{% hint style="warning" %}
**Important:** Check your local regulations regarding recording consent. Some jurisdictions require explicit verbal or written consent before recording conversations. Your workspace administrator should configure recording settings in compliance with applicable laws.
{% endhint %}

<details>

<summary>Troubleshooting</summary>

#### Customer can't join the room

**Possible causes:**

* Room link expired (rooms expire after 30 days)
* Browser doesn't support video calls
* Corporate firewall blocking WebRTC traffic

**Solutions:**

* Create a new room and send a fresh link
* Ask customer to try a different browser (recommend Chrome)
* Ask customer to check with their IT department about WebRTC access

#### Poor video or audio quality

**Possible causes:**

* Slow internet connection
* Network congestion
* Too many browser tabs open

**Solutions:**

* Ask both parties to close unnecessary browser tabs and applications
* Turn off video and use audio only
* If both parties are on slow connections, consider requesting a screen recording instead

#### Screen sharing not working

**Possible causes:**

* Browser permissions denied
* macOS screen recording permission not granted
* Browser doesn't support screen sharing API

**Solutions:**

* Check browser permissions and re-grant screen sharing access
* On macOS: System Preferences → Security & Privacy → Screen Recording → Enable for browser
* Update browser to the latest version
* Try a different browser

#### Recording didn't save

**Possible causes:**

* Recording was never started during the call
* Session was too short (less than a few seconds)
* Recording is still being processed

**Solutions:**

* Check if the recording was started during the call (look for the recording indicator)
* Wait a few minutes—recordings can take time to process after the call ends

</details>


# Customize video calls

See what parts of the video call experience you can customize.

You can customize video calls in two places:

* **Workspace settings** control what guests see and how rooms behave.
* **Personal preferences** control how you join calls as a host.

Use the pages below to pick the right type of customization.

<table data-view="cards"><thead><tr><th>Title</th><th data-card-target data-type="content-ref">Target</th><th data-hidden data-card-cover data-type="image">Cover image</th></tr></thead><tbody><tr><td>Video call settings</td><td><a href="/spaces/fW6XSzJSKsNyZnOkSJPt/pages/1SZoSd6Vz1N2A51vQjwq">/spaces/fW6XSzJSKsNyZnOkSJPt/pages/1SZoSd6Vz1N2A51vQjwq</a></td><td><a href="/files/VUT7IMsac9GQ1RjUe7XL">/files/VUT7IMsac9GQ1RjUe7XL</a></td></tr><tr><td>Personal video call preferences</td><td><a href="/spaces/fW6XSzJSKsNyZnOkSJPt/pages/XTxkbDTtUJLG9xrbHqRt">/spaces/fW6XSzJSKsNyZnOkSJPt/pages/XTxkbDTtUJLG9xrbHqRt</a></td><td><a href="/files/WRTejjNzGdVmE3Q7XyWm">/files/WRTejjNzGdVmE3Q7XyWm</a></td></tr></tbody></table>

### What you can customize

#### Workspace-level settings

Workspace admins can configure:

* Guest join defaults
* In-call interface elements
* Room branding, including logo and background color
* Recording behavior and consent

#### Personal host preferences

Each team member can set:

* Display name
* Join muted
* Join with camera off
* Self view behavior
* Camera effects
* Noise cancellation
* Low data mode

{% hint style="info" %}
Use **Video call settings** for anything shared across the workspace. Use **Personal video call preferences** for your own join defaults.
{% endhint %}


# Video call settings

Configure guest defaults, room UI, branding, and recording behavior for video calls.

The **Settings → Video Call** page is the central place to configure how your live video call rooms behave. Use it to control guest defaults, in-call UI, room branding, and recording behavior.

### Plan availability

Video call settings are available on **Pro** and **Enterprise** plans. The **Recordings** tab is available on all plans.

{% hint style="info" %}
Only workspace administrators can change these settings. Personal host preferences are configured separately in [Personal video call preferences](/video-calls/customize-video-calls/personal-video-call-preferences).
{% endhint %}

***

### Guest Defaults

Guest Defaults control what happens when a guest joins a call — before they're inside the room.

#### Guest joins muted

When enabled, guests enter the call with their microphone muted. They can unmute themselves at any time using the in-call controls. Useful if you want to avoid background noise at the start of a call.

#### Guest joins with camera off

When enabled, guests enter the call with their camera turned off. They can turn it on once they're in the call. Useful for customers who may not be ready to appear on camera right away.

#### Pre-call review

Shows guests a device check screen before they enter the room. They can test their camera, microphone, and speaker and confirm everything is working. This reduces the chance of audio or video issues at the start of the call.

When **Pre-call review** is enabled, two additional options become available:

**Connectivity & device test** — Runs a technical check on the guest's connection quality, not just their devices. Recommended if your customers commonly join from unreliable networks.

**Allow skip pre-call test** — If enabled, guests can choose to skip the pre-call screen and join immediately. If disabled, they must complete the check before proceeding.

#### Pre-call permission help link

If a guest's browser blocks camera or microphone access, Screendesk can display a help link pointing them to a page that explains how to grant permissions. Enter the URL of your help article or documentation page in this field. Leave it blank to disable the link.

{% stepper %}
{% step %}

#### Go to Video Call settings

Navigate to **Settings → Video Call** in your Screendesk workspace.
{% endstep %}

{% step %}

#### Select the Guest Defaults tab

This tab is selected by default when you open the page.
{% endstep %}

{% step %}

#### Enable the options you want

Toggle each setting on or off. Changes save automatically.
{% endstep %}
{% endstepper %}

***

### In-call UI

In-call UI controls which interface elements are visible inside the room. Hiding elements you don't use keeps the call interface cleaner, especially for 1-on-1 support sessions.

| Setting                            | What it hides                                               |
| ---------------------------------- | ----------------------------------------------------------- |
| **Hide people panel button**       | The button that opens the participant list sidebar          |
| **Hide participant count**         | The number shown next to the participant list button        |
| **Hide picture-in-picture button** | The PiP button that pops video into a floating window       |
| **Hide settings button**           | The gear icon that lets participants change device settings |
| **Hide chat**                      | The in-call text chat panel                                 |

{% hint style="info" %}
These settings apply to all guests and hosts joining your rooms. If you use a separate messaging channel for support conversations, hiding the in-call chat avoids confusion about where customers should type.
{% endhint %}

***

### Branding

Use branding settings to make your video rooms look more like your product.

#### Logo

Upload a company logo to show at the top of the video room.

Use a transparent PNG when possible.

**Logo specs:**

* **Supported formats:** PNG, JPEG
* **Maximum file size:** 5 MB
* **Maximum dimensions:** 800 × 500 px
* **Recommended dimensions:** 200 × 100 px

#### Background color

Choose the background color shown behind participant tiles and in empty room areas.

Use a hex color value such as `#404040`.

The default color is `#404040`.

{% hint style="info" %}
Branding settings apply to all new video rooms created by your workspace.
{% endhint %}

***

### Clarity & Guidance

#### Highlight active speaker

When enabled, a visual ring highlights the participant who is currently speaking. This helps guests follow conversations in calls with multiple participants.

#### Participant labels in subgrid

When enabled, participant names appear below their video tiles in the subgrid layout. Useful when you regularly host calls with several participants who may not know each other.

***

### Recordings

The Recordings tab consolidates all recording-related settings for live video calls.

| Setting                       | Description                                                  |
| ----------------------------- | ------------------------------------------------------------ |
| **Enable live recordings**    | Allow video calls to be recorded and saved to your workspace |
| **Auto-start recording**      | Automatically begin recording when the host joins            |
| **Enable live transcription** | Generate a transcript of the call in real time               |
| **Recording consent**         | Show a consent notice to guests before they join             |

#### Recording consent

When recording consent is enabled, guests see a consent modal on the join page before entering the room. The modal shows your logo, an auto-generated notice describing that the call may be recorded, your custom consent message, and a link to your privacy policy.

Guests can click **Accept** to join or **Decline** to exit. Guests who decline are not blocked from the room — they can still join, but the host is notified via an in-call banner and auto-recording stops if it was active.

**To configure recording consent:**

{% stepper %}
{% step %}

#### Open the Recordings tab

Go to **Settings → Video Call** and click the **Recordings** tab.
{% endstep %}

{% step %}

#### Enable the Recording consent toggle

Turn the toggle on. A live preview card appears showing what guests will see.
{% endstep %}

{% step %}

#### Customize the consent text

Enter your consent message in the text field. For example: "This call may be recorded for quality and training purposes."
{% endstep %}

{% step %}

#### Add a privacy policy link (optional)

Fill in **Link text** (for example, "Privacy Policy") and the **URL** pointing to your privacy policy. The link appears inside the consent card on the join page.
{% endstep %}

{% step %}

#### Add translations (optional)

If your workspace serves customers in multiple languages, locale tabs appear at the top of the preview. Switch to a locale tab and enter a translated consent message and link text for that language. Guests whose browser locale matches will see the translated version automatically.
{% endstep %}

{% step %}

#### Save

Click **Save**. The consent modal is now active for all guests joining your video rooms.
{% endstep %}
{% endstepper %}


# Personal video call preferences

Configure your own default host experience for live video calls.

**Profile → Video Call** lets each team member set their own default behavior when joining a call as a host. These preferences only affect your account. They do not change guest behavior or workspace-wide call settings.

### Open your preferences

{% stepper %}
{% step %}

#### Open Profile Settings

Click your avatar in the top-right, then select **Profile Settings**.
{% endstep %}

{% step %}

#### Select Video Call

Open **Video Call** in the left sidebar.
{% endstep %}
{% endstepper %}

***

### Available preferences

#### Display name

Sets the name other participants see when you join a call.

Leave it blank to use your account name.

#### Join muted

Joins calls with your microphone muted by default.

You can unmute at any time.

#### Join with camera off

Joins calls with your camera turned off by default.

You can turn it on after joining.

#### Float self view

Shows your own camera as a small floating overlay instead of a tile in the main grid.

Use it to keep more space for other participants.

#### Auto-hide self view

Hides the floating self view after a few seconds of inactivity.

Move your mouse to show it again.

This option requires **Float self view**.

#### Low data mode

Reduces bandwidth usage for your video stream.

Use it on slow or metered connections.

Video quality may be lower.

#### Default camera effect

Sets the camera effect applied when you join a call.

For example, you can default to background blur.

You can still change the effect during the call.

***

{% hint style="info" %}
These settings only affect your own host experience. Workspace defaults for guests and room behavior are managed in [Video call settings](/video-calls/customize-video-calls/video-call-settings).
{% endhint %}


# Participant insights

View technical details for each guest after a live video call to troubleshoot connection and compatibility issues.

After a live video call, Screendesk automatically fetches technical details about each guest who joined the session. This data appears in the **Insights** tab on the recording page and helps you understand the context of a support call — especially when troubleshooting connection or compatibility issues.

### Plan availability

Participant insights are available on **Pro** and **Enterprise** plans.

***

### What's captured

<figure><img src="/files/rzYAzOX1nKmvTv3J3c9E" alt=""><figcaption></figcaption></figure>

For each guest participant, Screendesk collects:

| Field                 | Description                                      |
| --------------------- | ------------------------------------------------ |
| **Display name**      | The name the participant used in the call        |
| **Join / leave time** | When they entered and left the room              |
| **Operating system**  | OS name and version, with a platform icon        |
| **Browser**           | Browser name, with a browser icon                |
| **Device**            | Device model if available                        |
| **Device type**       | Desktop, mobile, or tablet                       |
| **Screen resolution** | The guest's screen dimensions                    |
| **Window size**       | The size of their browser window during the call |
| **Timezone**          | The guest's timezone                             |
| **Locale**            | The guest's browser locale (e.g., en-US, fr-FR)  |
| **IP address**        | The IP address the guest connected from          |
| **ISP**               | Internet service provider                        |
| **Location**          | City, region, and country                        |
| **VPN**               | Whether the guest appears to be using a VPN      |

{% hint style="info" %}
Host and recorder participants are excluded from the Insights tab. Only guest participants are shown.
{% endhint %}

***

### Viewing insights

{% stepper %}
{% step %}

#### Open a live recording

Go to **Live** in the left sidebar and click on any completed call recording.
{% endstep %}

{% step %}

#### Click the Insights tab

The Insights tab appears next to the Details and Transcript tabs in the recording sidebar.
{% endstep %}

{% step %}

#### Review participant cards

Each guest appears as a card. Expand the card to see all available details. Fields that weren't captured (for example, if a guest joined from a browser that doesn't report device type) are omitted.
{% endstep %}
{% endstepper %}

***

### When data becomes available

Participant insights are fetched automatically after the call ends. This usually takes a few minutes. If you open the Insights tab immediately after a call, the data may not yet be available — refresh the page after a short wait.


# Triggers to record a video call

Record live screensharing sessions, choose when recording starts, and find replays in your dashboard.

Before the recording starts, participants will be asked to provide consent with the following message:

<figure><img src="/files/OqRE8zQ33OlLXEEG5jju" alt="" width="375"><figcaption></figcaption></figure>

Screendesk can automatically record your live video call sessions, capturing both video and audio. Recordings are processed and stored in your workspace, where they can be reviewed, shared, and used for training or documentation purposes.

{% hint style="info" %}
**Plan availability:** Live session recording is available on **Pro** and **Enterprise** plans. Trial accounts also have access during the trial period.

Your workspace administrator controls whether recording is enabled and how recordings are triggered. If you don't see recording options in your live sessions, ask your admin to enable this feature in **Account Settings → Live Screensharing**.
{% endhint %}

### How recording works

When recording is enabled for your workspace, Screendesk captures the entire video call—including screen shares, participant video, and audio—and saves it as an MP4 file. After the call ends, the recording is automatically processed and added to your workspace.

#### What gets recorded

* **Screen sharing** — Any screens shared by participants during the call
* **Participant video** — Webcam feeds from all participants (if cameras are enabled)
* **Audio** — All audio from the call, including voices and system sounds
* **Timestamp** — The date and time the call started and ended

#### What doesn't get recorded

* **Chat messages** — Text chat within the video room is not captured
* **Private moments** — Recording only captures what happens while recording is active
* **Individual participant tracking** — The recording shows the active speaker view, not separate streams per participant

### Recording trigger options

Your workspace administrator configures how recordings start. There are four options:

#### Manual start (recommended for privacy)

The host must manually click the "Start Recording" button during the call. This gives you full control over when recording begins and ends.

**When to use:**

* You want maximum privacy control
* You need to explain recording consent to the customer first
* Not every session needs to be recorded

**How it works:**

1. Join the video call as the host
2. Wait for the customer to join
3. Inform the customer that you'll be recording
4. Click the "Start Recording" button in the video room controls
5. A recording indicator appears for all participants
6. Click "Stop Recording" when finished, or the recording stops automatically when the call ends

#### Prompt on first participant

When the first participant with permission joins the call, they see a prompt asking if they want to start recording.

**When to use:**

* You want recordings for most sessions but want to confirm each time
* You want a reminder to start recording without it being automatic

**How it works:**

1. The first host to join sees a dialog: "Start recording this session?"
2. Click "Start" to begin recording immediately
3. Click "Cancel" to skip recording for this session
4. The recording can still be started manually later if needed

#### Automatic on first participant

Recording starts automatically as soon as the first participant joins the room.

**When to use:**

* You need to record every session for compliance or quality assurance
* You don't want to risk forgetting to start recording
* You've already informed customers in advance that sessions will be recorded

**How it works:**

1. The host joins the video room
2. Recording starts automatically
3. A recording indicator appears immediately
4. The customer sees the recording indicator when they join

{% hint style="warning" %}
**Legal notice:** In many jurisdictions, you must inform participants before recording begins. Automatic recording may not comply with consent laws in your region. Consult with your legal team before enabling automatic recording.
{% endhint %}

#### Automatic on second participant

Recording starts automatically when the second participant joins (i.e., when the customer joins after the host).

**When to use:**

* You want to avoid recording empty rooms
* You want automatic recording but only when both parties are present

**How it works:**

1. The host joins the video room (no recording yet)
2. The customer joins
3. Recording starts automatically as soon as the second person enters
4. Both participants see the recording indicator

### Managing recordings after the call

Once the call ends, the recording is processed and uploaded to your Screendesk workspace automatically.

#### Where recordings appear

Recordings from live video calls are stored in your workspace with the following properties:

* **Source type:** Live Recordings (`source: lsc`)
* **Linked to ticket:** If the session was started from a helpdesk integration, the recording is automatically linked to that ticket or conversation
* **Customer email:** If available from the helpdesk integration, the customer's email is attached to the recording
* **Default folder:** Live recordings can be auto-routed to specific folders using Recording Triage rules

#### Processing time

After the call ends, the recording is uploaded to cloud storage and processed. This typically takes:

* **Short calls (< 5 minutes):** 1-2 minutes
* **Medium calls (5-20 minutes):** 2-5 minutes
* **Long calls (> 20 minutes):** 5-15 minutes

Processing includes:

* Uploading the MP4 file from the video room to your Screendesk storage
* Generating HLS streaming segments for videos longer than 1 minute
* Extracting video metadata (duration, resolution, file size)
* Creating thumbnail preview images

{% hint style="info" %}
Very short recordings (less than a few seconds) may not be saved. If a participant immediately leaves after joining, the recording may not process successfully.
{% endhint %}

### Viewing and sharing live recordings

Live recordings work just like other recordings in your workspace:

* View them from the **Recordings** page
* Filter by source type "Live Recordings"
* Share them via link with customers or team members
* Add them to folders for organization
* Apply labels and assign team members
* Include them in helpdesk ticket responses

#### Access control

By default, live recordings follow your workspace's recording visibility settings. Your administrator can configure whether live recordings are:

* **Anyone with link** (default) — Anyone who has the link can view the recording
* **Workspace members only** — Only team members in your workspace can view

This setting is separate from the recording visibility for customer-submitted recordings.

### Recording indicators for participants

When recording is active, all participants see a clear indicator. This ensures transparency and complies with consent requirements.

**What participants see:**

* A red recording indicator icon in the video room interface
* The word "Recording" or a red dot in the video controls
* In some video room interfaces, a persistent banner message

**When the indicator appears:**

* Immediately when recording starts (manual or automatic)
* Remains visible throughout the entire recording
* Disappears when recording stops

### Recording storage and retention

Recordings are stored according to your workspace's storage location setting:

* **America** — Stored in AWS S3 (US East region)
* **Europe** — Stored in AWS S3 (EU region)

#### Data retention

Live recordings follow your workspace's data retention policy:

* If automatic deletion is enabled, recordings are deleted after the configured period
* Administrators can configure separate retention periods for live recordings vs. received recordings
* Deleted recordings cannot be recovered

To configure retention settings, go to **Account Settings → Security → Data Retention**.

### Disabling or enabling recording

Only workspace administrators can change recording settings.

To enable or disable live session recording:

{% stepper %}
{% step %}

#### Navigate to settings

Go to **Account Settings → Live Screensharing** (requires Admin role).

<figure><img src="/files/36Qqrn7WIXd3EgP9RMtw" alt=""><figcaption></figcaption></figure>
{% endstep %}

{% step %}

#### Toggle recording

Find the **Enable recordings for live screensharing** toggle. Turn it on or off.

* **On** — Live sessions will be recorded according to the start trigger setting
* **Off** — No recordings will be created for live sessions
  {% endstep %}

{% step %}

#### Choose start trigger

Select one of the four recording start triggers:

* Manual (host starts)
* Prompt (asks host on join)
* Automatic (starts on first participant)
* Automatic on second participant (starts when customer joins)

<figure><img src="/files/ibwbAoG2vaLZNvXZLbwV" alt=""><figcaption></figcaption></figure>
{% endstep %}

{% step %}

#### Save changes

Click **Save** to apply the new settings. Changes take effect immediately for all new live sessions.
{% endstep %}
{% endstepper %}

{% hint style="warning" %}
If you disable recording after it was previously enabled, any recordings that were already created will remain in your workspace. Only new sessions will be unrecorded. To delete existing recordings, you must manually delete them from the **Recordings** page.
{% endhint %}

### Recording consent best practices

To ensure compliance with recording consent laws and build customer trust:

#### Before the call

* **Set expectations in your email or chat message:** "This call may be recorded for quality assurance."
* **Include recording policy in your help center:** Explain when and why you record sessions.
* **Use manual recording trigger:** This gives you time to ask for consent verbally before starting.

#### During the call

* **Ask for verbal consent:** "I'd like to record this session for documentation purposes. Is that okay with you?"
* **Explain the purpose:** "The recording will help us document the solution and improve our support process."
* **Point out the recording indicator:** "You'll see a recording indicator appear in a moment."

#### After the call

* **Inform the customer where they can access the recording:** Provide a link if the recording will be shared.
* **Explain retention:** Let them know how long the recording will be kept.

{% hint style="info" %}
**Regulatory compliance:** Recording consent laws vary by country and region. Some jurisdictions require "all-party consent" (everyone must agree), while others only require "one-party consent" (only one participant needs to agree). Consult with your legal team to ensure your recording practices comply with local laws.
{% endhint %}

<details>

<summary>Troubleshooting</summary>

#### Recording didn't appear after the call

**Possible causes:**

* Recording was never started during the session
* The call was too short (less than a few seconds)
* Recording is still being processed (wait a few minutes)
* A technical error occurred during upload

**Solutions:**

1. Check the **Recordings** page and filter by "Live Recordings"
2. Wait 5-10 minutes for processing to complete
3. Check with your administrator that recording is enabled
4. If the recording still doesn't appear after 15 minutes, contact Screendesk support

#### Recording quality is poor

**Possible causes:**

* Participants had slow internet connections during the call
* Significant network packet loss
* Low-resolution screen sharing

**Solutions:**

* Ensure all participants have stable internet (minimum 2 Mbps)
* Close unnecessary applications during calls
* Ask participants to share at a higher resolution
* Consider shorter sessions if bandwidth is limited

#### Can't find the "Start Recording" button

**Possible causes:**

* Recording is disabled by your workspace administrator
* Your plan doesn't include live recording
* You're not the host (only hosts can control recording)

**Solutions:**

* Check with your administrator that recording is enabled
* Verify your workspace is on Pro or Enterprise plan
* Ensure you're joining via the host link, not the guest link

#### Recording stopped unexpectedly

**Possible causes:**

* Host left the call
* Network connection was lost
* Maximum recording duration was reached

**Solutions:**

* The partial recording up to the disconnection point should still be saved
* Check the **Recordings** page to see if a partial recording was created
* If the host needs to leave mid-call, another participant with host permissions should join first

</details>


# Video call vs. co-browsing

Same Objective, Different Approaches - Comparing the Technical Solutions for Real-time Customer Support

When supporting customers in real time, you have multiple tools at your disposal. Understanding the differences between live video calls with screen sharing and co-browsing helps you choose the right approach for each situation—and explains why live screensharing is often the less intrusive, more customer-friendly option.

### What is live screensharing?

**Live screensharing** (via Screendesk's live video calls) allows customers to voluntarily share their screen with you in a video call. You can see exactly what they see, but you cannot control their mouse or keyboard. The customer retains full control of their device at all times.

**How it works:**

1. You send the customer a video room link
2. Customer joins the call in their browser
3. Customer clicks "Share Screen" and chooses what to share (entire screen, window, or tab)
4. You see their screen in real time, but cannot interact with it
5. Customer can stop sharing at any time

### What is co-browsing?

**Co-browsing** (also called collaborative browsing) allows support agents to view and directly interact with a customer's browser session. In most co-browsing tools, the agent can move the customer's mouse, click buttons, fill forms, and navigate the website on behalf of the customer.

**How it works:**

1. Customer starts a co-browsing session from your website
2. Agent joins the session and sees the customer's browser
3. Agent can control the mouse cursor and click elements (depending on permissions)
4. Both parties see the same view synchronized in real time
5. Customer or agent can end the session

{% hint style="info" %}
Screendesk focuses on live video calls with screen sharing rather than traditional co-browsing. This design choice prioritizes customer privacy and control while still enabling effective real-time support.
{% endhint %}

### Key differences

| Feature                    | Live screensharing (Screendesk)            | Co-browsing                           |
| -------------------------- | ------------------------------------------ | ------------------------------------- |
| **Control**                | Customer has full control                  | Agent can control customer's browser  |
| **What's shared**          | Entire screen, window, or tab              | Only the specific website/web app     |
| **Scope**                  | Any application or desktop                 | Limited to browser sessions           |
| **Privacy**                | Customer chooses what to share             | Everything on the page is visible     |
| **Installation**           | No installation (browser-based)            | No installation (browser-based)       |
| **Use case**               | Any troubleshooting, training              | Web app support only                  |
| **Customer comfort**       | Less intrusive, more control               | More intrusive, less control          |
| **Masking sensitive data** | Customer can avoid showing sensitive areas | Requires technical data masking setup |

### Why live screensharing is less intrusive

#### 1. Customer retains full control

**Live screensharing:**

* Customer controls their own mouse and keyboard at all times
* Agent provides verbal guidance: "Click the Settings button in the top-right"
* Customer executes actions themselves with agent guidance

**Co-browsing:**

* Agent can take control of the customer's mouse cursor
* Agent clicks, types, and navigates on behalf of the customer
* Customer may feel like they've "given up" control of their device

**Customer perspective:** Most customers are more comfortable when they maintain control of their own device. Live screensharing feels like showing someone your screen, while co-browsing can feel like someone else is operating your computer remotely.

#### 2. Customer chooses what to share

**Live screensharing:**

* Customer explicitly selects what to share (entire screen, specific window, or browser tab)
* Browser shows a picker: "What would you like to share?"
* Customer can switch what they're sharing or stop sharing at any time

**Co-browsing:**

* Everything on the webpage is automatically visible to the agent
* Customer cannot selectively hide parts of the page
* All form fields, account details, and on-page content are shared

**Customer perspective:** Customers appreciate having granular control over what you can see. If they have sensitive information in other windows or tabs, they can choose to share only the relevant window.

#### 3. Clear visual boundaries

**Live screensharing:**

* Customer sees a persistent indicator showing that sharing is active
* Browser displays a banner: "You are sharing your screen"
* Stopping sharing is always one click away

**Co-browsing:**

* Indicators may be less prominent or embedded in the page
* Customer may not notice when co-browsing is active
* Ending the session may require navigating to a specific control

**Customer perspective:** Clear, persistent indicators reduce anxiety. Customers feel safer when they can always see that sharing is happening and can stop it instantly.

#### 4. No remote control concerns

**Live screensharing:**

* Agent cannot click, type, or interact with the customer's screen
* Customer never worries about accidental or unauthorized actions
* The worst-case scenario is the agent sees something the customer didn't mean to show

**Co-browsing:**

* Agent has the ability to interact with the page
* Customer may worry: "What if the agent clicks the wrong thing?"
* Customers may be uncomfortable with someone else filling out forms or navigating their account

**Customer perspective:** Even when co-browsing has permission controls, the mere fact that remote control is possible creates anxiety. Live screensharing removes this concern entirely.

### When to use each approach

#### Use live video calls with screen sharing for:

✅ **Troubleshooting issues in desktop applications**

* Customer has a problem with software installed on their computer
* You need to see settings, dialog boxes, or menus outside the browser

✅ **Training and onboarding sessions**

* Walking customers through complex multi-step processes
* Teaching customers how to use features or configure settings
* Customer appreciates maintaining control while learning

✅ **Issues that span multiple applications**

* Customer needs to copy data from one app and paste into another
* Troubleshooting involves checking system settings, file explorer, or other programs

✅ **High-security or privacy-sensitive situations**

* Customer is uncomfortable with remote control
* Customer is working with sensitive personal or financial information
* Customer prefers to execute actions themselves with your guidance

✅ **General-purpose customer support**

* Default choice for most customer support scenarios
* Works for both web apps and desktop software
* Customer feels more in control and comfortable

#### Use co-browsing for:

✅ **Web application support only**

* Issue is entirely contained within your web application
* Customer is specifically having trouble navigating your website

✅ **High-volume, transactional support**

* Very quick issues where walking customers through steps is slower
* Example: "I'll reset this setting for you in two seconds"

✅ **Customers explicitly request help**

* Customer says: "Can you just do it for me?"
* Customer is frustrated and wants the agent to take over

✅ **Form filling assistance**

* Customer needs help filling out a complex form
* Agent can guide and fill fields more efficiently than verbal instructions

{% hint style="warning" %}
**Important:** Co-browsing tools require careful privacy configuration to mask sensitive data like credit card numbers, passwords, and personal information. Live screensharing leaves this control in the customer's hands—they simply avoid showing sensitive windows or fields.
{% endhint %}

### Decision flowchart

```
Is the issue in a web browser?
│
├─ No → Use live screensharing
│
└─ Yes
   │
   Is the customer comfortable with remote control?
   │
   ├─ No → Use live screensharing
   │
   └─ Yes
      │
      Does the customer want to maintain control?
      │
      ├─ Yes → Use live screensharing
      │
      └─ No
         │
         Is the issue quick and transactional?
         │
         ├─ Yes → Co-browsing may be appropriate
         │
         └─ No → Use live screensharing (better for complex issues)
```

**Rule of thumb:** When in doubt, use live screensharing. It's less intrusive, more versatile, and customers are generally more comfortable with it.

### Hybrid approach: Guided screensharing

The best of both worlds is **guided screensharing**, where the agent uses live video calls to see the customer's screen and provides clear, step-by-step verbal guidance:

**Agent:** "I can see your screen now. Let's fix this together. Can you click the Settings icon in the top-right corner?"

**Customer:** \[Clicks Settings]

**Agent:** "Perfect. Now scroll down to the Privacy section."

**Customer:** \[Scrolls down]

**Agent:** "Great. Do you see the checkbox that says 'Enable notifications'? Let's uncheck that."

This approach combines the visibility of co-browsing with the customer control of live screensharing. The customer feels guided and supported without feeling like they've given up control.

### Privacy and trust considerations

#### Building customer trust

Customers are more likely to trust and engage with support when they feel in control:

* **Live screensharing signals:** "We respect your autonomy and privacy"
* **Co-browsing signals:** "We need access to your account to help you" (which may raise concerns)

#### Reducing privacy risks

**Live screensharing:**

* Customer can avoid showing password managers, other tabs, or desktop files
* Customer can cover or minimize windows with sensitive content
* If something sensitive appears, customer can immediately stop sharing

**Co-browsing:**

* All content on the page is automatically visible
* Customer cannot selectively hide parts of the page
* Privacy depends on proper technical masking configuration

#### Compliance and regulations

**Live screensharing:**

* Customer explicitly grants permission each time by clicking "Share Screen"
* Clear consent mechanism built into the browser
* Easy to demonstrate compliance with privacy regulations

**Co-browsing:**

* Requires explicit consent mechanisms built into your website
* Must properly mask PII, payment information, and sensitive fields
* More complex compliance considerations for GDPR, CCPA, etc.

### What customers prefer

Research and customer feedback consistently show:

1. **Customers prefer maintaining control** — 78% of customers report feeling more comfortable when they control their own mouse and keyboard during support sessions
2. **Clear sharing indicators reduce anxiety** — Persistent browser indicators (like Chrome's "You are sharing your screen" banner) make customers feel safer
3. **Choice matters** — Customers appreciate being able to choose what window or tab to share

**Common customer concerns with co-browsing:**

* "What if the agent accidentally clicks something I didn't want them to?"
* "Can they see my other tabs?"
* "What if they access something they shouldn't?"

**Customers rarely express these concerns with live screensharing** because they maintain full control.

### Best practices for live screensharing

To maximize the benefits of live screensharing while minimizing any potential intrusiveness:

#### Before the call

* **Set expectations:** "I'll be able to see your screen, but you'll be in full control. I'll guide you through the steps."
* **Explain what to share:** "When you join, I'll ask you to share your screen. You can choose to share just the browser tab or your entire screen."

#### During the call

* **Give clear, specific instructions:** Instead of "Click over there," say "Click the blue Submit button in the bottom-right corner"
* **Be patient:** Remember the customer is executing actions, not you—give them time
* **Acknowledge their control:** "Go ahead and close that window when you're ready"

#### After the call

* **Confirm sharing has stopped:** "You can stop sharing your screen now. Thanks for walking through this with me!"
* **Document what was shared:** If recording, explain what will be saved

### Related topics

* Live video calls — Overview of Screendesk's live video call feature
* Recording live sessions — How live call recordings work
* Access videos from helpdesk — Start live sessions from tickets
* Privacy and security — How Screendesk protects customer privacy


# Adding video to the library

Add and remove recordings in the Video Library, and control who can manage shared videos.

The Video Library is a shared collection of reusable recordings that your entire team can access and send to customers directly from the dashboard or from within your helpdesk tool. Any recording in Screendesk can be added to the library, making it easy to build a catalog of how-to videos, troubleshooting walkthroughs, or product demos.

<figure><img src="/files/BAVyrC3aW59DhGxl6sVJ" alt=""><figcaption></figcaption></figure>

### Who can manage the library

Only **Admins** and **Editors** can add or remove videos from the library. Members can browse and use library videos, but cannot change which recordings appear there.

{% hint style="info" %}
Videos that were uploaded directly (using the **Upload Video** button) are automatically added to the library. The add and remove actions described below apply to recordings created through screen recording, helpdesk integrations, or the Chrome extension.
{% endhint %}

### Add a recording to the library

You can add a recording to the library from two places: the dashboard and the individual recording page.

{% tabs %}
{% tab title="From the dashboard" %}
{% stepper %}
{% step %}

#### Find the recording

Navigate to your dashboard and locate the recording you want to add. You can use the **Received**, **Sent**, or **Live** filter tabs to narrow down your list, or search by title.
{% endstep %}

{% step %}

#### Open the recording menu

Hover over the recording card and click the **three-dot menu** icon that appears in the top-right area of the card.

<div align="left"><figure><img src="/files/B5iWKYRq75gBKWSkqo8b" alt="" width="297"><figcaption></figcaption></figure></div>
{% endstep %}

{% step %}

#### Select "Add to library"

Click **Add to library** from the dropdown menu. The recording will be moved to the library immediately, and a confirmation message will appear: *"Video was successfully added to library."*
{% endstep %}
{% endstepper %}
{% endtab %}

{% tab title="From the recording page" %}
{% stepper %}
{% step %}

#### Open the recording

Click on any recording to open its detail page.
{% endstep %}

{% step %}

#### Click the library icon

In the header area of the recording page, click the **Add to Library** button (a video icon with a gray border). A tooltip reading "Add to Library" will appear when you hover over it.

<figure><img src="/files/4mmToo3d2rCRMoF851L0" alt=""><figcaption></figcaption></figure>
{% endstep %}

{% step %}

#### Confirm the change

The button style will change to a rose-colored background, indicating the recording is now in the library. A confirmation message will appear: *"Video was successfully added to library."*
{% endstep %}
{% endstepper %}
{% endtab %}
{% endtabs %}

{% hint style="warning" %}
When a recording is added to the library, it is automatically removed from any folder it was previously in. Library videos are managed separately from folder-based organization.
{% endhint %}

### Remove a recording from the library

{% tabs %}
{% tab title="From the library view" %}
{% stepper %}
{% step %}

#### Go to the Library tab

On the dashboard, click the **Library** filter tab to see all library recordings.
{% endstep %}

{% step %}

#### Open the recording menu

Hover over the recording card and click the **three-dot menu** icon.
{% endstep %}

{% step %}

#### Select "Remove from library"

Click **Remove from library**. The recording will be removed from the library view, and a confirmation message will appear: *"Video was successfully removed from library."*

<div align="left"><figure><img src="/files/cFDD09agiD1F1w64Ahq6" alt="" width="318"><figcaption></figcaption></figure></div>
{% endstep %}
{% endstepper %}
{% endtab %}

{% tab title="From the recording page" %}
Open the recording and click the **Remove from Library** button in the header (displayed with a rose-colored background when the recording is currently in the library). The button will revert to a gray style, confirming the recording has been removed.
{% endtab %}
{% endtabs %}

### Browse the library

To view all library videos, click the **Library** tab on the dashboard filter bar. The filter tabs — **Received**, **Sent**, **Live**, and **Library** — appear at the top of your recordings list.

The library view displays each recording as a card showing the video thumbnail, duration, view count, title, and creation date. You can further refine what you see using:

* **Search** — filter by recording title
* **Labels** — filter by any labels assigned to the recording
* **Date range** — filter by when the recording was created
* **Users** — filter by who created the recording

### What happens after adding to the library

Once a recording is in the library, your team can:

* **Send it from the helpdesk sidebar** — Agents using Zendesk, Intercom, or Freshdesk can search the library and share videos directly within a conversation. See Access videos from helpdesk for details.
* **Search it by title or tags** — The library is searchable from both the dashboard and helpdesk integrations. In the helpdesk sidebar, agents can type `#tagname` to filter by tags.
* **Share it via link** — Each library video has a shareable URL that can be copied and sent anywhere.

{% hint style="info" %}
The library count is displayed next to the page heading when viewing the Library tab (e.g., *"12 recordings"*), so you always know how many reusable videos your team has available.
{% endhint %}


# Upload videos to workspace

Upload pre-recorded videos to your workspace and auto-add them to the Video Library for easy sharing.

Screendesk lets you upload pre-recorded video files directly to your workspace. Uploaded videos are automatically added to your Video Library, making them immediately available for your team to share with customers through helpdesk integrations or via link.

This is useful for building a library of product walkthroughs, training content, onboarding guides, or canned video responses that agents can send repeatedly.

### Requirements

Before uploading, make sure the following conditions are met:

| Requirement     | Details                                                                                    |
| --------------- | ------------------------------------------------------------------------------------------ |
| **Role**        | You must be an **Admin** or **Editor**. Members and watch-only users cannot upload videos. |
| **File format** | MP4, WebM, or QuickTime (MOV)                                                              |
| **File size**   | Up to **50 MB** per file                                                                   |

{% hint style="info" %}
The Upload Video button is only visible to Admins and Editors. If you don't see it on your dashboard, check your role with your workspace administrator.
{% endhint %}

### How to upload a video

{% stepper %}
{% step %}

#### Open the upload modal

Click the **Upload Video** button at the top of your dashboard. A modal window titled "Upload Videos" will appear.

<figure><img src="/files/8mga0CRxeQETb61MZubw" alt=""><figcaption></figcaption></figure>
{% endstep %}

{% step %}

#### Select your files

You have two options:

* **Click "Choose files"** to open a file picker and select one or more video files from your computer.
* **Drag and drop** video files directly into the dashed upload area.

You can select multiple files at once. MP4, WebM, and QuickTime (MOV) files up to 50 MB each are accepted.

<figure><img src="/files/6vYmYgFVzOwBZDw0QNZj" alt=""><figcaption></figcaption></figure>
{% endstep %}

{% step %}

#### Monitor the upload progress

Each file displays a progress bar showing the upload status in real time. You will see the file name, size, and a percentage indicator as the upload proceeds.

* **Rose-colored bar** — upload in progress
* **Green bar** — upload complete
* **Red bar** — upload failed

If you need to start over, click **Clear All** to remove all selected files from the queue.
{% endstep %}

{% step %}

#### Complete the upload

Click the **Upload Videos** button to start uploading. Once all files finish uploading, you will see a "Upload complete!" confirmation, and the modal will close. Your videos will appear in the **Library** tab on the dashboard.
{% endstep %}
{% endstepper %}

### What happens after upload

Once a video is uploaded, Screendesk processes it automatically in the background. Here's what takes place:

| Step                     | What happens                                                                                                                       | Timing                         |
| ------------------------ | ---------------------------------------------------------------------------------------------------------------------------------- | ------------------------------ |
| **Storage**              | The video file is stored securely on AWS S3, in either the US or EU region depending on your workspace's storage location setting. | Immediate                      |
| **Duration extraction**  | The video duration is detected and displayed on the recording card.                                                                | Starts after a 30-second delay |
| **Transcription**        | If your plan includes transcription, the audio is automatically transcribed and a text summary is generated.                       | A few minutes                  |
| **Thumbnail generation** | A preview thumbnail image is created from the video.                                                                               | A few minutes                  |
| **GIF preview**          | An animated GIF preview is generated for use in embeds and sharing.                                                                | A few minutes                  |
| **Video conversion**     | The video is converted to an optimized MP4 format for faster playback.                                                             | A few minutes                  |

{% hint style="info" %}
You don't need to wait for processing to finish. The video appears in your library immediately after upload and can be shared right away. Processing happens in the background.
{% endhint %}

### Uploaded videos in the library

All uploaded videos are automatically marked as library videos. This means:

* They appear under the **Library** filter tab on the dashboard.
* They are available in the **Send from Library** option inside helpdesk integrations (Zendesk, Intercom, Freshdesk).
* They can be searched by title from both the dashboard and helpdesk sidebars.

Unlike recordings captured through the browser or helpdesk integrations, uploaded videos cannot be toggled in and out of the library — they always remain in the library.

### Managing uploaded videos

From the dashboard's Library view, you can manage your uploaded videos using the **three-dot menu** on each recording card:

* **Rename** — change the video title to something your team can easily find.
* **Download Video** — download the processed or original file.
* **Delete** — permanently remove the video from your workspace.

You can also open any uploaded video to view its detail page, where you can edit the title and description, view the transcript (if available), and copy the share link.

{% hint style="warning" %}
Deleting a video is permanent and cannot be undone. Make sure the video is no longer needed before removing it.
{% endhint %}

### Sharing uploaded videos

Each uploaded video has a unique shareable link. You can copy it by hovering over a recording card and clicking the **link icon** that appears, or by using the **Share** options on the recording detail page.

Share options include:

* **Copy link** — a direct URL to the video player page.
* **Embed code** — an iframe snippet for embedding the video on a website.
* **GIF** — a link to the animated GIF preview (once generated).
* **Download** — a direct download link for the video file.


# Share videos from helpdesk

Use Screendesk in your helpdesk to request recordings, send videos, share from the library, and start live sessions.

### Supported helpdesk platforms

Screendesk provides in-app integrations for the following platforms:

| Platform         | Integration type         | Key capabilities                                                          |
| ---------------- | ------------------------ | ------------------------------------------------------------------------- |
| **Zendesk**      | Ticket sidebar           | Request recording, send recording, send from library, live screen sharing |
| **Intercom**     | Conversation sidebar     | Request recording, send recording, send from library, live screen sharing |
| **Freshdesk**    | Portal embed + API       | Request recording from customers via portal form                          |
| **Freshservice** | Ticket integration       | Request and receive recordings linked to tickets                          |
| **HubSpot**      | Sidebar widget           | Request recording, search library, link recordings to contacts            |
| **HelpScout**    | Conversation integration | Send and receive recordings linked to conversations                       |

{% hint style="info" %}
Your workspace administrator sets up the helpdesk integration. If you don't see Screendesk in your helpdesk tool, ask your admin to enable it from the Screendesk **Integrations** settings page.
{% endhint %}

### Using the helpdesk sidebar

Zendesk, Intercom, and HubSpot display a Screendesk sidebar panel directly within the ticket or conversation view. The sidebar gives you quick access to the following actions.

<figure><img src="/files/EO6z4OtlM1N319VQjA9P" alt=""><figcaption></figcaption></figure>

#### Send a video from the library

Use this to share a pre-made video — such as a how-to guide or FAQ walkthrough — without recording a new one.

{% stepper %}
{% step %}

#### Click "Send from Library"

In the Screendesk sidebar, click **Send from Library** (shown with a library icon). The sidebar expands to display the library search view.
{% endstep %}

{% step %}

#### Search for the right video

Type a video title in the search bar to find a specific recording. You can also search by tag using the `#tagname` syntax (e.g., `#onboarding` or `#billing`).

The search results show a list of matching library videos with their thumbnail, title, and creation date.
{% endstep %}

{% step %}

#### Share the video

Click **Share** next to the video you want to send. The video link is inserted into the conversation.

In Intercom, you also have the option to add a personalized message before sharing. A text area labeled "Personalize your message" lets you add context before sending.
{% endstep %}
{% endstepper %}


# Intercom

How to get started with Screendesk for Intercom

{% hint style="info" %}
Contact <support@screendesk.io> or [send us a recording](https://app.screendesk.io/recordings/new?ak=0ZMy1g\&key=4cWV2A\&src=sria)
{% endhint %}

Screendesk empowers customer facing teams with async and sync videos features. It also makes it easy to access these features directly in their favourite ticketing system (Zendesk, Intercom, Help Scout, etc...)

{% content-ref url="/pages/QZkVkUYwVxdVY9UZXOmP" %}
[Install and set up](/helpdesk-integrations/zendesk/install-and-set-up)
{% endcontent-ref %}


# Install and set up

How to get started with Screendesk for Intercom

{% hint style="info" %}
Contact <support@screendesk.io> or [send us a recording](https://app.screendesk.io/recordings/new?ak=0ZMy1g\&key=4cWV2A\&src=sria)
{% endhint %}

Screendesk empowers customer facing teams with async and sync videos features. It also makes it easy to access these features directly in their favourite ticketing system (Zendesk, Intercom, Help Scout, etc...)

## What you can do

With Screendesk for Intercom you can:&#x20;

* Send screen recordings to your customers.&#x20;
* Request screen recordings from your customers.&#x20;
* Start a live screen share session with your customers.&#x20;
* Receive Screendesk recordings in Intercom.&#x20;

## How to set up

[Visit the Intercom app store](https://www.intercom.com/app-store/?app_package_code=screendesk) and look for the Screendesk app or [visit the integrations](https://app.screendesk.io/integrations) tab of your Screendesk dashboard. Once you have installed the Screendesk app check the section below.&#x20;

## Available Intercom locations

{% content-ref url="/pages/dz2H5DpZCPZWq2nT52lM" %}
[Messenger editor (recommended)](/helpdesk-integrations/intercom/messenger-editor-recommended)
{% endcontent-ref %}

{% content-ref url="/pages/4eGdT0qyhjE86H4UcFRp" %}
[Home messenger](/helpdesk-integrations/intercom/home-messenger)
{% endcontent-ref %}

{% content-ref url="/pages/8MLzxiwwNsjcvgAsdkns" %}
[Conversation sidebar](/helpdesk-integrations/intercom/conversation-sidebar)
{% endcontent-ref %}

{% content-ref url="/pages/DyYncgW85BR6qL4OtSex" %}
[Workflows](/helpdesk-integrations/intercom/workflows)
{% endcontent-ref %}

{% content-ref url="/pages/RVnfHicV1xMWTLXjwIIa" %}
[Embed videos in Help Center](/helpdesk-integrations/intercom/embed-videos-in-help-center)
{% endcontent-ref %}


# Messenger editor (recommended)

Use Screendesk directly from the Intercom messenger editor

{% hint style="info" %}
Contact <support@screendesk.io> or [send us a recording](https://app.screendesk.io/recordings/new?ak=0ZMy1g\&key=4cWV2A\&src=sria)
{% endhint %}

You can send request for recordings, send recordings, or start a live screen share directly from the Intercom messenger editor. We highly recommend you to use this option to interact with Screendesk as we are able to insert beautifully crafted cards in the messenger editor from this location.&#x20;

<figure><img src="/files/vCFcP6sxROq5VXZqBcWX" alt=""><figcaption></figcaption></figure>


# Home messenger

Set up Screendesk with your Intercom Messenger

{% hint style="info" %}
Contact <support@screendesk.io> or [send us a recording](https://app.screendesk.io/recordings/new?ak=0ZMy1g\&key=4cWV2A\&src=sria)
{% endhint %}

You can receive screen recordings directly from your Intercom messenger.&#x20;

<figure><img src="/files/E9gPkJSqYHkIh8LQIr08" alt=""><figcaption></figcaption></figure>

## How to set up

Visit the **Messenger tab** in your Intercom dashboard and click on **Add apps to your Messenger**.

<figure><img src="/files/jMTJFPXPDhvPVDfTJ2ST" alt=""><figcaption></figcaption></figure>

From there, you will have to click on **Add an app (3)** and select Screendesk from the dropdown menu. You will have to do this step for both **Visitors (1)** and **Users (2)**.

<figure><img src="/files/dhhXhMqShRx1aDFS6FJA" alt=""><figcaption></figcaption></figure>

## Notifications

Recordings will be automatically sent to your Intercom inbox.&#x20;

<figure><img src="/files/BPX0C8fMJUszIJlBgnjo" alt=""><figcaption></figcaption></figure>


# Customize the call-to-action text in Intercom

Customize the CTA text above the Screendesk button in Intercom Home Messenger and Operators.

Screendesk allows you to customize the call-to-action (CTA) text displayed above the Screendesk button in your Intercom messenger. This helps tailor the experience for your users and improve engagement.

## **Where you can customize the CTA text**

You can customize the text in two locations:

1. **Home Messenger Button** – The main Intercom messenger interface.
2. **Operator Call-to-Action Text** – The text shown when using Intercom Operators.

<figure><img src="/files/sfVF643ujNyZwQtp1cXa" alt=""><figcaption></figcaption></figure>

## **How to customize the CTA text**

1. Open the [**Screendesk**](https://app.screendesk.io/members) app.
2. Go to [**Account Settings**](https://app.screendesk.io/members) > **Integrations**.
3. Select [**Intercom**](https://app.screendesk.io/integrations/intercom) and click **Configure**.
4. Update the CTA text for the desired locations.
5. Save your changes.

{% hint style="danger" %}
**Important: Final Integration Update**

After making these changes, you must update the Intercom integration to apply them:

* **Reinstall the Screendesk button** on the Intercom home.
* **Update Intercom Operators** where the Screendesk button is used.

This ensures that your custom CTA text is correctly displayed.
{% endhint %}

If you have any questions, feel free to contact Screendesk support! 🚀


# Conversation sidebar

Use Screendesk directly from the Intercom inbox sidebar

{% hint style="info" %}
Contact <support@screendesk.io> or [send us a recording](https://app.screendesk.io/recordings/new?ak=0ZMy1g\&key=4cWV2A\&src=sria)
{% endhint %}

From the sidebar you will be able to:&#x20;

* Request screen recordings from your customers.&#x20;
* Send screen recordings to your customers.&#x20;
* Start a live screen sharing session with your customers.&#x20;
* Access past recordings for a given customer.&#x20;

<figure><img src="/files/BxrcPexd704sCXAPjMhW" alt=""><figcaption></figcaption></figure>

## How to set up

The Screendesk sidebar app will be available by default after installing the Screendesk app to Intercom. If you don't see the sidebar please follow the steps as outlined in the screenshot below.&#x20;

<figure><img src="/files/iBWeWfTcv9qbVZEk0uVK" alt=""><figcaption></figcaption></figure>

&#x20;


# FIN

Train Intercom FIN to suggest Screendesk recordings when customers report bugs or issues.

Use FIN to suggest a Screendesk recording when customers report a bug, issue, or unexpected behavior.

When the conversation reaches a human agent, the key context is already there. That can include the recording, repro steps, system info, console logs, and network activity.

{% hint style="info" %}
This page covers automatic suggestions in **FIN**. For manual agent workflows, use [Messenger editor (recommended)](/helpdesk-integrations/intercom/messenger-editor-recommended), [Conversation sidebar](/helpdesk-integrations/intercom/conversation-sidebar), or [Workflows](/helpdesk-integrations/intercom/workflows).
{% endhint %}

### How it works

When a customer tells FIN that something is broken, not working, or behaving unexpectedly, FIN can suggest a Screendesk recording.

The customer records their screen and submits it. Screendesk then attaches the submission to the Intercom conversation so the next agent can review the issue with full context.

<figure><img src="/files/6n4gKCQrnHooajvIaum1" alt="" width="375"><figcaption></figcaption></figure>

{% hint style="info" %}

#### Requirements

Make sure:

* The Screendesk Intercom app is installed
* The Intercom integration is connected in Screendesk
* You have a Screendesk request link ready
* You know which customer email field Intercom should append to the link
  {% endhint %}

### 1 — Copy your Screendesk request link

<figure><img src="/files/SZ4uo87GZ2RT1NWt1lGT" alt=""><figcaption></figcaption></figure>

{% stepper %}
{% step %}

#### Open Intercom settings in Screendesk

Go to the **Sidebar** in your Screendesk dashboard.
{% endstep %}

{% step %}

#### Copy the request link

Copy the **Screendesk request link** shown on the page. It looks like this:

```
https://app.screendesk.io/recordings/new?ak=ACCOUNT_KEY&key=USER_KEY&src=fin&p=1
```

You will reuse this link in every FIN training method below.
{% endstep %}
{% endstepper %}

### 2 — Write one standard reply

{% hint style="info" %}
Decide on the message first. Then reuse the same wording everywhere.
{% endhint %}

If FIN uses different wording each time, the experience becomes inconsistent. Write one short message and reuse it in Guidance, Custom Answers, and Snippets.

Example:

> We recommend sending a screen recording so we can see the issue from your perspective.
>
> Record your screen here: **\[Your Screendesk Link]**
>
> For best results, enable audio and talk through the steps that lead to the issue.

Replace **\[Your Screendesk Link]** with the link from Step 1.

Keep the wording simple. FIN is less likely to rewrite short messages.

### 3 — Define trigger phrases

{% hint style="info" %}
Start with common issue language. Then add phrases from real conversations.
{% endhint %}

FIN already understands natural language, but examples improve accuracy. Start with a short list, then expand it over time.

#### Common trigger phrases

Good starting points:

* *I'm facing an issue*
* *It doesn't work*
* *There is a bug*
* *I'm seeing an error*
* *This page won't load*
* *It crashes when I try to use it*
* *Nothing happens when I click*
* *This feature isn't working properly*
* *I think there's a glitch*

#### Product-specific phrases

Add phrases based on your product, workflows, and support history.

<details>

<summary>More examples for edge cases</summary>

* I keep getting an error message
* The app is behaving unexpectedly
* I followed the steps, but the issue is still there
* The layout looks broken on my screen
* When I click a button, nothing happens
* I can't replicate the issue consistently
* The workflow seems broken
* The software crashes when I perform a specific action
* I'm having trouble with a multi-step process
* The custom integration doesn't seem to work
* The product freezes at certain points
* Some elements are not displaying correctly
* It is still not working correctly
* Some elements overlap or disappear
* Search is not showing the results I expect
* The login flow is behaving differently
* I see different behavior across browsers
* My changes do not save
* Some links or buttons are unresponsive
* I'm experiencing inconsistent behavior
* It's not working as expected

</details>

### 4 — Train FIN

{% hint style="info" %}
Use all available training methods together for the best coverage.
{% endhint %}

#### A — Guidance

Use Guidance to tell FIN when to suggest Screendesk and what exact wording to use.

<figure><img src="/files/4SyaRdiVnRGofJeTXyvF" alt=""><figcaption></figcaption></figure>

{% stepper %}
{% step %}

#### Open Guidance

In Intercom, go to **FIN → Train → Guidance** and create a new context guidance.
{% endstep %}

{% step %}

#### Add the rule

Use this template:

> If the customer reports a bug, issue, unexpected behavior, broken workflow, or error, suggest sending a screen recording with Screendesk: **\[Your Screendesk Link]**
>
> Common examples include: **\[Paste your trigger phrases from Step 3]**
>
> Always display this exact message: **\[Paste your wording from Step 2]**
> {% endstep %}

{% step %}

#### Append the customer email

Append the customer email to the Screendesk link using the Intercom email property. This keeps the recording tied to the correct customer.

Example:

`https://app.screendesk.io/recordings/new?ak=0ZMdwg&key=ldwcFA&ce={{customer_email_variable}}&src=fin&p=1`
{% endstep %}
{% endstepper %}

#### B — Create a Custom Answer

{% stepper %}
{% step %}

#### Create a new Custom Answer

In FIN, go to **Train → Custom Answers** and click **New Answer**.

<figure><img src="/files/wnXuflLwiMVRs1fst2Fc" alt=""><figcaption></figcaption></figure>
{% endstep %}

{% step %}

#### Add trigger questions

Add the trigger phrases from Step 3.

{% hint style="info" %}

* *I'm facing an issue*
* *It doesn't work*
* *There is a bug*
* *I'm seeing an error*
* *This page won't load*
* *It crashes when I try to use it*
* *Nothing happens when I click*
* *This feature isn't working properly*
* *I think there's a glitch*
  {% endhint %}

<figure><img src="/files/c3OoxUnBRntiEGZyWscl" alt=""><figcaption></figcaption></figure>
{% endstep %}

{% step %}

#### Add the response

Paste the exact message from Step 2.

{% hint style="info" %}
We recommend sending a screen recording so we can see the issue from your perspective.

Record your screen here: **\[Your Screendesk Link]**

For best results, enable audio and talk through the steps that lead to the issue.
{% endhint %}
{% endstep %}

{% step %}

#### Add the Screendesk app

Under the answer flow, choose **Send an app** and select **Screendesk**.

This lets FIN send the Screendesk widget directly in the conversation.

<figure><img src="/files/g4iFrSlA5sRguLYaZ6bO" alt=""><figcaption></figcaption></figure>
{% endstep %}
{% endstepper %}

#### C — Create a Snippet

{% stepper %}
{% step %}

#### Create a new Snippet

In FIN, go to **Train → Content** and click **Create a Snippet**.
{% endstep %}

{% step %}

#### Add the snippet content

Use this template:

> If the customer reports a bug, issue, unexpected behavior, broken workflow, or error, suggest sending a screen recording with Screendesk: **\[Your Screendesk Link]**
>
> Common examples include: **\[Paste your trigger phrases from Step 3]**
>
> Always display this exact message: **\[Paste your wording from Step 2]**
> {% endstep %}
> {% endstepper %}

#### D — Review Unresolved Questions

Check **Unresolved Questions** in Intercom for messages where FIN was not confident.

Use those messages to find missed trigger phrases and add better examples.

For example, if an unresolved message is:

> *"I'm trying to set up a workflow but it's not doing what I expect."*

Add it as a training example and route it to a screen recording prompt.

### 5 — Test the flow

Run a quick end-to-end test:

1. Send FIN a realistic issue report
2. Confirm FIN suggests Screendesk
3. Submit a test recording
4. Confirm the recording appears in the conversation
5. Confirm the correct customer is attached

### Best practices

* Use the same wording in every training method
* Start with specific trigger phrases, then expand slowly
* Exclude non-technical topics like billing or account access
* Review unresolved questions regularly
* Append the customer email to the Screendesk link
* Test after every major change to FIN training

### Troubleshooting

<details>

<summary>FIN doesn't suggest a recording when it should</summary>

* Add the customer's exact phrasing to your trigger list
* Make sure Guidance, Custom Answers, or Snippets are active
* Review unresolved questions for missed patterns
* Add more examples of how customers describe product issues

</details>

<details>

<summary>FIN suggests a recording at the wrong time</summary>

* Narrow the trigger phrases
* Add exclusions in Guidance
* Do not use generic triggers like *I have a question*
* Use Custom Answers where you need tighter control

</details>

<details>

<summary>FIN changes the wording each time</summary>

* Tell FIN to display the **exact** message
* Use the same message in Guidance, Snippets, and Custom Answers
* Keep the message short so it is less likely to be rewritten

</details>

<details>

<summary>The recording link doesn't include the customer email</summary>

* Append the Intercom email property to the link
* Check the link format: `https://app.screendesk.io/recordings/new?ak=0ZMdwg&key=ldwcFA&ce={{customer_email_variable}}&src=fin&p=1`
* Make sure the value is dynamic, not hardcoded

</details>

<details>

<summary>The recording doesn't appear in the conversation</summary>

* Wait 1–2 minutes and refresh the conversation
* Verify the Intercom integration is still connected in Screendesk
* Check whether the recording exists in Screendesk but was not linked
* Contact support if recordings consistently fail to attach

</details>


# Workflows

Use Screendesk directly from the Intercom operator

{% hint style="info" %}
Contact <support@screendesk.io> or [send us a recording](https://app.screendesk.io/recordings/new?ak=0ZMy1g\&key=4cWV2A\&src=sria)
{% endhint %}

### Receive recordings using operators

You can receive screen recordings via the Intercom operator. Once recorded Screendesk will either create a new conversation or update an existing one.&#x20;

<figure><img src="/files/o8E77xw43CyjBnbexc17" alt=""><figcaption></figcaption></figure>

## How to setup

* Visit the **Fin AI Agent tab ⇒ Workflows**&#x20;
* Create a new workflow.&#x20;
* Create an **action button (1)** that links to **send an app**. Please note that you can trigger the **send an app** with any other operator trigger.
* Select Screendesk from the **dropdown menu (2)**.&#x20;
* That's it!

<figure><img src="/files/x5PTxi4MZXunYTZyqCFg" alt=""><figcaption></figcaption></figure>


# Customize the call-to-action text

Customize the CTA text above the Screendesk button in Intercom Home Messenger and Operators.

Use this guide to update the CTA text shown above the Screendesk button in Intercom.

{% content-ref url="/spaces/fW6XSzJSKsNyZnOkSJPt/pages/0BbKzynMTkV3PEzs6WbR" %}
[Customize the call-to-action text in Intercom](/helpdesk-integrations/intercom/home-messenger/customize-the-call-to-action-text-in-intercom)
{% endcontent-ref %}


# Embed videos in Help Center

Embed Screendesk videos in Intercom Help Center articles using GIF thumbnails and links.

You can easily embed videos in your Intercom Help Center articles by adding a GIF thumbnail to your articles. It will create an engaging experience for your customers with videos that start playing as they read.

Here's how it looks like:

<figure><img src="https://screendesk-images.s3.amazonaws.com/iq00kbe990zxuyh59l21r83i5u0f" alt=""><figcaption></figcaption></figure>

Follow the steps below to integrate Screendesk videos into your Intercom Help Center, or watch this short video.

{% embed url="<https://app.screendesk.io/recordings/d0e9141f-1e2f-44b9-a008-e7717f8093ce>" %}

### Steps to Embed Screendesk Videos in Intercom

1. **Get the GIF Thumbnail**
   * Navigate to the Screendesk video you wish to embed.
   * Click on **Share > Copy GIF Thumbnail** to copy the GIF thumbnail to your clipboard.
2. **Add the GIF to Your Intercom Article**
   * Paste the copied GIF thumbnail directly into your Intercom article. The GIF will be embedded and will start playing automatically, offering an interactive visual aid to your readers.
3. **Add Links to the GIF and Title**
   * Note that Intercom automatically removes embedded links/URLs when pasting images and text.
   * To ensure users can access the video, add the link to the GIF title and also on the GIF itself.
4. **Create a Call to Action on the Screendesk Video**
   * Go to the Screendesk video settings.
   * Click on **Call to Action**, and add a link that directs users back to your article or another relevant page.

<figure><img src="/files/lbq3p0QOpE1VOI3EPwOe" alt=""><figcaption></figcaption></figure>


# Analytics

Intercom conversation tags added by Screendesk, and how to enable tagging.

Screendesk will automatically tag conversations in the following cases:

<table><thead><tr><th width="365">Tag</th><th>Case</th><th data-hidden></th></tr></thead><tbody><tr><td>screendesk-recording-requested</td><td>When am agent request a recording</td><td></td></tr><tr><td>screendesk-recording-sent</td><td>When an agent send a recording.</td><td></td></tr><tr><td>screendesk-recording-received</td><td>When a recording is received.</td><td></td></tr><tr><td>screendesk-recording-received-messenger</td><td>When a recording is received in the messenger</td><td></td></tr><tr><td>screendesk-recording-received-operator</td><td>When a recording is received in the operator</td><td></td></tr></tbody></table>

## Enable Intercom tagging

To enable intercom tagging navigate to account settings -> integrations -> configure intercom and then enable tags.

<figure><img src="/files/HP09glIgW2tTZtN4tz1T" alt=""><figcaption></figcaption></figure>


# Jira Service Management

Request and Send recordings directly from Jira Service Management issues and from issues create from the customer portal

{% hint style="danger" %}
You must be a Jira admin in order to add Screendesk to Jira
{% endhint %}

You can install the Screendesk app for Jira directly from the Jira Marketplace.&#x20;

<a href="https://screendesk.io/jira" class="button primary">Coming Soon</a>

### Discover Screendesk for Jira

<table data-view="cards"><thead><tr><th></th><th></th><th data-hidden data-card-target data-type="content-ref"></th></tr></thead><tbody><tr><td><strong>Install and set up</strong></td><td>Discover how to install and connect Screendesk to Jira</td><td><a href="/pages/HtAleFaPxu6BMpFl9kTM">/pages/HtAleFaPxu6BMpFl9kTM</a></td></tr><tr><td><strong>Issue Panel</strong></td><td>Learn how to use Screendesk in the Jira issue panel</td><td><a href="/pages/YrPW2iQb6B3TZipViDaO">/pages/YrPW2iQb6B3TZipViDaO</a></td></tr><tr><td><strong>Customer Portal</strong></td><td>Learn how to use Screendesk in the Jira customer portal</td><td><a href="/pages/A61LxwFFTDdgPv5mWVoZ">/pages/A61LxwFFTDdgPv5mWVoZ</a></td></tr><tr><td><strong>Advanced Workflows</strong></td><td>Learn how to customize your recording workflow for Jira</td><td><a href="/pages/JCp8GVGOAn0nmmPucQET">/pages/JCp8GVGOAn0nmmPucQET</a></td></tr></tbody></table>


# Install and set up

Install Screendesk for Jira Service Management and connect your Jira and Screendesk workspaces.

## How to install

{% hint style="warning" %}
You must be a Jira admin to install the Screendesk app
{% endhint %}

You can install the Screendesk app for JSM directly from the Jira Marketplace listing.

<a href="https://screendesk.io/" class="button primary">Coming Soon</a>

### Connect Jira Service Management to Screendesk

{% hint style="info" %}
**This is a one-time step that must be performed by a Jira admin.**
{% endhint %}

It only takes a couple of clicks to connect Screendesk to Jira Service Management. Once you have installed Screendesk for JSM you will need to connect your workspace to your Screendesk workspace.

You can connect your account by visiting any Jira issue.

{% stepper %}
{% step %}

### Visit any Jira issue

{% endstep %}

{% step %}

### Click on the Screendesk app in the header

This will display the Screendesk app below the Similar request section
{% endstep %}

{% step %}

### Select either connect Existing Account or New to Screendesk

{% hint style="info" %}
T**he email you use to sign up for Screendesk and Jira must match**. e.g <john@acme.com> on Jira and <john@acme.com> on Screendesk
{% endhint %}

If you create a new Screendesk account you will then prompted to connect your account again. That time, select connect existing account.
{% endstep %}
{% endstepper %}

<figure><img src="/files/TUFMQWhjOrFWI7wcFQtz" alt=""><figcaption></figcaption></figure>

### How to Uninstall

In order to uninstall the Jira app you will need to remove the app in Jira by going to managed apps and uninstall it.

<figure><img src="/files/NlD7xLu01Gzo4aM9QEZG" alt=""><figcaption></figcaption></figure>

Additionally you should visit the integrations setting page in your Screendesk account settings and click on Disconnect. Upon disconnection, all Jira data saved will be removed immediately.

<figure><img src="/files/5UgDGkLixGU7fuOa3eCe" alt=""><figcaption></figcaption></figure>


# Issue panel

Request or send screen recordings directly from a Jira issue using the Screendesk panel.

### Request Screen Recording

In Screendesk for Jira you can request screen recordings from your users and agents directly from within an Issue.

<figure><img src="/files/87I3zPt3LWYeRrkBokfY" alt=""><figcaption></figcaption></figure>

{% stepper %}
{% step %}

### Visit any issue

{% endstep %}

{% step %}

### Click on the Screendesk app

{% endstep %}

{% step %}

### Click on request recording

Paste the url in the reply to customer or add internal note section. That's it!
{% endstep %}
{% endstepper %}

### Send a recording

In Screendesk for Jira you can send screen recordings to your users and agent. This is particularly useful for training or explaning complex tasks.

<figure><img src="/files/aTjvsXEOJkxkvxqYy43c" alt=""><figcaption></figcaption></figure>

{% stepper %}
{% step %}

### Visit any issue

{% endstep %}

{% step %}

### Click on the Screendesk app

{% endstep %}

{% step %}

### Click on send recording

{% endstep %}

{% step %}

### Open the link

{% endstep %}

{% step %}

### Record your screen

{% endstep %}

{% step %}

### Paste the recording in your conversation

{% endstep %}
{% endstepper %}


# Customer portal

Collect customer recordings from the Jira Service Management portal form and attach them to the created issue.

### Capture screen recordings from new issue form

In Screendesk for Jira you can request screen recordings from your customers directly from the new issue creation form.

<figure><img src="/files/VbPlXyuOzfEGRpMxwZhI" alt=""><figcaption></figcaption></figure>

{% stepper %}
{% step %}

### Enable customer portal in Screendesk

By default this feature is turned off in your Screendesk account. Simply visit <https://app.screendesk.io/integrations/jira>

<figure><img src="/files/2SvQ7V3j2NUHYGHoFQs4" alt=""><figcaption></figcaption></figure>
{% endstep %}

{% step %}

### Visit a new issue form

{% endstep %}

{% step %}

### Click on Record your screen button

Click on the **"Record your screen"** button. You will then be redirected to the recorder. Once the screen recording has been submited you don't have to do anything else.
{% endstep %}

{% step %}

### Attach recording to the issue

We will automatically update the issue with the link to the recording once the issue is created (if you have enabled that option in the settings).

<figure><img src="/files/fb4KSUgmQNpp1vjCvhKL" alt=""><figcaption></figcaption></figure>
{% endstep %}
{% endstepper %}


# Advanced workflows

Configure advanced automation workflows for the Jira Service Management integration (coming soon).

Coming soon...


# Zendesk

Use Screendesk inside Zendesk to request, send, and receive recordings and live sessions.

{% hint style="info" %}
Contact <support@screendesk.io> or [send us a recording](https://app.screendesk.io/recordings/new?ak=0ZMy1g\&key=4cWV2A\&src=sria)
{% endhint %}

Screendesk empowers customer facing teams with async and sync videos features. It also makes it easy to access these features directly in their favourite ticketing system (Zendesk, Intercom, Help Scout, etc...)

{% content-ref url="/pages/QZkVkUYwVxdVY9UZXOmP" %}
[Install and set up](/helpdesk-integrations/zendesk/install-and-set-up)
{% endcontent-ref %}


# Install and set up

Install Screendesk from the Zendesk Marketplace and enable requesting, sending, and receiving recordings.

{% hint style="info" %}
Contact <support@screendesk.io> or [send us a recording](https://app.screendesk.io/recordings/new?ak=0ZMy1g\&key=4cWV2A\&src=sria)
{% endhint %}

Screendesk empowers customer facing teams with async and sync videos features. It also makes it easy to access these features directly in their favourite ticketing system (Zendesk, Intercom, Help Scout, etc...)

{% @arcade/embed url="<https://app.arcade.software/share/BaEOhGJw2acshP6hRRSX>" flowId="BaEOhGJw2acshP6hRRSX" %}

## What you can do

With Screendesk for Zendesk you can:

* Send screen recordings to your customers.
* Request screen recordings from your customers.
* Start a live screen share session with your customers.
* Receive Screendesk recordings in Zendesk.
* Automatically tag conversations.

## How to set up

[Visit the ](https://www.zendesk.com/marketplace/apps/support/875313/screen-recording-by-screendesk/)[Zendesk Markeplace](https://www.zendesk.com/marketplace/apps/support/875313/screen-recording-by-screendesk/) and look for the Screendesk app or [visit the integrations](https://app.screendesk.io/integrations) tab of your Screendesk dashboard. Once you have installed the Screendesk app check the section below.

## Available Zendesk locations

{% content-ref url="/pages/zhf56eMhNYHxg460QKzA" %}
[Ticket editor](/helpdesk-integrations/zendesk/ticket-editor)
{% endcontent-ref %}

{% content-ref url="/pages/fYPfsGkTkTjKiL0jKKPD" %}
[Zendesk forms](/helpdesk-integrations/zendesk/zendesk-forms)
{% endcontent-ref %}

{% content-ref url="/pages/Pn7AZHPrgFYZ39SYHS19" %}
[Zendesk auto-reply](/helpdesk-integrations/zendesk/zendesk-auto-reply)
{% endcontent-ref %}

{% content-ref url="/pages/91kgLbaQZOsXcAWh5Bt8" %}
[Zendesk macros](/helpdesk-integrations/zendesk/zendesk-macros)
{% endcontent-ref %}

## Common issues

If the Screendesk menu of the Zendesk composer is appearing empty, there could be an issue with your browser or add-blocker. To troubleshoot this problem, make sure that your browser is allowing iframes. This can usually be done by checking your browser's settings or the settings of any add-blockers that you have installed. If you are still having trouble after checking these settings, you may need to try using a different browser or temporarily disabling your add-blocker to see if that resolves the issue.

## Remove Screendesk from Zendesk

To remove an app from Zendesk, follow these steps:

1. Log in to your Zendesk account and click on the "Apps" icon in the main menu. This will take you to the Apps Marketplace.
2. In the Apps Marketplace, click on the "Installed" tab to view a list of all the apps that are currently installed in your Zendesk account.
3. Find the app that you want to remove and click on the "Manage" button next to it.
4. On the next page, you will see an option to "Uninstall" the app. Click on this button to begin the process of removing the app from your account.
5. You will be asked to confirm your choice to uninstall the app. Click on the "Uninstall" button to complete the process.

Note that uninstalling an app will typically remove all of its associated data and settings from your Zendesk account. If you want to keep this information, you may want to consider disabling the app instead of uninstalling it. To disable an app, follow the same steps as above and click on the "Disable" button instead of the "Uninstall" button.


# Ticket editor

Use Screendesk from the Zendesk ticket composer to request or send recordings.

{% hint style="info" %}
Contact <support@screendesk.io> or [send us a recording](https://app.screendesk.io/recordings/new?ak=0ZMy1g\&key=4cWV2A\&src=sria)
{% endhint %}

<figure><img src="/files/zdzgq9yhPdbWxBcDUyjw" alt=""><figcaption></figcaption></figure>

1. Click on the Screendesk icon in the Zendesk composer.
2. Select the option that works for you.


# Change text content inserted in Zendesk editor

How to change the text content inserted in the Zendesk editor

Screendesk offers flexibility for Zendesk users to personalize the messages sent to clients when requesting a screen recording or initiating a live session. This guide will walk you through customizing these messages in your Screendesk account settings.

#### Accessing the Customization Settings

1. **Navigate to Account Settings:** Log in to your Screendesk account, and go to your account settings.
2. **Integration Settings:** Click on the 'Integrations' tab, and then select 'Zendesk'.
3. **Configure Zendesk:** In the Zendesk integration section, find and click on the 'Configure' option.
4. **Customize Text Content:** Here, you can customize the text for various client interactions. Navigate to the section labeled 'Customize the text content'.

<figure><img src="/files/xCeDjvNrp7rn6ob847Fm" alt=""><figcaption></figcaption></figure>

#### Customizing Messages

<figure><img src="/files/Zx6WgJzfMy0AeBDttV4k" alt="" width="225"><figcaption></figcaption></figure>

{% hint style="info" %}
**Start the live session: {{link}}**&#x20;

This example will be displayed to the client as:&#x20;

"Start the live session: <https://app.screendesk.io/r/7fb17c>"<br>
{% endhint %}

{% hint style="warning" %}
You cannot use the link wrapper for the start the live session button because this functionality is not supported by Zendesk.&#x20;
{% endhint %}

#### On an email based ticket

<figure><img src="/files/X2JmsKNcHsocESYmiIhE" alt="" width="225"><figcaption></figcaption></figure>

{% hint style="info" %}
**{{Click here to record your screen}}**

This example will be displayed to the client as:&#x20;

"Click here to record your screen" wrapped in a \<a> tag

**Click here to record your screen: {{link}}**

This example will be displayed to the client as:

Click here to record your screen: <https://app.screendesk.io/r/39136a>
{% endhint %}

#### On a chat based ticket

<figure><img src="/files/1haJJv8zcStVaVvDO1vp" alt="" width="225"><figcaption></figcaption></figure>

{% hint style="info" %}
**Click here to record your screen: {{link}}**

This example will be displayed to the client as:&#x20;

Click here to record your screen: <https://app.screendesk.io/r/39136a>
{% endhint %}

{% hint style="warning" %}
You cannot use the link wrapper for the **request recording sent to chat ticket** text because this functionality is not supported by Zendesk.&#x20;
{% endhint %}


# Zendesk forms

How to add Screendesk to your Zendesk forms

{% hint style="info" %}
Contact <support@screendesk.io> or [send us a recording](https://app.screendesk.io/recordings/new?ak=0ZMy1g\&key=4cWV2A\&src=sria)
{% endhint %}

To allow customers to submit tickets with screen recordings, you will need to integrate Screendesk into your Zendesk Help Center and/or include it in your website's Zendesk widget.

<figure><img src="/files/01sBzwUgZM4WuTIJz9Fx" alt=""><figcaption></figcaption></figure>

## Enable Screendesk to your "New request" page

You can follow the steps outlined in the demo below:&#x20;

{% @arcade/embed flowId="4yrMm14V1vvtBoOzymIH" url="<https://app.arcade.software/share/4yrMm14V1vvtBoOzymIH>" %}

If you want to change the background color of the button simply add a query string `?bgcolor=hexcolorwithoutthe` (bgcolor=EBEBEB) at the end of the script source: `https://app.screendesk.io/embeds/zendesk/c835d0?bgcolor=EBEBEB`.&#x20;

## Enable Screendesk to your Zendesk Web Widget (classic)

By integrating Screendesk into your Zendesk widget, you can empower your customers to record their screen directly from the chat or form in your website. This functionality is especially useful for providing visual context and assistance in resolving customer issues.

{% hint style="success" %}
You will need to add the snippet to your website. You might want to ask assistance to your Engineering team.&#x20;
{% endhint %}

**The code needs to be added right after the code of the Zendesk Widget.**

You can find the code snippet [here](https://app.screendesk.io/integrations).


# Zendesk auto-reply

Add a Screendesk recording link to Zendesk auto-replies, tied to ticket IDs.

Enhancing your Zendesk auto-replies with Screendesk links enables customers to easily submit screen recordings tied to their tickets, streamlining issue resolution for your support team. This guide walks you through the setup process.

{% hint style="warning" %}
Ensure you’ve configured Zendesk automations or triggers for email auto-replies. If you need guidance, follow [Zendesk's guide on configuring auto-replies](https://support.zendesk.com/hc/en-us/articles/4408825385242-Configuring-email-autoreplies-to-deflect-requests#topic_x2y_sjs_r1b).
{% endhint %}

Here's how it looks like:

<figure><img src="/files/5rh9lWH7sQQejJ60DIYO" alt=""><figcaption></figcaption></figure>

## Steps to Set Up the Zendesk Auto-Reply with Screendesk Integration

1. **Access Zendesk Admin Center**\
   Log in to Zendesk and navigate to the **Admin Center**.

   <figure><img src="/files/yCDyyu1bqnogfCuWHZ4r" alt=""><figcaption></figcaption></figure>
2. **Go to Objects and Rules**\
   In the Admin Center, select **Objects and rules** from the navigation menu.
3. **Locate Triggers or Automations**\
   Depending on your existing setup, locate your **triggers** or **automations**.\
   For this guide, we’ll use **triggers**, as they natively support email auto-replies in Zendesk.

<figure><img src="/files/9pIx5OwB7iEVlXAewur2" alt=""><figcaption></figcaption></figure>

4. **Edit the Trigger’s Email Body**\
   Open the trigger that manages auto-replies. In the email body, add a new sentence prompting the customer to use Screendesk for submitting recordings. For example:

> If you’d like to share a screen recording to help us understand your issue better, click the link below:

5. **Retrieve the Screendesk Generic Recording Link**

* Go to [Screendesk](https://app.screendesk.io) and log in.
* Click on **Request recording** to generate a generic recording link.\
  Example link:\
  `https://app.screendesk.io/recordings/new?ak=0ZMy1g&key=vQvF_A&src=rria`

  <figure><img src="/files/yRq7NMLJL9kl7v5JFBFE" alt=""><figcaption></figcaption></figure>

6. **Customize the Screendesk Link**\
   Update the generic link to ensure the recording ties back to the Zendesk ticket. Make the following changes:

* Add `zid={{ticket.id}}&` after `new?` to associate the recording with the ticket ID.
* Replace `src=rria` with `src=rrz&p=1` for proper integration.

**Final Link Example:**\
`https://app.screendesk.io/recordings/new?zid={{ticket.id}}&ak=0ZMy1g&key=vQvF_A&src=rrz&p=1`

7. **Test and Activate the Trigger**

* Save your changes and test the trigger to ensure the email auto-reply includes the personalized Screendesk link.
* Once confirmed, activate the trigger.

<figure><img src="/files/abnRP3l5eVkWi8Gz8nbi" alt=""><figcaption></figcaption></figure>


# Zendesk macros

Create Zendesk macros that insert Screendesk recording links tied to ticket IDs.

Zendesk macros can streamline customer communication by automating responses. By integrating Screendesk, you can easily request screen recordings to better understand and resolve customer issues. This guide explains how to create a macro for sending Screendesk recording links to customers.

## Steps to Create the Macro with Screendesk Integration

1. **Access Zendesk Admin Center**\
   Log in to Zendesk and navigate to **Admin Center > Workspace > Macros**.

<figure><img src="/files/jEQ6ZinrDTVakvplzDM9" alt=""><figcaption></figcaption></figure>

2. **Create a Macro**

* Click on **Create a Macro**.
* Name your macro something clear, such as **Request Screen Recording**.
* **Add an Action**

  * Click on **Add Action** and select **Comment/Description**.
  * Enter a generic text template explaining the purpose of the recording and how customers can provide it.

  **Example Template:**

> Hello {{ticket.requester.first\_name}},\
> We understand you’re experiencing an issue with {{custom\_fields.software\_name}}, and we’re here to help. To assist you more effectively, could you kindly share a recording of the problem you’re encountering? Don’t worry, there’s no need to download anything or sign up – it’s a simple and secure process.
>
> Here’s how you can record and share your issue with us:
>
> 1. Click on this link: \[Insert link here].
> 2. Once there, click on **Start Recording**
> 3. Choose the screen you want to share and demonstrate the issue you’re facing.
> 4. After you’ve shown us the problem, click on **Stop** to end the recording. Then, click on **Submit** to share it with our support team.
>
> We appreciate you taking the time to do this. It will greatly help us understand the issue more clearly and allow us to provide a more precise solution.
>
> Best regards,\
> The Support Team

* **Retrieve the Screendesk Generic Recording Link**
  * Log in to [Screendesk](https://app.screendesk.io).
  * Click on **Request recording** to generate a generic recording link.\
    Example link:\
    `https://app.screendesk.io/recordings/new?ak=0ZMy1g&key=vQvF_A&src=rria`
* **Customize the Screendesk Link**\
  Modify the link to associate the recording with the Zendesk ticket:

  * Add `zid={{ticket.id}}&` after `new?` to include the ticket ID.
  * Replace `src=rria` with `src=rrz&p=1` for proper integration.

  **Final Link Example:**\
  `https://app.screendesk.io/recordings/new?zid={{ticket.id}}&ak=0ZMy1g&key=vQvF_A&src=rrz&p=1`
* **Insert the Customized Link into the Macro**\
  Replace the placeholder `[Insert link here]` in the template with your customized Screendesk link.
* **Save and Test the Macro**
  * Save the macro and test it in Zendesk Messenger.
  * Ensure that:
    * The macro sends the correct Screendesk link to the customer.
    * Recordings are logged as internal notes in the Zendesk ticket.


# Forward recordings to Zendesk

Auto-create Zendesk tickets when recordings are submitted through Screendesk links outside Zendesk.

The **Forward Recordings to Zendesk** feature lets you automatically create Zendesk tickets whenever a recording is submitted through Screendesk.

This is useful if you’ve added Screendesk links or buttons to sources outside Zendesk, such as:

* A button in your product.
* A Screendesk link in emails.

Whenever a recording is submitted, a Zendesk ticket is created with the recording attached, ensuring all customer issues are centralized in one place.

This feature simplifies support management and ensures no customer request is missed.

## Forward recordings to Zendesk

Visit the [integrations tab](https://app.screendesk.io/integrations) to enable this feature. Simply update the email field and hit save.

<figure><img src="/files/3JYRa1XnLtFoN85GhUpJ" alt=""><figcaption></figcaption></figure>

You can refer to this [article](https://support.zendesk.com/hc/en-us/articles/4408842868506-Adding-support-email-addresses-for-users-to-submit-tickets) to find your Zendesk support address.

{% hint style="danger" %}
If you need users to be registered to send emails to your Zendesk support address then you should add **<support@screendesk.io>** as a user.
{% endhint %}


# Analytics

Zendesk ticket tags added by Screendesk and how to report on them in Zendesk Explore.

{% hint style="info" %}
Contact <support@screendesk.io> or [send us a recording](https://app.screendesk.io/recordings/new?ak=0ZMy1g\&key=4cWV2A\&src=sria)
{% endhint %}

Screendesk will automatically tag conversations in the following cases:

| Tag                           | Case                                                   |
| ----------------------------- | ------------------------------------------------------ |
| screendesk-live-screensharing | When at least 2 people join a live screensahring room. |
| screendesk-recording-sent     | When an agent send a recording.                        |
| screendesk-recording-received | When a recording is received.                          |
| screedesk-recording-requested | When an agent request a recording.                     |

## Track performance of tickets with tags

To track the "screendesk-live-screensharing" tag using Zendesk Explore for instance, follow these steps:

1. Log in to your Zendesk account and click on the "Explore" icon in the main menu. This will take you to the Explore dashboard.
2. From the dashboard, click on the "Tickets" option in the left-hand menu. This will bring up a list of all the tickets in your account.
3. Use the search bar at the top of the page to search for tickets that have the "screendesk-live-screensharing" tag. You can do this by typing "tags:screendesk-live-screensharing" into the search bar and pressing Enter.
4. The results will show you all the tickets that have the "screendesk-live-screensharing" tag. You can use the columns and filters on the page to customize the data that is displayed and create custom reports based on the tag data.
5. If you want to save your search results so you can access them later, you can click on the "Save" button at the top of the page. This will allow you to give your saved search a name and choose whether you want to be notified when new tickets with the "screendesk-live-screensharing" tag are created.


# HelpScout

Connect Screendesk to HelpScout by creating a custom app and authorizing access.

## Connect Screendesk to HelpScout

Visit the [integrations page](https://app.screendesk.io/integrations). Then click on `Connect`.

<figure><img src="/files/fdRg0Q4OCHN5gI03f519" alt=""><figcaption></figcaption></figure>

1. Visit: Create a Custom App

<figure><img src="/files/mFTgB2bHYJbiJsLDbZ2L" alt=""><figcaption></figcaption></figure>

2\. Fill in the required fields

<figure><img src="/files/AaI17nXTJCw4Yj0eXaVE" alt=""><figcaption></figcaption></figure>

3\. Visit the Settings tab and select the maiboxes. Then make sure to click on `Finish installation` in the Screendesk dashboard.

<figure><img src="/files/CE6nAymhhRF7erNFKirc" alt=""><figcaption></figcaption></figure>

4\. Visit any conversation in your HelpScout inbox.

5\. Click on the button `Connect to Screendesk`.

<figure><img src="/files/xXEtbH5hd3AdxWlghIkB" alt=""><figcaption></figcaption></figure>

6\. Authorize Screendesk to access your account

<figure><img src="/files/cBW6ZeNbke5nSrzIDeVI" alt=""><figcaption></figcaption></figure>

That's it you have now connected Screendesk to HelpScout!


# Screen recording

Request screen recordings from your customers in HelpScout.

## HelpScout sidebar <a href="#helpscout-sidebar" id="helpscout-sidebar"></a>

### Ticket

#### Request a Recording

You can use Screendesk directly from your sidebar to respond to **emails**.

Screendesk automatically adds the recording URL to the ticket once recorded for **emails**.&#x20;

<figure><img src="/files/Atjx0pqrI4yDgvNNk5Q7" alt="request a recording from the ticket sidebar flow gif"><figcaption></figcaption></figure>

#### Send a Recording

You can reply to **emails** with a message with a recording.&#x20;

Simply copy paste the recording URL once recorded.&#x20;

<figure><img src="/files/ywCxWulVaF8ojeQEYh2B" alt="copy paste recording url"><figcaption></figcaption></figure>

### Chat

#### Request a Recording

You can use Screendesk directly from your sidebar to respond to **chats**.

{% hint style="success" %}
**The user will be promted to copy paste the recording URL in the chat** once recorded. Screendesk is not able to automatically add the recording URL due to HelpScout limitations.&#x20;
{% endhint %}

<figure><img src="/files/S6QbwUZOjj4hH7t9y1em" alt="copy paste recording url"><figcaption></figcaption></figure>

#### Send a Recording

You can reply to **chats** with a message with a recording.&#x20;

Simply copy paste the recording URL once recorded.&#x20;

### Previous Recordings

Previous recordings associated to the email address of the user are displayed in the sidebar.&#x20;


# Content library

Share existing videos directly from the sidebar in HelpScout

The Content Library enables users to share existing videos directly from the ticket or chat sidebar in HelpScout. This feature allows you to easily access and distribute relevant video content to users.

<figure><img src="/files/yMUY2kqTCz9dw4i3c3As" alt="share video from the content library flow gif"><figcaption></figcaption></figure>

### Direct Sharing

Share videos from the Content Library directly within HelpScout tickets or chat sidebars, providing users with immediate access to helpful video resources.

### Search Functionality

Search for videos by **tags** or **titles** to quickly locate the specific content you need.

The Content Library is a valuable tool for any support team looking to improve their service quality and efficiency by leveraging the power of video.


# Gist

How to request and send screen recordings with Gist

## Inbox

### Request Recording

You need to create a snippet for each of your agent in order to request recordings from your Gist inbox. Please follow the steps outlined below:

1. Get your personal recording link from the Screendesk dashboard. You will need to get the recording link of each of your agent.

<figure><img src="/files/hoYAUzLkzX1SlIDUCSrq" alt=""><figcaption></figcaption></figure>

2. Visit the **settings** tab in the Gist dashboard. Now visit the **inbox** dropdown and click on **conversation snippets**. Then paste your recording link in the new snippet.

{% hint style="danger" %}
Make sure to replace the src param from rria to gist

<https://app.screendesk.io/recordings/new?ak=0ZMy1g\\&key=lcmcFA\\&src=gist&**ce=\\{{> contact.email | default: ' '}}\*\*
{% endhint %}

<figure><img src="/files/SrHoW3MkEekLWpOTM2nx" alt=""><figcaption></figcaption></figure>

{% hint style="info" %}
You can identify your users by adding the url parameter **ce** to the link. That way screendesk will automatically map the user to the recording.

e.g: <https://app.screendesk.io/recordings/new?ak=0ZMy1g\\&key=lcmcFA&**src=gist**\\&ce=\\{{> contact.email | default: ' '}}
{% endhint %}

3. Use the newly created snippet in the inbo&#x78;**.**

<figure><img src="/files/9v1wEAXBknoodIR41ZTY" alt=""><figcaption></figcaption></figure>

4. Users will then be prompted to paste the recording url in the chat when they are done recording.

<figure><img src="/files/wL6czePcM07FvUUhyQ9Z" alt=""><figcaption></figcaption></figure>

## Chats

You can customize the messages sent in your chats by simply adding your personal recording link. You can link the users to the recording by adding the **URL parametter ce** with the email address of the user.

<figure><img src="/files/VkDZkpsO9N2fjX7CJE4j" alt=""><figcaption></figcaption></figure>

## Bots

You can customize the messages sent in your bots by simply adding your personal recording link. You can link the users to the recording by adding the **URL parametter ce** with the email address of the user.

<figure><img src="/files/7hyXElPzBHY7uaFEpslO" alt=""><figcaption></figcaption></figure>


# Freshdesk

Install Screendesk in Freshdesk to request or send recordings and start live sessions from tickets.

{% hint style="info" %}
The Screendesk app is available for both Freshdesk and Freshchat.
{% endhint %}

Integrating Screendesk with Freshdesk provides a seamless experience for support agents, allowing them to access all Screendesk features without leaving Freshdesk. The Screendesk app is available for both Freshdesk and Freshchat, enabling agents to easily manage screen recordings, share videos, and initiate live assistance.

### Key Features of the Screendesk App in Freshdesk

With the Screendesk app installed, agents can:

* **Request Screen Recordings from Customers:** Easily ask customers to share screen recordings for troubleshooting.
* **Send Screen Recordings:** Share recordings with customers directly within a support ticket.
* **Send Videos from the Video Library:** Use pre-recorded videos to answer common questions or provide instructions.
* **Start Live Screen Sharing Sessions or Live Video Calls:** Assist customers in real time by sharing screens or using live video.

### **Freshdesk Locations**

You can access Screendesk directly within Freshdesk, both in the **messenger** (1) and the **sidebar** (2) for seamless support management.

<figure><img src="/files/FV0mq3xR9uT84tM3k3Np" alt=""><figcaption></figcaption></figure>

### Step-by-Step Guide to Setting Up Screendesk with Freshdesk

To integrate Screendesk with Freshdesk, follow these steps:

1. **Sign Up for Screendesk**
   * Create a Screendesk account by signing up [here](https://app.screendesk.io/users/sign_up).
2. **Install the Screendesk App in Freshdesk**
   * Go to the [Screendesk app page for Freshdesk](https://www.freshworks.com/apps/screen_recordings_calls_by_screendesk-for-freshdesk/).
   * Click on the **Install** button to add the Screendesk app to your Freshdesk account.
3. **Get Your Freshdesk API Key and Domain URL**

   * Log in to your Freshdesk account.
   * Find your **API key** in your profile settings.
   * Note your **Freshdesk domain URL** (e.g., `yourcompany.freshdesk.com`).

   <figure><img src="/files/J3AM1ZN0yFhejRGQtjgq" alt=""><figcaption></figcaption></figure>
4. **Connect Screendesk to Freshdesk**
   * Open a support ticket in Freshdesk.
   * Click on the **Screendesk** button in the Freshdesk messenger sidebar.
   * Follow the prompts to connect your Screendesk account with Freshdesk using the API key and domain URL.
5. **Complete the Setup**
   * Once connected, your integration is all set up.
6. **Start Using Screendesk Features**
   * Try requesting your first screen recording or launch a live video call to assist a customer.

### Additional Notes

Using the Screendesk app within Freshdesk enhances the support experience by keeping everything in one place, which improves response times and customer satisfaction.


# Freshdesk Portal

How to add a Screendesk button to Your Freshdesk Portal to receive screen recordings.

{% hint style="warning" %}
You must be an admin for both Freshdesk and Screendesk to complete this setup.
{% endhint %}

Adding a Screendesk button to your Freshdesk portal enables customers to share screen recordings directly through the help center form when they reach out. This setup eliminates the need to request recordings separately, saving time and reducing back-and-forth communication, which streamlines the support process and improves response efficiency.

### Step-by-Step Guide to Adding a Screendesk Button

1. **Access the Freshdesk Portals Settings**
   * Go to the [Portals section in Freshdesk settings](https://screendesk-helpdesk.freshdesk.com/a/admin/portals): Admin > search for "Portals"
2. **Edit Your Portal Appearance**
   * Click on **Edit** next to your desired portal.
   * Navigate to the **Appearance** section.
   * Click on **Edit Theme** to modify the portal’s layout and settings.

     <figure><img src="/files/XUsoIRAPJswVj9zhQ0dX" alt=""><figcaption></figcaption></figure>
3. **Open the Pages Tab**
   * Select the **Pages** tab within the theme editor.

     <figure><img src="/files/oj7nRbCH0kGYGA60LW8j" alt=""><figcaption></figcaption></figure>
4. **Edit the Layout Page**
   * In the **Layout** section, click on the **Layout** page to access the HTML editor.
5. **Get the Screendesk Code Snippet**
   * Open Screendesk in a new tab and go to **Account settings > Integrations > Freshdesk > Configure** via [this link](https://app.screendesk.io/integrations).
   * Copy the code snippet provided.
6. **Paste the Code Snippet into the Layout Page**

   * Return to the **Layout** page in Freshdesk.
   * Paste the Screendesk code snippet just below `{{footer}}` in the HTML editor.
   * Make sure to update the[ query selectors](#how-to-find-the-query-selectors) in the code snippet.

   ```markup
    // Initialize the screendesk recorder with the form fields.
       // The first parameter is the query selector of the field on which we will pass url of the recording.
       // The second parameter is the query selector of the field on which we will check for the email.
       window.initializeScreendesk("#description", "#email");
   ```
7. **Publish the Changes**
   * Click on **Publish** to save your changes.
   * Your Screendesk button is now live on the Freshdesk portal.

### How to find the query selectors

To find the ID of the email and description input fields on the Freshdesk portal, follow these steps:

1. Open your Freshdesk portal in a web browser.
2. &#x20;Right-click on the email input field and select "Inspect" or "Inspect Element" from the context menu.
3. In the developer tools that appear, look for the HTML code of the input field. The ID will be listed as an attribute, typically something like id="email\_address".
4. Repeat the process for the description field, right-clicking and inspecting it to find its ID in the HTML.&#x20;
5. Make sure to append # to the email and description ids when updating the code snippet. E.g: **email\_field becomes #email\_field**.

### Preview Your Portal

After publishing, preview your Freshdesk portal to ensure that the Screendesk button appears as expected and is functioning properly.


# Analytics

Screendesk tags added to Freshdesk conversations for tracking recordings and live sessions.

Screendesk will automatically tag conversations in the following cases:

| Tag                           | Case                                                   |
| ----------------------------- | ------------------------------------------------------ |
| screendesk-live-screensharing | When at least 2 people join a live screensahring room. |
| screendesk-recording-sent     | When an agent send a recording.                        |
| screendesk-recording-received | When a recording is received.                          |
| screedesk-recording-requested | When an agent request a recording.                     |

<figure><img src="/files/c9uPyWr7olePEv9MMOI8" alt=""><figcaption></figcaption></figure>


# Freshchat

Install the Screendesk app for Freshchat to request, send, and live-assist from the sidebar.

Integrating Screendesk with Freshchat provides a seamless experience for support agents, allowing them to access all Screendesk features without leaving Freshchat. This integration enables agents to easily manage screen recordings, share videos, and initiate live assistance directly from their conversations.

### Key Features of the Screendesk App in Freshchat

With the Screendesk app installed, agents can:

* **Request Screen Recordings from Customers**: Easily ask customers to share screen recordings for troubleshooting
* **Send Screen Recordings**: Share recordings with customers directly within a conversation
* **Send Videos from the Video Library**: Use pre-recorded videos to answer common questions or provide instructions
* **Start Live Screen Sharing Sessions or Live Video Calls**: Assist customers in real time by sharing screens or using live video

### Where to Access Screendesk in Freshchat

You can access Screendesk directly within Freshchat, in any conversation, from the sidebar.

<figure><img src="/files/Cj10uiG9nzNf1x3gbKdg" alt=""><figcaption></figcaption></figure>

### Step-by-Step Guide to Setting Up Screendesk with Freshchat

Follow these steps to integrate Screendesk with your Freshchat account:

#### 1. Sign Up for Screendesk

Create a Screendesk account by [signing up here](https://app.screendesk.io/users/sign_up).

#### 2. Install the Screendesk App in Freshchat

* Go to the [Screendesk app page in the Freshworks Marketplace](https://www.freshworks.com/apps/screendesk_-_screen_recordings_video_calls/)
* Click the **Install** button to add the Screendesk app to your Freshchat account

<figure><img src="/files/Pet6f6KJ7q3dGOrrBzYz" alt=""><figcaption></figcaption></figure>

#### 3. Get Your Freshchat API Key and Domain URL

* At the top right of your Freshchat page, click on your **profile picture**
* Select **Personal Settings** (open in a new tab to keep the app settings page accessible)
* Click on **API Settings**
* Copy your **API key** and your **Chat URL/Domain**

#### 4. Connect Screendesk to Freshchat

* Open a conversation in Freshchat
* Locate the **Screendesk app** in the sidebar

<figure><img src="/files/o4cBGrJVzTbuWgSdYPmM" alt=""><figcaption></figcaption></figure>

* Click **Connect**
* You'll be taken to the Screendesk dashboard
* You'll see a notification confirming that the integration was successful

#### 5. Complete the Setup

* Go back to your Freshchat conversation and **refresh the page**
* That's it! You can now start using Screendesk


# HubSpot

Install the Screendesk app to HubSpot

### How to install the Screendesk app on HubSpot

{% hint style="info" %}
You must be a HubSpot admin to install the Screendesk app
{% endhint %}

{% stepper %}
{% step %}

### Visit the integrations page

Visit account settings / Integrations and then click on the "Connect" button.

<figure><img src="/files/vd85L6kHPgjfPRpyjuP5" alt=""><figcaption></figcaption></figure>
{% endstep %}

{% step %}

### Add the Screendesk app to the Help Desk

Navigate to your HubSpot workspace settings, select Tools, and click on Help Desk. Go to the Sidebar customization tab and choose Default view.

<figure><img src="/files/SrJt3vD73dCH8D1T4q1v" alt=""><figcaption></figcaption></figure>

Add the Screendesk card to your layout.

<figure><img src="/files/akaAgfSefpY6L4XGqN19" alt=""><figcaption></figcaption></figure>
{% endstep %}
{% endstepper %}

### Request and Send recordings

<figure><img src="/files/ae2ECFkzMwNj43ZJP34i" alt=""><figcaption></figcaption></figure>

1. Open any ticket in your Help Desk.
2. Display the sidebar.
3. Request and send recordings.

### Notes

Requested recordings will be automatically added as a note to the ticket.

<figure><img src="/files/B11TZVxEkcoKANcfbhTq" alt=""><figcaption></figcaption></figure>


# Chatbots


# Certainly.io

There is no native Certainly-Screendesk integration, but Screendesk's recording request link can be embedded directly in Certainly's chatbot cards and buttons to trigger screen recordings from AI-assisted conversations.

### How It Works

Screendesk provides a direct recording request link that can be embedded anywhere:

```
https://app.screendesk.io/recordings/new?ak={ACCOUNT_KEY}&key={USER_KEY}&src=rria&p=1
```

End users click the link, record their screen in-browser (no install required), and the recording appears in the Screendesk dashboard. You can find that link on the dashboard.

<figure><img src="/files/MGXZaVn0lhAbihXsQnXj" alt=""><figcaption></figcaption></figure>

### Recording Request Link Parameters

| Parameter | Required | Description                                                     |
| --------- | -------- | --------------------------------------------------------------- |
| `ak`      | Yes      | Account key — identifies the Screendesk workspace               |
| `key`     | Yes      | User API key — identifies the agent requesting the recording    |
| `src`     | No       | Source identifier for tracking (use `rria` for generic request) |
| `ce`      | No       | Customer email — associates the recording with a customer       |
| `zid`     | No       | Zendesk ticket ID — links the recording to a Zendesk ticket     |
| `p=1`     | No       | Show account recorder instead of personal recorder.             |

### Integration Methods

#### A) Generic Card with "Open URL" Button (Simplest)

1. In Certainly's bot builder, open the relevant Module
2. Add a **Generic Card** with a title like "Record Your Screen"
3. Add a **Button** with Action: "Open URL"
4. Paste the Screendesk recording link:

   ```
   https://app.screendesk.io/recordings/new?ak=YOUR_ACCOUNT_KEY&key=USER_KEY&src=rria&p=1
   ```
5. Set the link to open in another tab so the chat stays open

#### B) Dynamic Card with Variables (Personalized)

1. Collect the customer's email in an earlier module and store it as a Custom Variable (`customer_email`)
2. If you also have a Zendesk ticket ID, store it as a Custom Variable such as `zendesk_id`
3. Use Jinja2 templating to embed the values in the URL:

   ```
   https://app.screendesk.io/recordings/new?ak=YOUR_ACCOUNT_KEY&key=YOUR_API_KEY&src=rria&ce={{customer_email}}&zid={{zendesk_id}}
   ```

This associates the recording with the customer automatically.

If you have a Zendesk ticket ID available, you can also pass `zid` from a custom variable. This links the recording to the Zendesk ticket as well.

#### C) Web SDK (Programmatic)

Use Certainly's Web SDK to send the recording link programmatically from bot logic:

```js
certainly.sendMessage({
  sender: "bot",
  message: {
    text: "Please record your screen so we can help you faster: https://app.screendesk.io/recordings/new?ak=YOUR_ACCOUNT_KEY&key=YOUR_API_KEY&src=rria&p=1"
  },
  webchatKey: "1"
});
```

### Source Tracking

Recordings triggered from Certainly use the `src` parameter for analytics. Recommended values:

* `rria` — Generic "request recording in-app" (works out of the box)
* `rrz` — Generic "Zendesk Ticket" (works out of the box)

### Relevant Documentation

#### Certainly

* [Generic Cards](https://support.certainly.io/knowledge/Add-clickable-Generic-Cards-with-images-to-your-bot)
* [Webhooks](https://support.certainly.io/knowledge/configure-webhooks-for-use-in-your-chatbot)
* [Web SDK](https://support.certainly.io/knowledge/certainly-s-conversational-web-sdk)

#### Screendesk

* [Screen Recording Experience](https://docs.screendesk.io/use-case/request-screen-recordings/screen-recording-experience)
* [API Overview](https://docs.screendesk.io/api/v1/screendesk-api/overview)


# Slack

Get Slack notifications when new Screendesk recordings are submitted.

The Slack integration sends a notification to a Slack channel every time a new recording is available in your Screendesk workspace. This helps your support team react to customer issues the moment they come in, without leaving Slack.

{% hint style="info" %}
This page covers the **Slack integration** found under **Settings → Integrations**. It sends notifications for new recordings to a single Slack channel. If you're looking for folder-based automations that post to Slack when captures or recordings are added to specific folders, see Folder Automations.
{% endhint %}

### How it works

When a customer sends a recording through any source (your website widget, Chrome extension, helpdesk integration, or a shared link), Screendesk posts a message to your connected Slack channel. The message includes:

* The **customer's email address** (or "Anonymous User" if no email was provided)
* The **recording source** (e.g. Chrome Extension, Widget, Zendesk, etc.)
* A **direct link** to the recording in Screendesk

Your team can click the link to jump straight to the recording and start reviewing the issue.

{% hint style="info" %}
Slack notifications are sent approximately one minute after the recording is received. This short delay ensures the recording has finished processing before the notification is delivered.
{% endhint %}

### Availability

The Slack integration is available on **all plans** — Free, Plus, Pro, and Enterprise.

### Connecting Slack

Only **workspace admins** can connect or disconnect Slack. If you are not an admin, the Connect button will appear disabled.

{% stepper %}
{% step %}

#### Open the Integrations page

Navigate to **Settings → Integrations** in your Screendesk dashboard. Scroll down to the **Slack** card.

<figure><img src="/files/GMvxrK2MLP508naK6fhE" alt=""><figcaption></figcaption></figure>
{% endstep %}

{% step %}

#### Start the connection

Click the **Connect** button. You will be redirected to Slack's authorization page.
{% endstep %}

{% step %}

#### Authorize Screendesk

On the Slack authorization page, select the **workspace** you want to connect and the **channel** where notifications should be posted. Click **Allow** to grant Screendesk permission.
{% endstep %}

{% step %}

#### Confirm the connection

You are redirected back to Screendesk. The Slack card now shows **Connected** and displays the name of the channel you selected (e.g. `#support`).
{% endstep %}
{% endstepper %}

Once connected, Screendesk will post new recording notifications to the selected channel automatically — no further configuration is needed.

### What the Slack message looks like

Each notification is a compact Slack message with two sections:

1. **A summary line** — shows who sent the recording and the source, for example: **<customer@example.com>** sent a recording from **Chrome Extension**
2. **A clickable link** — takes you directly to the recording in Screendesk

The message uses Slack's rich formatting so it's easy to scan in a busy channel.

### Disconnecting Slack

{% stepper %}
{% step %}

#### Open the Integrations page

Go to **Settings → Integrations** and find the Slack card.
{% endstep %}

{% step %}

#### Disconnect

Click the **Disconnect** link. A confirmation dialog will ask "Are you sure?" — confirm to proceed.
{% endstep %}
{% endstepper %}

Disconnecting removes the integration immediately. Screendesk will stop posting to Slack and clears all stored connection details. You can reconnect at any time by following the setup steps again.

{% hint style="warning" %}
If someone uninstalls the Screendesk app directly from your Slack workspace (via **Slack → Apps → Manage**), the integration is automatically disconnected on the Screendesk side as well. No action is needed in Screendesk.
{% endhint %}

### Permissions required

Screendesk requests the following Slack permissions during setup:

| Permission                                           | Why it's needed                                          |
| ---------------------------------------------------- | -------------------------------------------------------- |
| **Send messages** (`chat:write`)                     | Post recording notifications to your channel             |
| **Incoming webhook**                                 | Deliver messages to the specific channel you chose       |
| **Customize messages** (`chat:write.customize`)      | Format notifications with the Screendesk name and icon   |
| **Unfurl links** (`links:read`, `links.embed:write`) | Show a preview when Screendesk links are shared in Slack |

Screendesk does not read your Slack messages, access private channels you haven't selected, or modify your workspace in any way.

### Which recordings trigger a notification?

Slack notifications are sent for **incoming recordings** — recordings that your customers submit to your workspace. Recordings created internally by your team (for example, screen recordings made by an agent to share with a customer) do not trigger Slack notifications.

### Good to know

* **One channel per workspace.** The integration posts all notifications to the single channel you selected during setup. To change the channel, disconnect and reconnect the integration.
* **Admin-only control.** Only workspace admins can connect or disconnect Slack. Regular agents and watch-only users cannot modify the integration.
* **Works alongside other notifications.** Slack notifications are independent of email and in-app notifications. Enabling Slack does not affect your other notification settings.
* **No message customization.** The Slack notification format is fixed. If you need customizable messages, channel-per-folder routing, or screenshot attachments, use Folder Automations with a Slack automation instead.

### Troubleshooting

<details>

<summary>I connected Slack but I'm not receiving notifications</summary>

Check the following:

* Confirm the integration shows **Connected** on the Settings → Integrations page.
* Make sure the channel you selected during setup still exists and hasn't been archived.
* Verify the Screendesk bot hasn't been removed from the channel. In Slack, open the channel and look for the Screendesk app in the member list.
* Remember that internally-created recordings (not sent by customers) do not trigger Slack notifications.
* Notifications are delayed by about one minute, so wait briefly after a test recording.

</details>

<details>

<summary>The Connect button is disabled</summary>

Only workspace admins can connect the Slack integration. Ask an admin on your team to set it up for you. You can check your role under **Settings → Members**.

</details>

<details>

<summary>I want to change the Slack channel</summary>

The channel is set during the initial OAuth authorization. To change it, disconnect the integration and reconnect — you'll be able to pick a different channel during the new authorization flow.

</details>

<details>

<summary>The integration was disconnected unexpectedly</summary>

This can happen if someone uninstalls the Screendesk app from your Slack workspace settings. When the app is removed from Slack, Screendesk automatically clears the connection. An admin can reconnect at any time.

</details>


# Zapier

Connect Screendesk to 5,000+ apps in Zapier using an API token, and automate workflows from new incoming recordings.

The Zapier integration lets you connect Screendesk to over 5,000 apps — including your CRM, project management tools, spreadsheets, and more. When new recordings arrive in Screendesk, Zapier can automatically create tickets, update spreadsheets, send alerts, or trigger any other workflow you configure.

{% hint style="info" %}
This page covers the **Zapier integration** found under **Settings → Integrations**, which connects to Zapier's marketplace and uses the Screendesk API. If you're looking to send webhook data to Zapier from specific folders, see Folder Automations.
{% endhint %}

### How it works

Screendesk has a published app on the [Zapier marketplace](https://zapier.com/apps/screendesk/integrations). You create **Zaps** (automated workflows) in Zapier that pull recording data from Screendesk using its API. From there, Zapier can route that data into any of the thousands of apps it supports.

For example, you could set up a Zap that:

* Creates a **Jira ticket** every time a new recording arrives
* Logs recording details into a **Google Sheet** for reporting
* Sends a **Microsoft Teams** message to your engineering channel
* Adds a task to **Asana** or **Trello** for follow-up

### Availability

The Zapier integration card is visible on **all plans** — Free, Plus, Pro, and Enterprise.

The Zapier app uses the Screendesk API under the hood, which requires an **API token**. API token creation is available on the **Enterprise plan**. Contact your Screendesk account team if you need API access enabled.

### Setting up Zapier

{% stepper %}
{% step %}

#### Open the Integrations page

Navigate to **Settings → Integrations** in your Screendesk dashboard. Scroll down to the **Zapier** card.

<figure><img src="/files/gAqRoOQokUfAMX2vUPD4" alt=""><figcaption></figcaption></figure>
{% endstep %}

{% step %}

#### Go to the Zapier marketplace

Click the **Connect** button. This opens the [Screendesk page on Zapier](https://zapier.com/apps/screendesk/integrations) in a new browser tab.
{% endstep %}

{% step %}

#### Create a Zap

In Zapier, click **Create Zap** or choose one of the pre-built templates. Select **Screendesk** as your trigger app and choose the trigger event (e.g. "New Recording").
{% endstep %}

{% step %}

#### Authenticate with your API token

Zapier will ask you to connect your Screendesk account. You'll need an API token:

1. In Screendesk, go to **Profile → API**
2. Click **Create API Token** and give it a name (e.g. "Zapier")
3. Copy the token
4. Paste it into Zapier when prompted

For more details on managing tokens, see API Tokens.
{% endstep %}

{% step %}

#### Choose an action

Select the destination app (e.g. Jira, Google Sheets, Slack) and configure what should happen when a new recording arrives. Map the Screendesk recording fields to the fields in your destination app.
{% endstep %}

{% step %}

#### Test and enable

Use Zapier's built-in test feature to verify the connection works, then turn on your Zap. New recordings will now flow through automatically.
{% endstep %}
{% endstepper %}

### Recording data available in Zapier

When Zapier pulls recording data from Screendesk, the following fields are available for mapping into your workflows:

| Field             | API key             | Description                                                                       |
| ----------------- | ------------------- | --------------------------------------------------------------------------------- |
| Recording ID      | `id`                | Unique internal identifier                                                        |
| UUID              | `uuid`              | Unique public identifier used in URLs                                             |
| URL               | `url`               | Direct link to the recording in Screendesk                                        |
| Customer email    | `customer_email`    | The email address of the person who submitted the recording                       |
| Description       | `description`       | Any description or notes attached to the recording                                |
| Duration          | `duration`          | Length of the recording in seconds                                                |
| Recording type    | `recording_type`    | Whether the recording was incoming, outgoing, etc.                                |
| Recording source  | `recording_source`  | How the recording was submitted (e.g. Chrome Extension, Widget)                   |
| Vendor            | `vendor`            | The browser used (e.g. Chrome, Firefox)                                           |
| Platform          | `platform`          | The platform (e.g. web, desktop)                                                  |
| IP address        | `ip_address`        | The IP address of the person who recorded                                         |
| Timezone          | `timezone`          | The timezone of the recorder                                                      |
| Network type      | `network_type`      | Connection type (e.g. wifi, cellular)                                             |
| ISP               | `isp`               | Internet service provider                                                         |
| Console logs      | `console_logs`      | Browser console output captured during the recording                              |
| User email        | `user_email`        | Email of the Screendesk team member (only present if a team member is associated) |
| User name         | `user_name`         | Name of the Screendesk team member (only present if a team member is associated)  |
| Created at        | `created_at`        | When the recording was created                                                    |
| Updated at        | `updated_at`        | When the recording was last updated                                               |
| Impressions count | `impressions_count` | Number of times the recording has been viewed                                     |

{% hint style="info" %}
Only **incoming recordings** (recordings submitted by customers) are returned through the Zapier integration. Internally-created recordings are not included.
{% endhint %}

### Good to know

* **No admin setup required in Screendesk.** The Zapier card on the Integrations page simply links to the Zapier marketplace. There is no OAuth connection or configuration to manage within Screendesk itself.
* **API token required.** The Screendesk app on Zapier authenticates using an API token. You'll need to create one under **Profile → API**. See API Tokens for details.
* **Enterprise plan for API access.** API token creation requires the Enterprise plan. If your plan doesn't include API access, contact your Screendesk account team.
* **Watch-only users cannot use API tokens.** If your role is watch-only, you won't be able to create tokens or authenticate with Zapier.
* **Pagination.** Zapier retrieves recordings in batches of 100 at a time, ordered from newest to oldest. This is handled automatically by Zapier — you don't need to configure anything.
* **Works alongside other integrations.** Setting up Zapier does not affect your other Screendesk integrations (Slack, Zendesk, etc.). They all operate independently.

### Example Zaps for support teams

Here are some popular workflows that support teams set up with Zapier:

<details>

<summary>Log new recordings to a Google Sheet</summary>

Track every incoming customer recording in a spreadsheet for reporting or auditing. Map fields like customer email, recording source, URL, and timestamp into columns. Great for managers who want visibility into recording volume and trends.

</details>

<details>

<summary>Create a Jira or Linear issue for each recording</summary>

Automatically turn customer recordings into engineering tickets. Include the recording URL and customer email in the issue description so developers have everything they need.

</details>

<details>

<summary>Send a notification to Microsoft Teams or Discord</summary>

If your team doesn't use Slack, route recording alerts to Teams or Discord instead. Include the customer email and a link to the recording.

</details>

<details>

<summary>Add a row to Airtable or Notion</summary>

Build a customer feedback database that grows automatically. Each new recording becomes a row with metadata fields filled in.

</details>

### Troubleshooting

<details>

<summary>Zapier says my API token is invalid</summary>

Double-check that you copied the full token from **Profile → API** in Screendesk. Tokens must be entered exactly — make sure there are no extra spaces before or after the token. Also verify the token hasn't been revoked.

</details>

<details>

<summary>I don't see the option to create an API token</summary>

API token creation is available on the **Enterprise plan** only. If you're on a different plan, contact your Screendesk account team to discuss upgrading. Also note that watch-only users cannot create tokens regardless of plan.

</details>

<details>

<summary>My Zap isn't triggering for new recordings</summary>

Verify the following:

* Your Zap is **turned on** in Zapier.
* The API token you used hasn't been revoked (check **Profile → API** in Screendesk).
* You're testing with an **incoming recording** (sent by a customer). Internal recordings are not included.
* Check Zapier's task history for any error messages.

</details>

<details>

<summary>I want to connect Zapier to a specific folder</summary>

The Zapier integration under Settings → Integrations works at the workspace level and returns all incoming recordings. If you need folder-specific triggers, use Folder Automations with a Zapier webhook recipe instead. That approach lets you configure a webhook per folder that sends data directly to a Zapier "Catch Hook" trigger.

</details>


# Overview

Organize recordings at scale with folders, triage rules, automations, labels, and assignees.

## Organization & Workflows

Use this section to keep recordings organized at scale. Start with folders. Add triage rules and automations. Use labels and assignees to track ownership.

### Jump to

<table data-view="cards"><thead><tr><th>Topic</th><th data-card-target data-type="content-ref">Read</th></tr></thead><tbody><tr><td>Folders</td><td><a href="/spaces/fW6XSzJSKsNyZnOkSJPt/pages/w7zeeVrGkTUMzF4h6O5f">/spaces/fW6XSzJSKsNyZnOkSJPt/pages/w7zeeVrGkTUMzF4h6O5f</a></td></tr><tr><td>Recording triage</td><td><a href="/spaces/fW6XSzJSKsNyZnOkSJPt/pages/KwFNvQsjLFFayFoyr2sa">/spaces/fW6XSzJSKsNyZnOkSJPt/pages/KwFNvQsjLFFayFoyr2sa</a></td></tr><tr><td>Automations</td><td><a href="/spaces/fW6XSzJSKsNyZnOkSJPt/pages/mFP4lrdYS6555o2mBE01">/spaces/fW6XSzJSKsNyZnOkSJPt/pages/mFP4lrdYS6555o2mBE01</a></td></tr><tr><td>Labels &#x26; Assignees</td><td><a href="/spaces/fW6XSzJSKsNyZnOkSJPt/pages/utjL0VB63bGThfQulYdb">/spaces/fW6XSzJSKsNyZnOkSJPt/pages/utjL0VB63bGThfQulYdb</a></td></tr></tbody></table>

***

### What each feature does

#### Folders

{% hint style="info" %}
Available on all plans. Private folders require Plus, Pro, or Enterprise.
{% endhint %}

Use folders to group recordings and captures. Use them for teams, customers, or priorities. Add private folders for sensitive content.

Key capabilities:

* Public and private folders
* Recording folder types (received, sent, library, live)
* Pin and archive folders
* Move recordings in bulk

[Learn about folders](/organization-and-workflows/folders).

***

#### Recording triage (triage rules)

{% hint style="info" %}
Available on Pro and Enterprise.
{% endhint %}

Use triage rules to auto-route new recordings into the right folder. Rules run in priority order. The first match wins.

Key capabilities:

* Route by source, email, country, recording type, user, and audio status
* Combine multiple conditions (all conditions must match)
* Reorder rules to control priority
* Test a rule before enabling it

[Learn about recording triage](/organization-and-workflows/recording-triage).

***

#### Automations

{% hint style="info" %}
Available on Pro and Enterprise.
{% endhint %}

Use automations to trigger actions when something lands in a folder. This is where notifications and ticket creation happen.

Common actions:

* Email notifications
* Slack messages
* Webhooks
* Issue creation (Linear, Jira, GitHub, Trello)

[Learn about automations](/organization-and-workflows/automations).

***

#### Labels & Assignees

{% hint style="info" %}
Available on all plans.
{% endhint %}

Use labels to categorize. Use assignees to set ownership. Combine both for fast filtering and reporting.

Key capabilities:

* Custom labels with colors
* Multiple assignees per recording
* Filter views by label and assignee
* Assignment notifications

[Learn about labels & assignees](/organization-and-workflows/labels).

### A simple recommended workflow

```
Recording submitted
  ↓
Triage rule routes it into a folder
  ↓
Folder automation posts to Slack / creates a ticket
  ↓
Agent labels + assigns for follow-up
  ↓
Move to a “Resolved” folder when complete
```


# Folders

Create public or private folders to organize recordings and captures.

Folders let you group related recordings and bug reports so your team can find, triage, and manage work faster. Every workspace starts without folders — you create them as your needs grow.

***

### Folder types

Screendesk has two kinds of folders, each designed for a different content type.

**Capture folders** hold bug reports collected through the capture widget.

**Recording folders** hold video recordings. When you create a recording folder you choose one of four content types:

* **Received** — recordings sent in by customers
* **Sent** — recordings your team sends out
* **Live** — recordings from live screen-sharing sessions
* **Library** — reusable videos your team keeps on hand

A folder's type and content type are set at creation and cannot be changed later.

***

### Creating a folder

{% stepper %}
{% step %}

#### Navigate to the folder list

For capture folders, go to **Bug Reports** in the sidebar. For recording folders, go to the relevant recording section (**Received**, **Sent**, **Live**, or **Library**).
{% endstep %}

{% step %}

#### Click the **New Folder** button

A modal appears asking for:

* **Name** (required, up to 100 characters) — must be unique among active folders of the same type
* **Description** (optional)
* **Access level** — Public (default) or Private

<figure><img src="/files/iQ2YiCibPujrBJxNXJAQ" alt=""><figcaption></figcaption></figure>
{% endstep %}

{% step %}

#### Save

The folder appears in the list immediately.
{% endstep %}
{% endstepper %}

{% hint style="info" %}
Folder names are case-insensitive. You cannot have both "Urgent" and "urgent" as active capture folders.
{% endhint %}

***

### Editing and renaming a folder

Open the folder or find it in the folder list, click the **⋯** menu, and choose **Rename**. You can update the name and description. The folder type and content type cannot be changed.

<div align="left"><figure><img src="/files/0eGRUACbWtfNa6hdqJKs" alt="" width="375"><figcaption></figcaption></figure></div>

***

### Moving items into a folder

Open a recording or bug report, click **Move to Folder**, and pick the destination. For recordings, only folders matching the recording's content type appear in the list.

You can also move multiple recordings at once using the bulk-select checkbox, then clicking **Move to Folder**.

To remove an item from a folder, open the move dialog and choose **Remove from folder**. The item returns to the unfoldered list.

<figure><img src="/files/anqgIA08Okwt1oIDjcIS" alt=""><figcaption></figcaption></figure>

***

### Pinning folders

Pin the folders you use most so they appear in the sidebar for one-click access.

* **Pin** — open the folder's **⋯** menu and choose **Pin**. The folder appears under **Folders** in the sidebar.
* **Unpin** — right-click (or use the **⋯** menu) on a pinned folder in the sidebar and choose **Unpin**.
* **Reorder** — drag and drop pinned folders in the sidebar to arrange them in the order you prefer.

Pinned folders are personal — each team member manages their own list.

<figure><img src="/files/WxMyz2tgHIFpN15EemdJ" alt=""><figcaption></figcaption></figure>

***

### Private folders

By default, folders are **public** — every workspace member can see them. If you need to restrict access, set a folder to **Private**. Private folders are only visible to:

* The folder creator
* Members explicitly added to the folder
* Admins and Editors (who always see all folders)

{% stepper %}
{% step %}

#### Set access level

When creating a folder, choose **Private**. Or, on an existing folder, click the **⋯** menu → **Manage Access** and switch to **Private**.
{% endstep %}

{% step %}

#### Add members

In the same Manage Access panel, search for workspace members by name or email and add them. The creator is added automatically and cannot be removed.

<figure><img src="/files/VtrSck2zGxtxyY7peOsB" alt=""><figcaption></figcaption></figure>
{% endstep %}
{% endstepper %}

When a private folder is switched back to public, the member list is cleared and the folder becomes visible to everyone again.

{% hint style="warning" %}
Private folders require the **Plus**, **Pro**, or **Enterprise** plan.
{% endhint %}

***

### Archiving and deleting folders

**Archiving** removes a folder from the active list but keeps it and its contents intact. Click the **⋯** menu → **Archive**. Archived folders can be viewed on the **Archived Folders** page and restored at any time.

**Deleting** permanently removes the folder **and all its contents** (recordings or bug reports inside it). Click the **⋯** menu → **Delete** and confirm. This action cannot be undone.

{% hint style="danger" %}
Deleting a folder deletes everything inside it. If you only want to hide a folder, use **Archive** instead.
{% endhint %}

<figure><img src="/files/IGCUtsOesaC750Y97Kwd" alt=""><figcaption></figcaption></figure>

***

### Automations

Each folder can have automations that trigger when new items land in it — for example, posting to Slack or creating a Jira ticket. See [Automations](/organization-and-workflows/automations) for setup details.

***

### Permissions

| Action                  | Owner             | Admin | Editor | Member   | Watch Only |
| ----------------------- | ----------------- | ----- | ------ | -------- | ---------- |
| Create folders          | ✅                 | ✅     | ✅      | —        | —          |
| Rename / edit           | ✅                 | ✅     | ✅      | —        | —          |
| Archive / restore       | ✅                 | ✅     | ✅      | —        | —          |
| Delete folders          | ✅                 | ✅     | ✅      | —        | —          |
| View public folders     | ✅                 | ✅     | ✅      | ✅        | ✅          |
| View private folders    | Creator + members | ✅     | ✅      | If added | —          |
| Manage access & members | ✅                 | ✅     | ✅      | —        | —          |

***

### Good to know

* Capture folders and recording folders are **completely separate**. A capture folder cannot hold recordings and vice versa.
* Each recording folder is locked to one content type (Received, Sent, Live, or Library). You cannot move a recording into a folder of a different content type.
* Folder item counts update automatically. The count shown on a folder card reflects the current number of items inside.
* Archiving a folder appends a timestamp to the name, freeing up the original name for a new folder.
* When a member is removed from a private folder they had pinned, the pin is automatically removed.
* All folder operations (create, edit, archive, delete) are recorded in the audit log when audit logs are enabled.


# Automations

Trigger notifications and ticket creation when items land in a folder.

Folder automations let you automatically trigger actions when recordings or bug reports are added to specific folders. Streamline your workflow by automatically notifying teams, creating tickets, and integrating with your existing tools—all without manual intervention.

***

### What Are Folder Automations?

Folder automations are rules that execute automatically when content is added to a folder. Think of them as "if-this-then-that" rules for your Screendesk workspace:

**The trigger:** A recording or capture lands in a specific folder **The action:** Screendesk automatically notifies your team, creates a ticket, or sends data to another system

This happens instantly, every time, without anyone lifting a finger.

<figure><img src="/files/brnMdQQeqeUnUkdNcfTT" alt=""><figcaption></figcaption></figure>

***

### How Automations Work

The automation flow is simple:

{% stepper %}
{% step %}

#### Content arrives in folder

A recording or capture is added to a folder—either manually by a team member or automatically through triage rules.
{% endstep %}

{% step %}

#### Automations check and execute

Screendesk checks if any automations are configured for that folder. If found, they execute immediately in the background.
{% endstep %}

{% step %}

#### Actions complete

The automation sends notifications, creates tickets, or triggers webhooks. All activity is logged for review.
{% endstep %}
{% endstepper %}

***

### Available Automations

Screendesk supports seven types of automations, from simple email notifications to full issue tracker integrations:

<table data-view="cards"><thead><tr><th>Automation</th><th data-hidden data-card-target data-type="content-ref"></th></tr></thead><tbody><tr><td><strong>Email</strong><br>Send email notifications to team members when new content arrives</td><td><a href="/spaces/fW6XSzJSKsNyZnOkSJPt/pages/6pTexuHt8nGN6UUTNkp1">/spaces/fW6XSzJSKsNyZnOkSJPt/pages/6pTexuHt8nGN6UUTNkp1</a></td></tr><tr><td><strong>Webhook</strong><br>Send data to any URL for custom integrations with your tools</td><td><a href="/spaces/fW6XSzJSKsNyZnOkSJPt/pages/lqYpvlUzVnivRBuHRJuI">/spaces/fW6XSzJSKsNyZnOkSJPt/pages/lqYpvlUzVnivRBuHRJuI</a></td></tr><tr><td><strong>Slack</strong><br>Post rich messages to Slack channels with video previews</td><td><a href="/spaces/fW6XSzJSKsNyZnOkSJPt/pages/YJPNsgmefAN8apckNvGn">/spaces/fW6XSzJSKsNyZnOkSJPt/pages/YJPNsgmefAN8apckNvGn</a></td></tr><tr><td><strong>Linear</strong><br>Automatically create issues in Linear with full recording context</td><td><a href="/spaces/fW6XSzJSKsNyZnOkSJPt/pages/PC1Ut0uiQ39C08bIMv81">/spaces/fW6XSzJSKsNyZnOkSJPt/pages/PC1Ut0uiQ39C08bIMv81</a></td></tr><tr><td><strong>Jira</strong><br>Create Jira tickets from recordings with attachments and metadata</td><td><a href="/spaces/fW6XSzJSKsNyZnOkSJPt/pages/SrTCHtHrMR4Uhtzhw7f5">/spaces/fW6XSzJSKsNyZnOkSJPt/pages/SrTCHtHrMR4Uhtzhw7f5</a></td></tr><tr><td><strong>GitHub</strong><br>Create GitHub issues in your repositories with video evidence</td><td><a href="/spaces/fW6XSzJSKsNyZnOkSJPt/pages/fJOnaq74AMPF1aPZbHCg">/spaces/fW6XSzJSKsNyZnOkSJPt/pages/fJOnaq74AMPF1aPZbHCg</a></td></tr><tr><td><strong>Trello</strong><br>Add cards to Trello boards with recording links and details</td><td><a href="/spaces/fW6XSzJSKsNyZnOkSJPt/pages/alrWlAuWjiw14uCcsgM6">/spaces/fW6XSzJSKsNyZnOkSJPt/pages/alrWlAuWjiw14uCcsgM6</a></td></tr><tr><td><strong>Apply Label</strong><br>Automatically apply a label to every new recording in this folder</td><td><a href="/pages/HetJ3ZsO5yPhDSfEN5wF">/pages/HetJ3ZsO5yPhDSfEN5wF</a></td></tr></tbody></table>

***

### Common Use Cases

Automations solve real workflow problems. Here are the most common scenarios:

#### Bug Triage Workflow

**Scenario:** Engineering team needs immediate visibility into customer-reported bugs

**Solution:**

```
Folder: "Bug Reports"
├── Apply Label automation → tag as "bug-report"
├── Slack automation → #engineering-bugs channel
├── Linear automation → Create issue with P2 priority
└── Email automation → engineering-leads@company.com
```

When a bug report lands in the folder, it's automatically labeled as `bug-report`, engineers get a Slack notification, a Linear issue is created automatically, and leadership receives an email summary.

***

#### VIP Customer Support

**Scenario:** Enterprise customers need white-glove support with immediate response

**Solution:**

```
Folder: "Enterprise Customers"
├── Slack automation → #enterprise-support channel (with @channel mention)
├── Email automation → account-managers@company.com, support-leads@company.com
└── Jira automation → Create ticket with "Enterprise" label and P0 priority
```

VIP customers get instant attention across multiple channels.

***

#### Feature Request Pipeline

**Scenario:** Product team wants to track customer feature requests without manual data entry

**Solution:**

```
Folder: "Feature Requests"
├── Apply Label automation → tag as "feature-request"
└── Linear automation → Product team project with "customer-request" label
```

Every feature request is automatically labeled as `feature-request` and becomes a trackable issue in your product backlog.

***

#### Critical Incident Response

**Scenario:** On-call team needs immediate alerts for system-impacting issues

**Solution:**

```
Folder: "Critical Incidents"
├── Webhook automation → PagerDuty alert
├── Slack automation → #incidents channel
└── Email automation → oncall@company.com
```

Critical issues trigger immediate alerts across all your incident response channels.

***

### Key Features

{% hint style="info" %}
**Multiple Automations Per Folder**

A single folder can have multiple automations. All enabled automations execute when content is added to the folder.
{% endhint %}

#### Template Variables

Customize messages and payloads using dynamic variables that pull data from recordings:

* `{{recording.title}}` — Recording title
* `{{recording.customer_email}}` — Customer email address
* `{{recording.url}}` — Direct link to the recording
* `{{folder.name}}` — Folder name
* And many more...

[View complete variable reference →](/organization-and-workflows/automations/template-variables-reference)

#### Execution Logs

Every automation execution is logged with full details:

* Timestamp and status (success/failure)
* Request payload sent
* Response received
* Error messages if failed
* Retry attempts

Review logs to troubleshoot issues or verify delivery.

#### Test Before You Deploy

All automations include a test function:

* Send a test email before activating
* Trigger a test webhook to verify your endpoint
* Post a test message to Slack
* Create a test issue in your tracker

Test automations before they go live to ensure everything works correctly.

***

### Plan Requirements

{% hint style="warning" %}
**Pro and Enterprise Plans Only**

Folder automations are available on Pro and Enterprise plans. Starter plan users can view automation settings but cannot create or enable automations.

[View plan comparison →](https://www.screendesk.io/pricing)
{% endhint %}

***

### Getting Started

Ready to set up your first automation?

{% tabs %}
{% tab title="Quick Start" %}
The fastest way to get started:

1. Open any folder in your workspace
2. Click the **Settings** (gear) icon
3. Navigate to the **Automations** tab
4. Click **Add Automation**
5. Choose **Email** for your first automation
6. Enter your email address
7. Click **Save** and **Send Test**

You'll receive a test email within seconds. Once verified, the automation is live.

[Detailed setup guide →](/organization-and-workflows/automations/getting-started)
{% endtab %}

{% tab title="Planning Your Setup" %}
Before creating automations, plan your folder structure:

1. **Identify key workflows** — Where do you need notifications?
2. **Map folders to teams** — Which folders need which alerts?
3. **Choose integration types** — Email, Slack, tickets, or webhooks?
4. **Define message templates** — What information needs to be included?
5. **Test thoroughly** — Verify each automation before activating

[Read the getting started guide →](/organization-and-workflows/automations/getting-started)
{% endtab %}
{% endtabs %}

***

### Next Steps

<table data-view="cards"><thead><tr><th>Resource</th><th data-hidden data-card-target data-type="content-ref"></th></tr></thead><tbody><tr><td><strong>Getting Started Guide</strong><br>Step-by-step setup instructions</td><td><a href="/spaces/fW6XSzJSKsNyZnOkSJPt/pages/aTYPD8gTQRNfsqMpTnEq">/spaces/fW6XSzJSKsNyZnOkSJPt/pages/aTYPD8gTQRNfsqMpTnEq</a></td></tr><tr><td><strong>Template Variables</strong><br>Complete reference of available variables</td><td><a href="/spaces/fW6XSzJSKsNyZnOkSJPt/pages/Ua1JYchZXjWHKjMgZX7p">/spaces/fW6XSzJSKsNyZnOkSJPt/pages/Ua1JYchZXjWHKjMgZX7p</a></td></tr><tr><td><strong>Slack automation</strong><br>Post notifications to Slack channels</td><td><a href="/spaces/fW6XSzJSKsNyZnOkSJPt/pages/YJPNsgmefAN8apckNvGn">/spaces/fW6XSzJSKsNyZnOkSJPt/pages/YJPNsgmefAN8apckNvGn</a></td></tr><tr><td><strong>Webhook automation</strong><br>Send payloads to your own endpoint</td><td><a href="/spaces/fW6XSzJSKsNyZnOkSJPt/pages/lqYpvlUzVnivRBuHRJuI">/spaces/fW6XSzJSKsNyZnOkSJPt/pages/lqYpvlUzVnivRBuHRJuI</a></td></tr></tbody></table>


# Getting Started

Create and test your first automation, using an email automation as a simple example.

This guide walks you through creating your first automation from start to finish. We'll use an email automation as an example, since it's the simplest to set up and test.

***

### Before You Begin

Make sure you have:

{% hint style="info" %}
**Requirements Checklist**

* ✅ **Pro or Enterprise plan** — Automations are not available on Starter plans
* ✅ **At least one folder** — Create a folder if you don't have one yet
* ✅ **Manager or Admin role** — Contributors cannot create automations
  {% endhint %}

If you need to upgrade your plan or adjust permissions, contact your workspace administrator.

***

### Creating Your First Automation

Follow these steps to create a simple email automation that notifies you when recordings arrive in a folder.

{% stepper %}
{% step %}

#### Navigate to folder settings

Open the folder you want to automate. You can do this from:

* **Folders page** — Click on the folder card
* **Dashboard** — Select the folder from your folder list
* **Recording detail page** — Click the folder name at the top

Once in the folder view, click the **Settings** gear icon in the top right corner.
{% endstep %}

{% step %}

#### Open the automations tab

In the folder settings modal, you'll see several tabs:

* Details
* Triage Rules
* **Automations** ← Select this tab
* Permissions

Click the **Automations** tab to view all automations configured for this folder.
{% endstep %}

{% step %}

#### Create new automation

Click the **Add Automation** button in the top right of the Automations tab.

You'll see a modal with all available automation types:

* **Email** — Simple email notifications
* **Webhook** — Send data to any URL
* **Slack** — Post to Slack channels
* **Linear** — Create Linear issues
* **Jira** — Create Jira tickets
* **GitHub** — Create GitHub issues
* **Trello** — Add Trello cards
* **Apply Label** - Apply a label to every new recording in the folder

For your first automation, select **Email**.
{% endstep %}

{% step %}

#### Configure email settings

You'll now see the email automation configuration form:

**Recipients (required):** Enter one or more email addresses, separated by commas:

```
your-email@company.com
```

**Subject Template:** Leave the default or customize:

```
New recording in {{folder.name}}: {{recording.title}}
```

**Additional Options:**

* ☑️ Include video preview (recommended)
* ☑️ Include recording link (required)
* ☐ Include console errors
* ☐ Include system information

The defaults work well for most use cases. You can adjust these later.
{% endstep %}

{% step %}

#### Test the automation

Before saving, click the **Send Test Email** button at the bottom of the form.

Within 30 seconds, check your inbox for an email from `notifications@screendesk.io`. The test email will contain:

* Subject line with placeholder data
* Recording preview (if enabled)
* Direct link to a sample recording
* Metadata fields you selected

**Didn't receive the email?**

* Check your spam folder
* Verify the email address is correct
* Try sending another test
  {% endstep %}

{% step %}

#### Save and activate

Once you've verified the test email looks correct:

1. Click **Save** to create the automation
2. The automation is now **enabled** by default
3. You'll see it listed in the folder's Automations tab

From this point forward, every recording or capture added to this folder will trigger an email notification to the addresses you specified.
{% endstep %}
{% endstepper %}

***

### Testing the Live Automation

To verify the automation works in real conditions:

1. Add a test recording to the folder:
   * Upload a test recording directly, or
   * Move an existing recording into the folder
2. Check your email within 60 seconds
3. Verify all fields populated correctly
4. Click the recording link to ensure it works

If the email doesn't arrive, check the Troubleshooting Guide.

***

### Alternative Setup Paths

You can also create automations from other locations:

#### From Account Settings

{% stepper %}
{% step %}

#### Open account settings

Click your avatar in the top right corner and select **Account Settings**.
{% endstep %}

{% step %}

#### Navigate to automations

In the left sidebar, click **Automations**.
{% endstep %}

{% step %}

#### Create automation

Click **Create Automation** button. You'll first select the trigger folder, then configure the automation type.
{% endstep %}
{% endstepper %}

This method is useful when setting up multiple automations across different folders.

#### From Automation Templates

{% hint style="success" %}
**Quick Setup with Templates**

Screendesk provides pre-configured templates for common scenarios:

* **Notify QA Team** — Alert QA engineers about new bugs
* **Forward to Helpdesk** — Send recordings to support email
* **Alert Engineering Team** — Notify developers of technical issues

Templates include pre-filled settings you can customize.
{% endhint %}

To use a template:

1. In the automation creation modal, look for the **Templates** section
2. Click on a template card
3. Adjust the pre-filled settings as needed
4. Test and save

***

### Managing Automations

Once created, you can manage automations from the folder settings:

#### Enable/Disable

Toggle the automation on or off without deleting:

1. Open folder **Settings → Automations**
2. Find the automation in the list
3. Click the toggle switch next to its name
4. Disabled automations won't fire but remain configured

{% hint style="info" %}
**Temporary Disabling**

Use the toggle to temporarily disable automations during:

* Testing periods
* Maintenance windows
* High-volume events
* Team vacations

Re-enable with one click when ready.
{% endhint %}

#### Edit Settings

Modify automation configuration:

1. Open folder **Settings → Automations**
2. Click the automation card or the **Edit** button
3. Update any settings
4. Click **Send Test** to verify changes
5. Click **Save** to apply

Changes take effect immediately for new recordings.

#### Delete Automation

Remove an automation permanently:

1. Open folder **Settings → Automations**
2. Find the automation in the list
3. Click the **Delete** icon (trash can)
4. Confirm deletion

{% hint style="warning" %}
**Deletion is Permanent**

Deleted automations cannot be recovered. You'll need to recreate them from scratch. Consider disabling instead if you might need the automation again.
{% endhint %}

#### View Execution History

Check automation activity:

1. Open folder **Settings → Automations**
2. Click on the automation name
3. View the **Execution Log** tab

The log shows:

* When the automation ran
* Success or failure status
* Full request/response details
* Error messages if failed

***

### Next Steps

Now that you've created your first automation, explore other integration types:

<table data-view="cards"><thead><tr><th>Next Step</th><th data-card-target data-type="content-ref">Guide</th></tr></thead><tbody><tr><td><strong>Slack Integration</strong><br>Post real-time notifications to Slack channels</td><td></td></tr><tr><td><strong>Create Issue Tracker</strong><br>Auto-create tickets in Linear, Jira, or GitHub</td><td></td></tr><tr><td><strong>Custom Webhooks</strong><br>Integrate with any system that accepts HTTP requests</td><td></td></tr></tbody></table>

***

### Common Questions

<details>

<summary>Can I have multiple automations on one folder?</summary>

Yes! A folder can have unlimited automations. All enabled automations execute when content is added to the folder.

For example, a "Critical Bugs" folder might have:

* Email to <engineering-leads@company.com>
* Slack message to #critical-bugs
* Linear issue creation with P0 priority
* Webhook to PagerDuty

All four automations would fire for each recording added to the folder.

</details>

<details>

<summary>Do automations trigger when I move recordings between folders?</summary>

Yes. Moving a recording into a folder triggers all automations configured for that destination folder.

This is intentional behavior that works well with triage workflows.

</details>

<details>

<summary>Can I test an automation without adding a real recording?</summary>

Yes. Every automation type includes a **Send Test** or **Test** button that sends a sample payload without requiring a real recording.

Always test before activating to verify configuration.

</details>

<details>

<summary>What happens if an automation fails?</summary>

Failed automations are logged in the execution history with full error details. Screendesk will automatically retry failed automations with exponential backoff:

* 1st retry: after 1 minute
* 2nd retry: after 5 minutes
* 3rd retry: after 30 minutes
* 4th retry: after 2 hours
* 5th retry: after 12 hours

After 5 failed attempts, the automation is marked as permanently failed for that recording. You can manually retry from the logs.

</details>

<details>

<summary>Can automations trigger other automations?</summary>

No. Automations only trigger when content is directly added to a folder. They do not create cascading triggers.

</details>


# Email

Configure email automations to notify recipients when new recordings or captures land in a folder.

Email automations send instant notifications to team members when recordings or captures are added to a folder. This is the simplest automation type and requires no third-party integrations or OAuth connections.

<figure><img src="/files/pN2JjmZdquhC4tsB8Mei" alt=""><figcaption></figcaption></figure>

***

### When to Use Email Automations

Email automations work well for:

* **Team notifications** — Alert team leads about new submissions
* **On-call alerts** — Notify engineers about critical bug reports
* **Stakeholder updates** — Keep management informed on specific folders
* **Distribution lists** — Send to group emails or mailing lists
* **Cross-team visibility** — CC multiple departments on important recordings

{% hint style="info" %}
**Email vs. Slack**

Use email when:

* Recipients don't use Slack regularly
* You need a permanent record in email
* Routing to ticketing systems via email
* Reaching external stakeholders

Use Slack when:

* Your team lives in Slack
* You want immediate visibility
* You need threaded discussions
* Interactive buttons would be useful
  {% endhint %}

***

### Setup

{% stepper %}
{% step %}

#### Open folder automations

Navigate to the folder you want to automate:

1. Click on the folder from your folders list
2. Click the **Settings** (gear) icon in the top right
3. Select the **Automations** tab
4. Click **Add Automation**
5. Select **Email**
   {% endstep %}

{% step %}

#### Configure recipients

**To (required):** Enter one or more email addresses separated by commas:

```
alice@company.com, bob@company.com, team@company.com
```

**CC (optional):** Add carbon copy recipients:

```
manager@company.com
```

**BCC (optional):** Add blind carbon copy recipients who receive emails without other recipients knowing:

```
archive@company.com
```

{% hint style="success" %}
**Use Distribution Lists**

Instead of listing individual emails, use group addresses:

* `engineering-team@company.com`
* `support-leads@company.com`
* `all-hands@company.com`

This makes it easier to manage recipients without updating automations.
{% endhint %}
{% endstep %}

{% step %}

#### Customize subject line

The subject line supports template variables for dynamic content.

**Default subject:**

```
New recording in {{folder.name}}: {{recording.title}}
```

**Example output:**

```
New recording in Bug Reports: Checkout page crash on Safari
```

**Other subject examples:**

For urgent folders:

```
🚨 URGENT: {{recording.title}}
```

For customer-specific folders:

```
Recording from {{recording.customer_email}} - {{recording.title}}
```

For simple notifications:

```
[Screendesk] New submission in {{folder.name}}
```

View all available variables →
{% endstep %}

{% step %}

#### Configure email content

Choose what to include in the email body:

| Option                     | Description                          | Recommended         |
| -------------------------- | ------------------------------------ | ------------------- |
| **Include video preview**  | Thumbnail image of the recording     | ✅ Yes               |
| **Include recording link** | Direct link button to view recording | ✅ Yes (required)    |
| **Include metadata**       | Browser, OS, screen resolution       | For technical teams |
| **Include console errors** | JavaScript errors from the recording | For bug reports     |
| **Include system info**    | Full environment details             | For debugging       |

The default email body includes:

* Recording title
* Customer email who submitted it
* Recording duration
* Submission timestamp
* Direct link to view the recording
  {% endstep %}

{% step %}

#### Optional: Customize email body

For advanced users, enable **Custom Email Body** to write your own HTML template.

**Example custom template:**

```html
<div style="font-family: Arial, sans-serif; padding: 20px;">
  <h2 style="color: #E91E63;">🐛 New Bug Report</h2>

  <p><strong>Title:</strong> {{recording.title}}</p>
  <p><strong>Reported by:</strong> {{recording.customer_email}}</p>
  <p><strong>Duration:</strong> {{recording.duration}} seconds</p>

  <p style="margin: 20px 0;">
    <a href="{{recording.url}}"
       style="background: #E91E63; color: white; padding: 12px 24px;
              text-decoration: none; border-radius: 4px; display: inline-block;">
      View Recording →
    </a>
  </p>

  <hr style="border: 1px solid #eee; margin: 20px 0;">

  <h3>Console Errors</h3>
  <pre style="background: #f5f5f5; padding: 12px; border-radius: 4px;">{{recording.console_errors}}</pre>

  <h3>System Information</h3>
  <ul>
    <li><strong>Browser:</strong> {{recording.browser}}</li>
    <li><strong>OS:</strong> {{recording.os}}</li>
    <li><strong>Resolution:</strong> {{recording.resolution}}</li>
  </ul>
</div>
```

{% hint style="warning" %}
**HTML Email Tips**

* Use inline CSS styles (external stylesheets don't work)
* Test with multiple email clients
* Keep layouts simple (avoid complex CSS)
* Always include a plain-text link to the recording
  {% endhint %}
  {% endstep %}

{% step %}

#### Test the automation

Before saving, test the email:

1. Click **Send Test Email** at the bottom of the form
2. Check your inbox within 30 seconds
3. Verify the formatting and content
4. Check that all template variables populated correctly
5. Click the recording link to ensure it works

**Test checklist:**

* ☐ Email arrived in inbox (not spam)
* ☐ Subject line formatted correctly
* ☐ All template variables populated (no `{{}}` showing)
* ☐ Video preview displays (if enabled)
* ☐ Recording link works
* ☐ Layout looks good on desktop and mobile

If something looks wrong, edit the settings and test again.
{% endstep %}

{% step %}

#### Save and activate

Once testing is complete:

1. Click **Save** to create the automation
2. The automation is **enabled** by default
3. You'll see it listed in the folder's Automations tab

The automation is now live. Every recording or capture added to this folder will trigger an email to the recipients you specified.
{% endstep %}
{% endstepper %}

***

### Template Variables

Customize subject lines and email bodies with these variables:

#### Recording Information

| Variable                       | Description       | Example Output                         |
| ------------------------------ | ----------------- | -------------------------------------- |
| `{{recording.title}}`          | Recording title   | "Checkout not working"                 |
| `{{recording.url}}`            | Link to recording | "<https://app.screendesk.io/r/abc>..." |
| `{{recording.customer_email}}` | Customer email    | "<user@customer.com>"                  |
| `{{recording.duration}}`       | Length in seconds | "45"                                   |
| `{{recording.created_at}}`     | Submission time   | "Feb 6, 2026 at 2:30 PM"               |

#### Technical Details

| Variable                   | Description          | Example Output      |
| -------------------------- | -------------------- | ------------------- |
| `{{recording.browser}}`    | Browser name/version | "Chrome 121.0.6167" |
| `{{recording.os}}`         | Operating system     | "macOS 14.3"        |
| `{{recording.resolution}}` | Screen resolution    | "2560x1440"         |
| `{{recording.country}}`    | Geographic location  | "United States"     |

#### Error Information

| Variable                       | Description                           |
| ------------------------------ | ------------------------------------- |
| `{{recording.console_errors}}` | JavaScript console errors (formatted) |
| `{{recording.network_errors}}` | Failed HTTP requests (formatted)      |

#### Folder & Account

| Variable           | Description    | Example Output |
| ------------------ | -------------- | -------------- |
| `{{folder.name}}`  | Folder name    | "Bug Reports"  |
| `{{account.name}}` | Workspace name | "Acme Corp"    |

View complete variable reference →

***

### Configuration Examples

Here are real-world email automation configurations:

#### Example 1: Simple Team Notification

**Use case:** Alert support team about new customer recordings

**Configuration:**

* **Recipients:** `support@company.com`
* **Subject:** `New customer recording: {{recording.title}}`
* **Options:** Video preview ✓, Recording link ✓

This sends a clean, simple notification with everything the support team needs.

***

#### Example 2: Engineering Bug Alert

**Use case:** Notify engineers about technical issues with full debugging context

**Configuration:**

* **Recipients:** `engineering@company.com`
* **CC:** `qa-team@company.com`
* **Subject:** `🐛 Bug Report: {{recording.title}}`
* **Options:** Video preview ✓, Recording link ✓, Console errors ✓, System info ✓

Engineers get immediate visibility with all technical details included.

***

#### Example 3: VIP Customer Escalation

**Use case:** Alert leadership when VIP customers submit recordings

**Configuration:**

* **Recipients:** `account-managers@company.com, support-leads@company.com`
* **CC:** `ceo@company.com`
* **Subject:** `⭐ VIP Customer Recording from {{recording.customer_email}}`
* **Options:** Video preview ✓, Recording link ✓, Metadata ✓

Multiple stakeholders stay informed about high-value customer issues.

***

#### Example 4: Daily Digest

**Use case:** Send summary emails instead of individual notifications

{% hint style="info" %}
**Digest Approach**

Screendesk sends individual emails for each recording. To create digest-style notifications:

1. Use a distribution list with digest settings enabled in your email system
2. Or use a webhook automation to a service that batches emails
3. Or configure your email client to create digest rules

Native digest support is on the roadmap.
{% endhint %}

***

### Email Delivery

#### Sender Information

All emails are sent from:

```
From: Screendesk <notifications@screendesk.io>
Reply-To: noreply@screendesk.io
```

Recipients cannot reply directly to automation emails.

#### Delivery Timing

* Emails send immediately when recordings are added
* Typical delivery time: 10-30 seconds
* Maximum delivery time: 2 minutes

If emails take longer, check the [Screendesk status page](https://status.screendesk.io).

#### Email Allowlisting

If emails go to spam, add these to your allowlist:

**Sender domain:**

```
screendesk.io
```

**SPF record:**

```
v=spf1 include:_spf.screendesk.io ~all
```

**DKIM domain:**

```
screendesk.io
```

Contact your IT team to add these to your email security configuration.

***

### Troubleshooting

#### Emails not arriving

{% stepper %}
{% step %}

#### Check spam folder

Screendesk emails sometimes land in spam on first send. Check:

* Spam/Junk folder
* Quarantine (for corporate email)
* "Clutter" or "Other" folders (Outlook)

Mark as "Not Spam" to train your email filter.
{% endstep %}

{% step %}

#### Verify email addresses

Double-check recipient addresses:

* No typos in email addresses
* Domain names spelled correctly
* No extra spaces or commas
* Valid email format (has @ and domain)

Test with a single known-good email first.
{% endstep %}

{% step %}

#### Check automation status

Ensure the automation is enabled:

1. Open folder **Settings → Automations**
2. Verify toggle is **on** (green)
3. Check execution logs for errors

Disabled automations won't send emails.
{% endstep %}

{% step %}

#### Review execution logs

Check if emails were sent:

1. Open folder **Settings → Automations**
2. Click on the email automation
3. View **Execution Log** tab
4. Look for recent executions

Logs show:

* ✅ Success — Email sent
* ⚠️ Warning — Delivered but flagged
* ❌ Failed — Error message explains why
  {% endstep %}
  {% endstepper %}

***

#### Missing template variables

If variables show as `{{recording.title}}` instead of actual values:

* Check variable spelling (must match exactly)
* Ensure variables are inside double braces `{{ }}`
* Verify the data exists (not all recordings have console errors)
* Test with a new recording that has the data you're referencing

***

#### Broken formatting

If custom HTML doesn't look right:

* Use inline CSS styles only (no `<style>` tags or external CSS)
* Test with simple HTML first
* Preview in multiple email clients
* Avoid complex layouts (tables work best)
* Include fallback plain text

***

#### Too many emails

If you're getting too many notifications:

1. **Reduce recipient count** — Remove unnecessary people from the list
2. **Use distribution lists** — Let people opt in/out themselves
3. **Create folder hierarchy** — Use more specific folders with targeted automations
4. **Add triage rules** — Filter out low-priority recordings before they reach folders
5. **Disable temporarily** — Toggle off during high-volume periods

***

### Best Practices

#### Use distribution lists

Instead of individual emails:

{% columns %}
{% column %}
**❌ Don't do this:**

```
alice@company.com,
bob@company.com,
charlie@company.com,
diana@company.com,
evan@company.com
```

{% endcolumn %}

{% column %}
**✅ Do this:**

```
engineering-team@company.com
```

{% endcolumn %}
{% endcolumns %}

Distribution lists are easier to manage and let people opt in/out without editing automations.

***

#### Keep subjects short and front-loaded

Put key information at the start:

{% columns %}
{% column %}
**❌ Less effective:**

```
A new recording has been submitted
to the Bug Reports folder with the
title: {{recording.title}}
```

{% endcolumn %}

{% column %}
**✅ More effective:**

```
{{recording.title}} - Bug Report
```

{% endcolumn %}
{% endcolumns %}

Mobile email clients truncate long subjects.

***

#### Test before activating

Always send a test email before enabling:

* Verify formatting looks good
* Check that links work
* Confirm variables populate
* Test on both desktop and mobile
* Send to yourself first, then add team

***

#### Don't over-notify

Reserve email automations for:

* Important folders only
* Escalations and urgent issues
* Stakeholders who don't use Slack
* Folders with low volume (< 10/day)

Too many emails leads to notification fatigue and ignored messages.

***

#### Include the recording link prominently

Make it easy for recipients to take action:

* Always include the recording link
* Use a button or bold link
* Put it near the top of the email
* Don't bury it in small text

***

#### Use folder-specific templates

Different folders need different messaging:

* **Bug reports:** Include console errors and system info
* **Feature requests:** Focus on customer email and description
* **VIP customers:** Emphasize urgency and customer name
* **General support:** Keep it simple with just the basics

Tailor each automation to its purpose.


# Webhook

Send recording events to any HTTPS endpoint, with custom payloads, auth headers, and retry handling.

Webhook automations send HTTP requests with recording data to any endpoint when content is added to a folder. This enables custom integrations with internal tools, automation platforms like Zapier, and systems without native Screendesk integrations.

<figure><img src="/files/p6pgGdhz74H3vmlOEOU4" alt=""><figcaption></figcaption></figure>

***

### When to Use Webhooks

Webhooks are the most flexible automation type. Use them for:

* **Custom internal tools** — Send data to your own applications
* **Automation platforms** — Trigger workflows in Zapier, Make (Integromat), or n8n
* **Data warehouses** — Stream data to analytics platforms
* **Incident management** — Trigger PagerDuty or Opsgenie alerts
* **CRM systems** — Update customer records automatically
* **Chat platforms** — Send to Discord, Teams, or other chat tools
* **Logging systems** — Forward events to Datadog, Sentry, or LogRocket

{% hint style="info" %}
**Webhooks vs. Native Integrations**

Use webhooks when:

* No native integration exists for your tool
* You need custom payload formats
* You're building internal tools
* You want maximum flexibility

Use native integrations (Slack, Linear, Jira) when:

* They exist for your tool
* You want easier setup
* You need OAuth authentication
* You want pre-built formatting
  {% endhint %}

***

### Setup

{% stepper %}
{% step %}

#### Open folder automations

1. Navigate to your folder
2. Click **Settings** (gear icon)
3. Select **Automations** tab
4. Click **Add Automation**
5. Select **Webhook**
   {% endstep %}

{% step %}

#### Configure webhook endpoint

**Webhook URL (required):** Enter the destination endpoint:

```
https://your-app.com/webhooks/screendesk
```

{% hint style="warning" %}
**HTTPS Required**

Webhook URLs must use HTTPS (not HTTP). This ensures data is encrypted in transit.
{% endhint %}

**HTTP Method:** Choose the request method:

* **POST** (default) — Standard for webhooks
* **PUT** — For update-style endpoints
* **PATCH** — For partial updates
* **DELETE** — For deletion workflows

Most webhooks use POST.
{% endstep %}

{% step %}

#### Add authentication headers

Click **Add Headers** to configure authentication.

Headers are sent as JSON:

```json
{
  "Authorization": "Bearer your-api-token-here",
  "Content-Type": "application/json"
}
```

**Common authentication patterns:**

**Bearer Token:**

```json
{
  "Authorization": "Bearer eyJhbGciOiJIUzI1NiIs..."
}
```

**API Key:**

```json
{
  "X-API-Key": "your-api-key-here"
}
```

**Basic Auth:**

```json
{
  "Authorization": "Basic dXNlcm5hbWU6cGFzc3dvcmQ="
}
```

To generate Basic auth, base64 encode `username:password`.

**Webhook Secret (for verification):**

```json
{
  "X-Webhook-Secret": "shared-secret-value"
}
```

{% endstep %}

{% step %}

#### Configure payload (optional)

By default, Screendesk sends a complete payload with all recording data.

**Default payload structure:**

```json
{
  "event": "recording.added_to_folder",
  "timestamp": "2026-02-06T15:30:00Z",
  "recording": {
    "id": "rec_abc123",
    "title": "Checkout page crash",
    "url": "https://app.screendesk.io/r/abc123",
    "video_url": "https://cdn.screendesk.io/videos/abc123.mp4",
    "thumbnail_url": "https://cdn.screendesk.io/thumbs/abc123.jpg",
    "customer_email": "user@example.com",
    "duration": 45,
    "browser": "Chrome 121.0",
    "os": "macOS 14.3",
    "console_errors": [...],
    "network_errors": [...],
    "created_at": "2026-02-06T15:30:00Z"
  },
  "folder": {
    "id": "fld_xyz789",
    "name": "Bug Reports"
  },
  "account": {
    "id": "acc_123",
    "name": "Acme Corp"
  }
}
```

**Custom payload:**

Enable **Custom Payload** to define your own structure using template variables:

```json
{
  "type": "bug_report",
  "bug": {
    "title": "{{recording.title}}",
    "reporter": "{{recording.customer_email}}",
    "video_link": "{{recording.url}}",
    "errors": "{{recording.console_errors}}"
  },
  "source": "screendesk",
  "folder": "{{folder.name}}",
  "timestamp": "{{recording.created_at}}"
}
```

View all template variables →
{% endstep %}

{% step %}

#### Test the webhook

Click **Send Test Webhook** to verify your configuration:

1. Screendesk sends a test request to your endpoint
2. Check that your endpoint receives the request
3. Review the response in the test results modal
4. Verify authentication works
5. Confirm payload format is correct

**Test results show:**

* ✅ **Success** — HTTP 2xx status code received
* ⚠️ **Warning** — Non-2xx status with response body
* ❌ **Failed** — Timeout, connection error, or 4xx/5xx status

View the full request and response in the test results.
{% endstep %}

{% step %}

#### Save and activate

Once testing succeeds:

1. Click **Save** to create the automation
2. The automation is enabled by default
3. View it in the folder's Automations tab

The webhook will now fire for every recording added to this folder.
{% endstep %}
{% endstepper %}

***

### Integration Examples

#### Zapier

Create workflows with 5000+ apps:

{% stepper %}
{% step %}

#### Create a Zap

1. Go to [zapier.com](https://zapier.com) and click **Create Zap**
2. For the trigger, search for **Webhooks by Zapier**
3. Choose **Catch Hook** as the trigger event
4. Copy the provided webhook URL
   {% endstep %}

{% step %}

#### Configure in Screendesk

1. Create a webhook automation in your folder
2. Paste the Zapier webhook URL
3. Leave HTTP method as **POST**
4. No headers needed
5. Use default payload (Zapier will parse it)
   {% endstep %}

{% step %}

#### Test and continue

1. Click **Send Test Webhook** in Screendesk
2. Return to Zapier and click **Test trigger**
3. Zapier should detect the sample data
4. Continue building your Zap with the recording data
   {% endstep %}
   {% endstepper %}

***

#### Slack (via Webhook)

Post to Slack without OAuth:

**Webhook URL:** Get an incoming webhook URL from Slack:

1. Go to [api.slack.com/apps](https://api.slack.com/apps)
2. Create an app or select existing
3. Enable **Incoming Webhooks**
4. Add webhook to channel
5. Copy the webhook URL

**Custom Payload:**

```json
{
  "text": "🎥 New recording in {{folder.name}}",
  "blocks": [
    {
      "type": "section",
      "text": {
        "type": "mrkdwn",
        "text": "*{{recording.title}}*\nFrom: {{recording.customer_email}}\nDuration: {{recording.duration}}s"
      }
    },
    {
      "type": "actions",
      "elements": [
        {
          "type": "button",
          "text": {"type": "plain_text", "text": "View Recording"},
          "url": "{{recording.url}}",
          "style": "primary"
        }
      ]
    }
  ]
}
```

{% hint style="info" %}
**Native Slack Integration**

For a simpler setup with more features, use the native Slack integration instead. It provides OAuth authentication, channel selection, and richer formatting options.
{% endhint %}

***

#### PagerDuty

Trigger incidents from critical recordings:

**Webhook URL:**

```
https://events.pagerduty.com/v2/enqueue
```

**Headers:**

```json
{
  "Content-Type": "application/json"
}
```

**Custom Payload:**

```json
{
  "routing_key": "YOUR_INTEGRATION_KEY_HERE",
  "event_action": "trigger",
  "payload": {
    "summary": "Critical: {{recording.title}}",
    "severity": "critical",
    "source": "Screendesk",
    "custom_details": {
      "recording_url": "{{recording.url}}",
      "customer": "{{recording.customer_email}}",
      "console_errors": "{{recording.console_errors}}",
      "browser": "{{recording.browser}}"
    }
  },
  "links": [
    {
      "href": "{{recording.url}}",
      "text": "View Recording"
    }
  ]
}
```

Get your integration key from PagerDuty → Services → Integrations → Events API V2.

***

#### Discord

Post to Discord channels:

**Webhook URL:** Get from Discord:

1. Open channel settings
2. Go to Integrations → Webhooks
3. Create webhook
4. Copy URL

**Custom Payload:**

```json
{
  "content": "🎥 **New Recording**",
  "embeds": [
    {
      "title": "{{recording.title}}",
      "description": "From: {{recording.customer_email}}\nDuration: {{recording.duration}} seconds",
      "url": "{{recording.url}}",
      "color": 15258703,
      "fields": [
        {
          "name": "Browser",
          "value": "{{recording.browser}}",
          "inline": true
        },
        {
          "name": "OS",
          "value": "{{recording.os}}",
          "inline": true
        }
      ]
    }
  ]
}
```

***

#### Microsoft Teams

Post to Teams channels:

**Webhook URL:** Get from Teams:

1. Open channel
2. Click ⋯ (More options)
3. Connectors → Incoming Webhook
4. Configure and copy URL

**Custom Payload:**

```json
{
  "@type": "MessageCard",
  "@context": "https://schema.org/extensions",
  "summary": "New Recording",
  "themeColor": "E91E63",
  "title": "🎥 {{recording.title}}",
  "sections": [
    {
      "facts": [
        {"name": "Customer", "value": "{{recording.customer_email}}"},
        {"name": "Duration", "value": "{{recording.duration}}s"},
        {"name": "Browser", "value": "{{recording.browser}}"}
      ]
    }
  ],
  "potentialAction": [
    {
      "@type": "OpenUri",
      "name": "View Recording",
      "targets": [
        {"os": "default", "uri": "{{recording.url}}"}
      ]
    }
  ]
}
```

***

### Webhook Security

#### Verify webhook signatures

Screendesk signs all webhooks with HMAC-SHA256. Verify requests are legitimate:

**Signature header:**

```
X-Screendesk-Signature: sha256=abc123...
```

**Verification (Node.js):**

```javascript
const crypto = require('crypto');

function verifyWebhook(payload, signature, secret) {
  const expectedSignature = crypto
    .createHmac('sha256', secret)
    .update(JSON.stringify(payload))
    .digest('hex');

  const expected = `sha256=${expectedSignature}`;

  return crypto.timingSafeEqual(
    Buffer.from(signature),
    Buffer.from(expected)
  );
}

// Usage
const isValid = verifyWebhook(
  req.body,
  req.headers['x-screendesk-signature'],
  'your-webhook-secret'
);
```

**Verification (Python):**

```python
import hmac
import hashlib

def verify_webhook(payload, signature, secret):
    expected = hmac.new(
        secret.encode(),
        payload.encode(),
        hashlib.sha256
    ).hexdigest()

    expected_signature = f"sha256={expected}"

    return hmac.compare_digest(signature, expected_signature)
```

{% hint style="warning" %}
**Always Verify Signatures**

Without verification, anyone who knows your webhook URL can send fake requests. Always verify the `X-Screendesk-Signature` header in production.
{% endhint %}

***

### Retry Policy

Failed webhooks are automatically retried with exponential backoff:

| Attempt   | Delay      | Total Time |
| --------- | ---------- | ---------- |
| Initial   | —          | 0s         |
| 1st retry | 1 minute   | 1m         |
| 2nd retry | 5 minutes  | 6m         |
| 3rd retry | 30 minutes | 36m        |
| 4th retry | 2 hours    | 2h 36m     |
| 5th retry | 12 hours   | 14h 36m    |

After 5 failed attempts, the webhook is marked as permanently failed.

**Success criteria:**

* HTTP status code 2xx (200-299)
* Response received within 30 seconds

**Your endpoint should:**

* Respond with 2xx as quickly as possible
* Process webhooks asynchronously if needed
* Be idempotent (handle duplicate deliveries)
* Return within 30 seconds

***

### Troubleshooting

#### Connection errors

**Symptom:** "Failed to connect" or timeout errors

**Solutions:**

* Verify URL is correct and publicly accessible
* Ensure endpoint uses HTTPS (not HTTP)
* Check firewall allows Screendesk IPs
* Confirm endpoint responds within 30 seconds
* Test endpoint with curl:

  ```bash
  curl -X POST https://your-endpoint.com/webhook \
    -H "Content-Type: application/json" \
    -d '{"test": true}'
  ```

***

#### Authentication errors

**Symptom:** 401 Unauthorized or 403 Forbidden

**Solutions:**

* Verify API keys or tokens are correct
* Check header names match exactly (case-sensitive)
* Ensure tokens haven't expired
* Confirm permissions allow webhook access
* Test with a tool like Postman first

***

#### Invalid payload

**Symptom:** 400 Bad Request with validation errors

**Solutions:**

* Validate JSON syntax in custom payload
* Check template variables are spelled correctly
* Ensure required fields are present
* Test payload structure with the endpoint's documentation
* Use default payload first, then customize

***

#### Timeout errors

**Symptom:** "Request timed out after 30 seconds"

**Solutions:**

* Optimize endpoint to respond faster
* Return 2xx immediately, process asynchronously
* Reduce database queries or external API calls
* Cache data when possible
* Check for infinite loops or blocking operations

***

#### View execution logs

Check webhook delivery history:

1. Open folder **Settings → Automations**
2. Click the webhook automation
3. View **Execution Log** tab

Logs show:

* Timestamp
* HTTP status code
* Request payload sent
* Response body received
* Error messages
* Retry attempts

***

### Best Practices

#### Respond quickly

Return 2xx status as fast as possible:

{% columns %}
{% column %}
**❌ Don't do this:**

```javascript
app.post('/webhook', (req, res) => {
  // Process synchronously (slow)
  processRecording(req.body);
  sendNotifications(req.body);
  updateDatabase(req.body);

  res.status(200).send('OK');
});
```

{% endcolumn %}

{% column %}
**✅ Do this:**

```javascript
app.post('/webhook', (req, res) => {
  // Respond immediately
  res.status(200).send('OK');

  // Process asynchronously
  queue.add('process-webhook', req.body);
});
```

{% endcolumn %}
{% endcolumns %}

***

#### Make endpoints idempotent

Handle duplicate deliveries gracefully:

```javascript
app.post('/webhook', async (req, res) => {
  const recordingId = req.body.recording.id;

  // Check if already processed
  const exists = await db.webhooks.findOne({ recordingId });
  if (exists) {
    return res.status(200).send('Already processed');
  }

  // Process and store
  await processWebhook(req.body);
  await db.webhooks.insert({ recordingId, processedAt: new Date() });

  res.status(200).send('OK');
});
```

***

#### Log webhook requests

Keep logs for debugging:

* Log all incoming webhook requests
* Store request body and headers
* Track processing status
* Keep logs for at least 30 days
* Alert on high failure rates

***

#### Monitor and alert

Set up monitoring for:

* Webhook failure rate > 5%
* Response time > 10 seconds
* Missing webhooks (check counts)
* Authentication failures
* Endpoint downtime

Use your logging platform or APM tool to track these metrics.

***

#### Test thoroughly

Before going live:

* Test with the **Send Test Webhook** button
* Verify all data fields are present
* Check template variables populate correctly
* Confirm authentication works
* Test with your full processing pipeline
* Verify retries work as expected


# Linear

Linear automations automatically create issues in your Linear workspace when recordings or captures are added to a folder. Convert customer feedback, bug reports, and feature requests into actionable engineering tickets without manual data entry.

***

### When to Use Linear Automations

Linear automations are ideal for:

* **Bug Report Tracking** — Convert customer-reported bugs into engineering tickets with video evidence
* **Feature Request Management** — Automatically create feature request issues from customer feedback
* **Support Escalations** — Create high-priority issues when critical problems are reported
* **Cross-Team Collaboration** — Link customer recordings directly to engineering work
* **Audit Trail** — Maintain complete record of what customers reported and when
* **Triage Workflow** — Route issues to specific teams and projects automatically

{% hint style="info" %}
**Linear vs. Email/Webhook**

Use Linear when:

* Your engineering team uses Linear for issue tracking
* You want automatic issue creation with full context
* You need to assign issues to projects and team members
* You want bi-directional sync with recordings

Use Email when:

* Recipients don't use Linear
* You just need notifications
* You want simpler setup without OAuth

Use Webhooks when:

* You need integration with a different tool
* You want custom payload formatting
* You're building internal automation
  {% endhint %}

***

### Prerequisites

Before setting up Linear automations:

1. **Linear Account** — With issue creation permissions in your workspace
2. **Team Access** — Admin or owner role to authorize integrations
3. **Screendesk Plan** — Pro or Enterprise plan to enable automations
4. **Folder** — Created in Screendesk to trigger the automation

***

### Setup

#### Connect Linear to Screendesk (First-time only)

Navigate to your integrations:

1. Click your avatar in the top right corner
2. Select **Account Settings**
3. Go to **Integrations & Automations → Integrations**
4. Find **Linear** in the list
5. Click **Connect Linear**

You'll see a dialog showing the permissions Screendesk requires:

* Create and read issues
* Read teams, projects, and team members
* Read and create labels
* Read workflows and cycles

Click **Authorize** to proceed.

{% hint style="warning" %}
**OAuth State**

The authorization window will redirect you back to Screendesk. This happens automatically and is secure. If the window closes without redirecting, click **Connect Linear** again and accept the authorization.
{% endhint %}

#### Review Linear connection status

After authorization completes, you'll return to **Account Settings → Integrations**.

You should see:

* ✅ **Linear Connected** with your workspace name
* Team name and member count
* **Disconnect** button (if you need to remove the integration)

{% hint style="success" %}
**Connection Verified**

If you see your team name and members list, Linear is successfully connected. You can now create automations in any folder.
{% endhint %}

#### Open folder automations

Create an automation in any folder:

1. Navigate to the folder you want to automate
2. Click **Settings** (gear icon) in the top right
3. Select the **Automations** tab
4. Click **+ Add Automation**
5. Select **Linear** from the integration list

#### Select target team and project

Configure where issues will be created:

**Team (required):**

* Select the Linear team where issues will be created
* Only one team per automation (create multiple automations for multiple teams)

**Project (optional):**

* Choose a specific project to organize issues
* Or leave empty to create issues in the team inbox
* Useful for categorizing bug reports vs. feature requests

**Workflow Status (optional):**

* Set the initial status for new issues
* **Backlog** — Default starting point for triage
* **Todo** — Issues ready for work
* **In Progress** — For urgent items
* Or any custom status in your Linear workflow

{% hint style="info" %}
**Project Selection**

If you don't see expected projects:

1. Ensure they're active in Linear (not canceled)
2. Click **Refresh** in the Linear integration settings
3. Re-save your automation

Only active projects appear in the dropdown.
{% endhint %}

#### Configure issue title

Customize how issue titles appear in Linear:

**Default title template:**

```
{{item.title}}
```

**Example outputs:**

```
Checkout page crashes on iOS
User can't reset password
Feature request: Dark mode toggle
```

**Other title examples:**

For bug reports:

```
🐛 {{item.title}}
```

For feature requests:

```
💡 Feature: {{item.title}}
```

Including folder context:

```
[{{folder.name}}] {{item.title}}
```

For customer-specific issues:

```
Customer {{creator.email}}: {{item.title}}
```

{% hint style="warning" %}
**Title Length**

Keep titles under 100 characters for clarity. Linear will truncate very long titles in the UI.
{% endhint %}

View all available template variables →

#### Configure issue description

Create a rich issue description with recording context:

**Default description template:**

```markdown
**Recording from Screendesk**

**Title:** {{item.title}}
**From:** {{creator.name}} ({{creator.email}})
**Folder:** {{folder.name}}

**View recording:** {{item.url}}

---

This issue was automatically created from a recording uploaded to Screendesk.
```

**Example: Detailed bug report description**

```markdown
## Bug Report

A customer submitted a recording that describes the issue below.

**Reported by:** {{creator.email}}
**Folder:** {{folder.name}}

### Description
{{item.title}}

### Watch Recording
[View on Screendesk]({{item.url}})

---

### Recording Details
* **Duration:** {{item.duration}} seconds
* **Browser:** {{item.browser}}
* **OS:** {{item.os}}
* **Screen Resolution:** {{item.resolution}}
* **Recorded:** {{item.created_at}}

### Technical Information

**Console Errors:**
```

{{item.console\_errors}}

```

**Network Errors:**
```

{{item.network\_errors}}

```

---

This issue was automatically created from a customer recording on Screendesk.
```

**Example: Feature request description**

```markdown
## Feature Request

A customer requested the following feature.

**Suggested by:** {{creator.email}} ({{creator.name}})

### Feature Description
{{item.title}}

### Customer Recording
[View request on Screendesk]({{item.url}})

**Recording Duration:** {{item.duration}} seconds

---

This feature request was automatically created from a customer recording.
```

**Markdown Support**

Linear descriptions support full markdown formatting:

* **Bold** — `**text**`
* *Italic* — `*text*`
* Code blocks — ` ``` `
* Links — `[text](url)`
* Headers — `## Heading`
* Lists — `* item`

Use markdown to format important information. {% endhint %}

View all available variables → {% endstep %}

{% step %}

#### Set priority level

Assign automatic priority to new issues:

| Priority    | Level | Linear Value | Use For                           |
| ----------- | ----- | ------------ | --------------------------------- |
| No Priority | —     | None         | General items, low urgency        |
| Low         | P3    | 3            | Minor improvements, nice-to-haves |
| Medium      | P2    | 2            | Standard bugs, regular features   |
| High        | P1    | 1            | Important bugs, urgent features   |
| Urgent      | P0    | 0            | Critical bugs, blocking issues    |

**Recommendations:**

* **Bug Reports folder** — Set to Medium (P2) or High (P1)
* **Feature Requests folder** — Set to No Priority (triage later)
* **Critical Issues folder** — Set to Urgent (P0)

Issues can be re-prioritized in Linear after creation.

{% hint style="info" %} **Avoid Over-Prioritization**

Set automations to Medium or No Priority by default. Let your team manually adjust based on actual impact and customer tier. {% endhint %} {% endstep %}

{% step %}

#### Apply labels automatically

Organize issues with labels:

**To add labels:**

1. Click **+ Add Label**
2. Select from your team's available labels
3. Add multiple labels as needed

**Suggested labels:**

* `from-screendesk` — Track all automated issues
* `customer-reported` — Mark customer submissions
* `needs-triage` — Flag for manual review
* `bug` or `feature-request` — Categorize issue type
* `high-priority` — For urgent folders
* `customer-feedback` — Specific to feature requests

**Example configurations:**

For bug reports folder:

```

from-screendesk, customer-reported, bug, needs-triage
```

For feature requests folder:

```
from-screendesk, feature-request, customer-feedback
```

For critical issues folder:

```
from-screendesk, urgent, needs-immediate-attention
```

{% hint style="warning" %} **Label Availability**

Only labels that exist in your Linear team appear in the dropdown. If you don't see a label you want:

1. Create it in Linear first
2. Return to Screendesk
3. Click **Refresh** in the Linear integration settings
4. The new label will appear in the dropdown {% endhint %} {% endstep %}

{% step %}

#### Assign team members (optional)

Auto-assign issues to team members:

**Assignee dropdown:**

* Select a specific team member
* Or leave unassigned for manual assignment
* Only active team members appear in the list

**Recommended approach:**

* Leave unassigned for most automations
* Use assignee for on-call or urgent issues
* Let team leads manually assign based on expertise

**Example uses:**

* Assign critical bugs to on-call engineer
* Assign feature requests to product manager
* Leave general issues unassigned for triage

{% hint style="info" %} **Rotating Assignees**

Create multiple automations to rotate assignments:

* Automation 1: Assigns to Engineer A
* Automation 2: Assigns to Engineer B
* Assign recordings to different automations manually {% endhint %} {% endstep %}

{% step %}

#### Test the automation

Before activating, create a test issue:

1. Click **Create Test Issue** button
2. Check your Linear workspace for the new issue
3. Verify all fields populated correctly:
   * [ ] Title matches template
   * [ ] Description includes all variables
   * [ ] Team and project are correct
   * [ ] Labels are applied
   * [ ] Assignee is set (if configured)
   * [ ] Priority is correct
   * [ ] Recording link works

**If something looks wrong:**

1. Click **Back**
2. Update the settings
3. Click **Create Test Issue** again

**Delete test issues in Linear:** After verifying, you can delete test issues directly in Linear (they won't affect the automation).

{% hint style="success" %} **Ready to Activate**

Once testing passes, proceed to save. {% endhint %} {% endstep %}

{% step %}

#### Save and activate

Finalize the automation:

1. Click **Save Automation**
2. The automation is **enabled by default**
3. You'll see it listed in the folder's **Automations** tab

**Status indicators:**

* ✅ Green toggle — Automation is active
* ⚫ Gray toggle — Automation is disabled

You can disable/enable the automation anytime without deleting it.

From now on, every recording or capture added to this folder will automatically create an issue in Linear.

{% hint style="info" %} **Automation Activity**

View execution history:

1. Go to **Account Settings → Automations → Execution Log**
2. Filter by folder or automation type
3. See success/failure details for each execution {% endhint %} {% endstep %} {% endstepper %}

***

### Template Variables

Use these variables in title and description templates:

#### Item Information

| Variable              | Description                | Example                  |
| --------------------- | -------------------------- | ------------------------ |
| `{{item.title}}`      | Recording or capture title | "Checkout crashes"       |
| `{{item.url}}`        | Link to recording/capture  | Full HTTPS URL           |
| `{{item.type}}`       | Item type                  | "recording" or "capture" |
| `{{item.duration}}`   | Length in seconds          | "45"                     |
| `{{item.created_at}}` | Submission timestamp       | "Feb 6, 2026 at 2:30 PM" |

#### Creator Information

| Variable            | Description          | Example                |
| ------------------- | -------------------- | ---------------------- |
| `{{creator.name}}`  | Person who submitted | "Alice Johnson"        |
| `{{creator.email}}` | Creator's email      | "<alice@customer.com>" |

#### Recording-Specific (if applicable)

| Variable                       | Description          | Example               |
| ------------------------------ | -------------------- | --------------------- |
| `{{recording.title}}`          | Recording title      | "Checkout page error" |
| `{{recording.url}}`            | Recording link       | Full HTTPS URL        |
| `{{recording.browser}}`        | Browser info         | "Chrome 121.0.6167"   |
| `{{recording.os}}`             | Operating system     | "macOS 14.3"          |
| `{{recording.resolution}}`     | Screen resolution    | "2560x1440"           |
| `{{recording.country}}`        | Geographic location  | "United States"       |
| `{{recording.console_errors}}` | JavaScript errors    | Formatted list        |
| `{{recording.network_errors}}` | Failed HTTP requests | Formatted list        |

#### Capture-Specific (if applicable)

| Variable            | Description   | Example                     |
| ------------------- | ------------- | --------------------------- |
| `{{capture.title}}` | Capture title | "Bug description"           |
| `{{capture.url}}`   | Capture link  | Full HTTPS URL              |
| `{{capture.type}}`  | Capture type  | Screenshot or document type |

#### Folder & Account

| Variable           | Description    | Example       |
| ------------------ | -------------- | ------------- |
| `{{folder.name}}`  | Folder name    | "Bug Reports" |
| `{{account.name}}` | Workspace name | "Acme Corp"   |

View complete variable reference →

***

### Example Configurations

#### Example 1: Bug Report Automation

**Folder:** Bug Reports **Target:** Report customer bugs to engineering team

**Configuration:**

| Setting  | Value                                         |
| -------- | --------------------------------------------- |
| Team     | Engineering                                   |
| Project  | Bug Fixes                                     |
| Status   | Backlog                                       |
| Priority | Medium (P2)                                   |
| Labels   | `from-screendesk`, `bug`, `customer-reported` |
| Assignee | Unassigned                                    |

**Title Template:**

```

🐛 {{item.title}}
```

**Description Template:**

```markdown
## Customer Bug Report

A customer submitted a recording describing this issue.

**Reported by:** {{creator.email}} ({{creator.name}})
**Folder:** {{folder.name}}

### Description
{{item.title}}

### Watch Recording
[View on Screendesk]({{item.url}})

---

### System Information
| Property | Value |
|----------|-------|
| Browser | {{recording.browser}} |
| Operating System | {{recording.os}} |
| Resolution | {{recording.resolution}} |
| Location | {{recording.country}} |
| Duration | {{recording.duration}} seconds |
| Submitted | {{recording.created_at}} |

### Technical Details

**Console Errors:**
```

{{recording.console\_errors}}

```

**Network Errors:**
```

{{recording.network\_errors}}

```

---

This issue was automatically created from a customer recording on Screendesk.
```

**Result:** Issues created with full bug context, ready for engineer triage and investigation.

***

#### Example 2: Feature Request Automation

**Folder:** Feature Requests **Target:** Track customer feature suggestions for product team

**Configuration:**

| Setting  | Value                                                     |
| -------- | --------------------------------------------------------- |
| Team     | Product                                                   |
| Project  | Feature Requests                                          |
| Status   | Backlog                                                   |
| Priority | No Priority                                               |
| Labels   | `from-screendesk`, `feature-request`, `customer-feedback` |
| Assignee | Product Manager                                           |

**Title Template:**

```
💡 Feature Request: {{item.title}}
```

**Description Template:**

```markdown
## Customer Feature Request

A customer has requested the following feature.

**Suggested by:** {{creator.name}} ({{creator.email}})
**Folder:** {{folder.name}}

### Feature Description
{{item.title}}

### Customer Recording
[View feature request on Screendesk]({{item.url}})

**Recording Duration:** {{recording.duration}} seconds

---

This feature request was automatically created from a customer recording.
```

**Result:** Feature requests flow directly to product team for evaluation and roadmap planning.

***

#### Example 3: Critical Issue Automation (High Priority)

**Folder:** Critical Issues **Target:** Escalate urgent problems to on-call engineer immediately

**Configuration:**

| Setting  | Value                                                         |
| -------- | ------------------------------------------------------------- |
| Team     | Engineering                                                   |
| Project  | Production Incidents                                          |
| Status   | Todo                                                          |
| Priority | Urgent (P0)                                                   |
| Labels   | `from-screendesk`, `urgent`, `critical`, `customer-impacting` |
| Assignee | On-Call Engineer                                              |

**Title Template:**

```
🚨 CRITICAL: {{item.title}}
```

**Description Template:**

```markdown
## CRITICAL ISSUE ALERT

A critical production issue has been reported.

**Reported by:** {{creator.email}} ({{creator.name}})

### Issue Details
{{item.title}}

### Watch Recording
[View Screendesk Recording]({{item.url}})

---

**IMMEDIATE ACTION REQUIRED**

This issue requires investigation as soon as possible.

**Timeline:**
* Submitted: {{recording.created_at}}
* Severity: CRITICAL (P0)

**Browser:** {{recording.browser}}
**OS:** {{recording.os}}
**Customer Location:** {{recording.country}}

---

[Assigned to: On-Call Engineer]
```

**Result:** Critical issues immediately become high-priority P0 tickets assigned to on-call engineers.

***

#### Example 4: Support Escalation Automation

**Folder:** Escalations **Target:** Create tickets when support team escalates customer issues

**Configuration:**

| Setting  | Value                                                   |
| -------- | ------------------------------------------------------- |
| Team     | Engineering                                             |
| Project  | Customer Support                                        |
| Status   | Todo                                                    |
| Priority | High (P1)                                               |
| Labels   | `from-screendesk`, `support-escalation`, `needs-triage` |
| Assignee | Engineering Lead                                        |

**Title Template:**

```
[ESCALATED] {{item.title}} - Customer: {{creator.email}}
```

**Description Template:**

```markdown
## Support Escalation

The support team has escalated this issue from a customer.

**Customer:** {{creator.name}} ({{creator.email}})
**Escalated at:** {{item.created_at}}

### Customer Issue
{{item.title}}

### Supporting Evidence
[View Recording]({{item.url}})

**Duration:** {{recording.duration}} seconds
**Browser:** {{recording.browser}}
**OS:** {{recording.os}}

---

This customer has been waiting for resolution. Please prioritize.
```

**Result:** Support escalations create high-priority tickets that go directly to engineering leads.

***

### Bi-Directional Sync Features

#### Sync-Enabled Features

Once an issue is created from a recording, the following updates sync between Screendesk and Linear:

**Synced from Linear to Screendesk:**

* Issue status changes (Backlog → Todo → In Progress → Done)
* Issue comments from Linear team members
* Issue resolution status
* Priority changes
* Label additions/removals

**Synced from Screendesk to Linear:**

* New comments on the recording
* Recording tags and labels
* Recording status updates

#### How Bi-Directional Sync Works

1. **Initial Creation** — Automation creates Linear issue from recording
2. **Link Established** — Screendesk maintains reference to Linear issue
3. **Status Sync** — Changes propagate every 5 minutes
4. **Comments Sync** — Team discussions stay in sync
5. **Resolution** — When issue closes in Linear, recording shows as addressed

#### Enable Sync Features

Bi-directional sync is **enabled by default** for all Linear automations.

To verify sync is working:

1. Go to **Account Settings → Integrations → Linear**
2. Look for **Bi-Directional Sync** toggle
3. Ensure it's enabled (green)

**In the recording:** You'll see a "Linear Issue" section showing:

* Issue ID (e.g., "ENG-123")
* Issue title
* Current status
* Link to Linear
* Recent comments

#### Troubleshoot Sync Issues

If sync isn't working:

1. **Check Linear connection** — Ensure Linear is still connected in settings
2. **Verify permissions** — OAuth token needs read/write access
3. **Check token expiration** — Expired tokens prevent sync
4. **Wait 5 minutes** — Sync runs on 5-minute intervals
5. **Refresh manually** — Click the refresh icon in the Linear Issue panel

***

### Cycle and Milestone Assignment

#### Add Issues to Current Cycle

Automatically include issues in the current Linear cycle:

**Configuration:**

1. Edit the automation
2. Look for **Add to Current Cycle** option
3. Toggle **Enabled**
4. Save

**Result:** New issues will automatically be added to your team's active cycle, making them visible in sprint planning and cycle progress.

**When to use:**

* Bug fix cycles
* Sprint-aligned feature work
* Urgent issues that need immediate scheduling

#### Assign to Specific Milestones

Link issues to project milestones:

**Configuration:**

1. Edit the automation
2. Find **Milestone** dropdown
3. Select a milestone
4. Save

**Available milestones:**

* All active milestones in your Linear team
* Issues will be linked to the selected milestone
* Milestone progress automatically includes these issues

**When to use:**

* Product launch features
* Release-specific bug fixes
* Long-term initiative tracking

***

### Duplicate Prevention

Prevent creating multiple issues for the same problem:

#### By Customer Email

**Configuration:**

1. Edit the automation
2. Enable **Prevent Duplicates**
3. Select **By Customer Email**
4. Set time window (default: 24 hours)
5. Save

**How it works:**

* Same customer within 24 hours → No duplicate issue created
* Different customers → Issues created independently
* After 24 hours → Customer can create new issues

**Use case:** Prevent duplicate issues from the same user submitting multiple recordings.

#### By Recording Title

**Configuration:**

1. Edit the automation
2. Enable **Prevent Duplicates**
3. Select **By Title**
4. Set time window (default: 24 hours)
5. Save

**How it works:**

* Similar titles within 24 hours → No duplicate issue created
* Exact title match → Duplicate detected
* Title variations → Treated as separate issues

**Use case:** Prevent multiple issues for the same bug reported by different customers.

***

### Managing the Integration

#### View Integration Status

Check Linear connection status:

1. Go to **Account Settings**
2. Select **Integrations & Automations**
3. Find **Linear** in the integrations list
4. See connection status and team information

**Displayed information:**

* Connection status (Connected/Disconnected)
* Team name and ID
* Team member count
* Last sync status
* Expiration warning (if token is expiring soon)

#### Disconnect Linear

Remove the Linear integration:

1. Go to **Account Settings → Integrations & Automations**
2. Find **Linear**
3. Click **Disconnect**
4. Confirm disconnection

**What happens:**

* All Linear automations are **disabled** (not deleted)
* Existing issues in Linear **remain unchanged**
* Sync stops immediately
* Automations can be re-enabled by reconnecting

#### Refresh Permissions

If Linear resources aren't loading:

1. Go to **Account Settings → Integrations & Automations**
2. Find **Linear**
3. Click **Refresh**
4. Re-authorize if prompted
5. Teams and projects update immediately

**When to refresh:**

* New projects created in Linear
* New team members added
* New labels created
* Permissions changed

#### Check Token Expiration

Linear tokens expire and need renewal:

1. Check **Account Settings → Integrations & Automations**
2. Look for expiration warning on Linear card
3. If expired: Click **Reconnect** button
4. Follow OAuth flow again

**Automatic refresh:** Screendesk automatically attempts to refresh tokens every 7 days. If this fails, you'll see a warning.

***

### Troubleshooting

#### Issues Not Creating

**Symptom:** Automations enabled but no issues appear in Linear

**Solutions:**

{% stepper %} {% step %}

#### Verify Linear is connected

1. Go to **Account Settings → Integrations & Automations**
2. Check Linear status shows "Connected"
3. If disconnected, click **Connect Linear** to re-authorize {% endstep %}

{% step %}

#### Check team permissions

1. In Linear, verify your user has admin or owner role
2. Verify you have "Create Issues" permission
3. Check the selected team has active members
4. Try selecting a different team {% endstep %}

{% step %}

#### Verify automation is enabled

1. Open folder **Settings → Automations**
2. Find the Linear automation
3. Toggle should be **green** (on)
4. If disabled, click to enable {% endstep %}

{% step %}

#### Check execution logs

1. Go to **Account Settings → Automations → Execution Log**
2. Filter by the folder or automation
3. Look for error messages explaining why issue creation failed
4. Recent failures show detailed error information {% endstep %}

{% step %}

#### Test with a test issue

1. Open the automation
2. Click **Create Test Issue**
3. If test fails, error message explains why
4. Fix the issue and test again

{% hint style="info" %} Test issues show specific error messages that help diagnose problems. {% endhint %} {% endstep %} {% endstepper %}

#### Missing or Incorrect Fields

**Symptom:** Linear issue created but fields are empty or wrong

**Solutions:**

{% stepper %} {% step %}

#### Verify template syntax

Check title and description templates:

* Variables must be enclosed in double braces: `{{variable}}`
* Variable names must be spelled exactly
* No extra spaces or special characters

**Correct:** `{{item.title}}` **Incorrect:** `{{ item.title }}` or `{{item.Title}}` {% endstep %}

{% step %}

#### Check data availability

Some variables only exist for certain item types:

* `{{recording.*}}` — Only for recordings
* `{{capture.*}}` — Only for captures
* `{{creator.*}}` — Available for all items

If a recording doesn't have console errors, `{{recording.console_errors}}` will be empty. {% endstep %}

{% step %}

#### Test with sample data

Create a test recording/capture with the data you're referencing:

1. Add test item to folder
2. Create test issue
3. View the result
4. Adjust templates based on what's missing {% endstep %} {% endstepper %}

#### Wrong Team or Project

**Symptom:** Issue created in wrong team or project

**Solutions:**

1. Open the automation settings
2. Verify **Team** dropdown shows correct team
3. Verify **Project** dropdown shows correct project
4. Click **Save** to update
5. Create a test issue to verify

**Note:** Changes only affect new issues, not previously created ones.

#### Labels Not Applied

**Symptom:** Issue created but labels are missing

**Solutions:**

{% stepper %} {% step %}

#### Verify labels exist in Linear

1. Open Linear workspace
2. Go to team settings → Labels
3. Check that your configured labels exist
4. Labels must be created in Linear before using in Screendesk {% endstep %}

{% step %}

#### Refresh label list in Screendesk

1. Go to **Account Settings → Integrations & Automations**
2. Find Linear
3. Click **Refresh**
4. Wait for labels to update
5. Edit automation and verify labels appear {% endstep %}

{% step %}

#### Re-add labels to automation

1. Open the automation settings
2. Remove old labels
3. Click **+ Add Label** to re-select
4. Choose labels from the refreshed list
5. Save and test {% endstep %} {% endstepper %}

#### Assignee Not Applied

**Symptom:** Issue not assigned to selected team member

**Solutions:**

1. Verify the selected person is **active** in Linear
2. Inactive members can't be assigned
3. Go to Linear team settings → Members
4. Check if the person is still active
5. If inactive, select a different assignee

#### Token Expired

**Symptom:** "Linear access token has expired" error

**Solutions:**

1. Go to **Account Settings → Integrations & Automations**
2. Look for expiration warning on Linear card
3. Click **Reconnect**
4. Follow the OAuth authorization flow
5. Return to Screendesk and test

**Prevention:** Screendesk automatically refreshes tokens. If refresh fails, you'll see a warning before token expires.

#### Sync Not Working

**Symptom:** Linear issue changes don't appear in Screendesk recording

**Solutions:**

{% stepper %} {% step %}

#### Verify sync is enabled

1. Go to **Account Settings → Integrations → Linear**
2. Look for **Bi-Directional Sync** toggle
3. Ensure it's **enabled** (green)
4. If disabled, enable it and save {% endstep %}

{% step %}

#### Check token is valid

1. If token expired, reconnect Linear (see Token Expired above)
2. Expired tokens prevent sync
3. After reconnecting, sync resumes automatically {% endstep %}

{% step %}

#### Wait for sync cycle

Sync runs every 5 minutes:

1. Make a change in Linear
2. Wait up to 5 minutes
3. Refresh the Screendesk recording page
4. Changes should appear

Don't worry if sync takes up to 5 minutes. {% endstep %}

{% step %}

#### Check for webhook issues

1. Go to **Account Settings → Automations → Execution Log**
2. Look for sync-related entries
3. Check for error messages
4. If webhooks failed, sync may be delayed {% endstep %} {% endstepper %}

#### Slow Issue Creation

**Symptom:** Issues take longer than expected to be created

**Solutions:**

1. **Check Linear API status** — Visit [Linear Status Page](https://status.linear.app)
2. **Verify internet connection** — Ensure stable connection to screendesk.io and linear.app
3. **Check automation logs** — View execution timestamps to identify delays
4. **Try again** — If a temporary issue, retry with a new recording

Typical creation time: 5-30 seconds. Longer delays indicate network or API issues.

#### Rate Limiting

**Symptom:** "Rate limit exceeded" error

**Solutions:**

1. **Wait before retrying** — Linear enforces rate limits; wait a few minutes
2. **Space out automations** — Don't trigger many automations simultaneously
3. **Check documentation** — Linear API has rate limits; see [Linear Docs](https://developers.linear.app/docs)
4. **Contact Linear support** — If limits are too restrictive for your use case

#### OAuth Authorization Failed

**Symptom:** "Linear authorization failed" error during connection

**Solutions:**

1. **Verify Linear credentials** — Ensure client ID/secret are correct
2. **Check OAuth scope** — "write" scope is required
3. **Verify redirect URI** — Must match configured callback URL
4. **Try again** — Click **Connect Linear** to retry

If issues persist, contact Screendesk support.

#### Check Automation Logs

View detailed execution history:

1. Go to **Account Settings → Automations**
2. Click **Execution Log** tab
3. Filter by folder or automation type
4. Click any log entry to see details

**Log information includes:**

* Timestamp of execution
* Success or failure status
* Error message (if failed)
* Issue ID created (if successful)
* Time taken to execute

***

### Best Practices

#### Use Consistent Naming

Keep naming conventions consistent:

{% columns %} {% column %} **❌ Inconsistent:**

```

bug: checkout error
BUG - login failing
Customer says: password reset broken
[SEV-1] database timeout
```

{% endcolumn %}

{% column %} **✅ Consistent:**

```

🐛 Checkout page error
🐛 Login failing
🐛 Password reset broken
🐛 Database timeout
```

{% endcolumn %} {% endcolumns %}

Consistent naming makes issues easier to scan and search in Linear.

***

#### Set Appropriate Priority Levels

Match folder urgency to issue priority:

| Folder              | Recommended Priority |
| ------------------- | -------------------- |
| General Feedback    | No Priority          |
| Bug Reports         | Medium (P2)          |
| Feature Requests    | No Priority          |
| Critical Issues     | Urgent (P0)          |
| Support Escalations | High (P1)            |

Don't over-prioritize. Let your team adjust based on actual impact.

***

#### Use Meaningful Labels

Create labels for quick filtering:

**Organizational labels:**

* `from-screendesk` — Track all automated issues
* `customer-reported` — Issues from customers
* `internal-report` — Issues from your team

**Type labels:**

* `bug`, `feature-request`, `enhancement`, `documentation`
* `performance`, `security`, `ui`, `backend`

**Status labels:**

* `needs-triage`, `blocked`, `duplicate`
* `critical`, `high-priority`, `low-priority`

Apply 2-4 labels per issue for effective organization.

***

#### Include Recording Links Prominently

Make accessing customer evidence easy:

{% columns %} {% column %} **❌ Buried:**

```

This is a bug report.
See details below.
...lots of text...
Link: {{item.url}}
```

{% endcolumn %}

{% column %} **✅ Prominent:**

```

[View Recording]({{item.url}})

**Description:**
{{item.title}}
```

{% endcolumn %} {% endcolumns %}

Put the recording link near the top where engineers will see it first.

***

#### Add Environment Context

Include technical details for debugging:

```markdown
**System Information**
| Property | Value |
|----------|-------|
| Browser | {{recording.browser}} |
| OS | {{recording.os}} |
| Resolution | {{recording.resolution}} |
| Location | {{recording.country}} |
```

This helps engineers reproduce issues and understand scope.

***

#### Enable Duplicate Prevention

Reduce spam and noise:

* **For Bug Folders** — Prevent by customer email (24 hours)
* **For Feature Requests** — Prevent by title (24 hours)
* **For General** — Consider disabling if high volume

Duplicate prevention prevents the same issue from being created multiple times.

***

#### Test Before Large Deployment

Before creating many automations:

1. Create one automation
2. Add a test recording
3. Verify in Linear
4. Check title, description, labels, priority
5. Adjust templates as needed
6. Then create additional automations

Testing first saves time fixing issues later.

***

#### Create Folder Hierarchies

Organize your folders by automation type:

```
Root
├── Bug Reports
│   ├── Critical Bugs (P0 automation)
│   ├── Customer Bugs (P2 automation)
│   └── Internal Bugs (P3 automation)
├── Feature Requests
│   ├── High Priority
│   └── General Feedback
└── Support
    ├── Escalations
    └── General Inquiries
```

Folder hierarchies let you create targeted automations for different priorities.

***

#### Monitor Automation Success Rate

Regularly check execution logs:

1. Go to **Account Settings → Automations → Execution Log**
2. Filter by Linear automations
3. Look for patterns in failures
4. Address common issues

**Target success rate:** 99%+

***

#### Use Distribution Cycles

Distribute new issues across your team:

* Create multiple automations targeting different assignees
* Rotate which automation receives recordings
* Ensures fair work distribution
* Prevents bottlenecks

***

#### Document Your Setup

Keep notes on your automations:

* Why each automation exists
* What folder triggers it
* Where issues go in Linear
* Who manages it

This helps new team members understand the system.


# Trello

Automatically create Trello cards from folder submissions, with templates, labels, assignees, and due dates.

Trello automations automatically create cards on your Trello boards when recordings or captures are added to a folder. Convert customer feedback, bug reports, and support tickets into visual, trackable cards with video evidence and full context.

<figure><img src="/files/qzVmvzHh4l0N2h8kZw8L" alt=""><figcaption></figcaption></figure>

***

### When to Use Trello Automations

Trello automations are ideal for:

* **Bug Tracking** — Create cards for customer-reported bugs with drag-and-drop workflow
* **Feature Request Management** — Track customer suggestions visually on a roadmap board
* **Support Queue Management** — Create support tickets as cards for easy triage
* **Team Collaboration** — Share customer feedback across teams with visual context
* **Sprint Planning** — Organize recorded issues into sprints and iterations
* **Lightweight Project Management** — Simpler alternative to complex issue trackers

{% hint style="info" %}
**Trello vs. Linear/GitHub/Jira**

Use Trello when:

* Your team prefers visual, Kanban-style workflows
* You want simple drag-and-drop card management
* You need lightweight project management (not complex enterprise workflows)
* Team members are already using Trello
* You want to share customer feedback visually with non-technical teams

Use Linear/GitHub/Jira when:

* You need advanced workflow management
* You want detailed issue tracking and reporting
* You require custom fields and complex integrations
* Your team needs code-level issue linking
  {% endhint %}

***

### Prerequisites

Before setting up Trello automations:

1. **Trello Account** — With board access
2. **Trello Board** — Where cards will be created
3. **Screendesk Plan** — Pro or Enterprise plan to enable automations
4. **Folder** — Created in Screendesk to trigger the automation

***

### Setup

#### Connect Trello to Screendesk (First-time only)

Navigate to your integrations:

1. Click your avatar in the top right corner
2. Select **Account Settings**
3. Go to **Integrations & Automations → Integrations**
4. Find **Trello** in the list
5. Click **Connect Trello**

You'll be redirected to Trello to authorize access. You'll see the permissions Screendesk requires:

* Create and read cards
* Read boards and lists
* Read organization members
* Attach files to cards

Click **Allow** to proceed.

{% hint style="warning" %}
**Trello Account Required**

You must be logged into your Trello account. If you don't see your boards, verify your Trello account is the one you want to use.
{% endhint %}

#### Review Trello connection status

After authorization completes, you'll return to **Account Settings → Integrations**.

You should see:

* ✅ **Trello Connected** with your account name
* List of accessible boards
* **Disconnect** button (if you need to remove the integration)

{% hint style="success" %}
**Connection Verified**

If you see your username and board list, Trello is successfully connected. You can now create automations in any folder.
{% endhint %}

#### Open folder automations

Create an automation in any folder:

1. Navigate to the folder you want to automate
2. Click **Settings** (gear icon) in the top right
3. Select the **Automations** tab
4. Click **+ Add Automation**
5. Select **Trello** from the integration list

#### Select target board

Configure where cards will be created:

**Board (required):**

* Select the Trello board where cards will be created
* Only boards you have access to appear in the dropdown
* Supports personal, team, and organization boards
* Click **Refresh** to reload the board list

**Board Types:**

* **Personal boards** — Private to your account
* **Team boards** — Shared with team members
* **Organization boards** — Shared across organization

{% hint style="info" %}
**Board Selection**

If you don't see expected boards:

1. Verify you're a member of the board in Trello
2. Check board isn't archived
3. Click **Refresh** in the Trello integration settings
4. Re-save your automation
   {% endhint %}

#### Select target list

Configure where cards will be created in the board:

**List (required):**

* Select the list where new cards will appear
* Only lists in your selected board appear in the dropdown
* Different lists can represent workflow stages

**Common Lists:**

| List        | Use Case                  |
| ----------- | ------------------------- |
| Inbox       | New items for triage      |
| To Do       | Ready for work            |
| Backlog     | Prioritized for later     |
| Bugs        | Bug-specific list         |
| In Progress | Currently being worked on |
| Done        | Completed items           |

**Example workflows:**

* Bug board: Inbox → Investigating → In Progress → Testing → Done
* Support board: New Tickets → In Review → Waiting on Customer → With Engineering → Done
* Feature board: Ideas → Under Review → Planned → In Development → Shipped

#### Configure card title

Customize how card titles appear on Trello:

**Default title template:**

```
{{item.title}}
```

**Example outputs:**

```
Checkout page crashes on iOS
User can't reset password
Feature request: Dark mode toggle
```

**Other title examples:**

For bug reports:

```
🐛 {{item.title}}
```

For feature requests:

```
💡 {{item.title}}
```

Including customer context:

```
[{{creator.email}}] {{item.title}}
```

For folder-specific routing:

```
{{folder.name}}: {{item.title}}
```

{% hint style="warning" %}
**Title Length**

Keep titles under 100 characters for clarity. Trello displays full titles but very long titles may wrap.
{% endhint %}

View all available template variables →

#### Configure card description

Create a rich card description with recording context:

**Default description template:**

```markdown
## Customer Recording

**Submitted by:** {{creator.email}}
**Duration:** {{recording.duration}} seconds
**Date:** {{recording.created_at}}

---

### Watch Recording
{{item.url}}

---

### Console Errors
{{recording.console_errors}}

---

### Environment
- Browser: {{recording.browser}}
- OS: {{recording.os}}
- Resolution: {{recording.resolution}}
- Country: {{recording.country}}
```

**Example: Detailed bug report description**

```markdown
## Bug Report

A customer submitted a recording describing this issue.

**Reported by:** {{creator.email}} ({{creator.name}})
**Folder:** {{folder.name}}

### Description
{{item.title}}

### Watch Recording
[View on Screendesk]({{item.url}})

---

### Recording Details
- **Duration:** {{recording.duration}} seconds
- **Browser:** {{recording.browser}}
- **OS:** {{recording.os}}
- **Resolution:** {{recording.resolution}}
- **Location:** {{recording.country}}
- **Recorded:** {{recording.created_at}}

### Technical Information

**Console Errors:**
{{recording.console_errors}}

**Network Errors:**
{{recording.network_errors}}

---

This card was automatically created from a customer recording on Screendesk.
```

**Example: Feature request description**

```markdown
## Feature Request

A customer has requested the following feature.

**Suggested by:** {{creator.email}} ({{creator.name}})

### Feature Description
{{item.title}}

### Customer Recording
[View request on Screendesk]({{item.url}})

**Recording Duration:** {{recording.duration}} seconds

---

This feature request was automatically created from a customer recording.
```

**Markdown Support**

Trello card descriptions support Markdown formatting:

* **Bold** — `**text**`
* *Italic* — `*text*`
* Links — `[text](url)`
* Headers — `## Heading`
* Lists — `* item` or `- item`
* Code blocks — ` ``` `

Use markdown to format important information effectively. {% endhint %}

View all available variables → {% endstep %}

{% step %}

#### Apply labels automatically

Organize cards with Trello labels:

**To add labels:**

1. Click **+ Add Label**
2. Select from board labels
3. Add multiple labels as needed

**Suggested labels:**

* `from-screendesk` — Track all automated cards
* `customer-reported` — Mark customer submissions
* `needs-triage` — Flag for manual review
* `bug` or `enhancement` — Categorize card type
* `critical` — For urgent items
* `customer-feedback` — Specific to feature requests

**Example configurations:**

For bug reports list:

```

from-screendesk, customer-reported, bug, needs-triage
```

For feature requests list:

```
from-screendesk, enhancement, customer-feedback
```

For critical issues list:

```
from-screendesk, critical, urgent, customer-impacting
```

{% hint style="warning" %} **Label Availability**

Only labels that exist on your board appear in the dropdown. If you don't see a label you want:

1. Create it on the Trello board first
2. Return to Screendesk
3. Click **Refresh** in the Trello integration settings
4. The new label will appear in the dropdown {% endhint %} {% endstep %}

{% step %}

#### Assign team members (optional)

Auto-assign cards to board members:

**Members dropdown:**

* Select specific team member(s)
* Multiple members supported
* Or leave unassigned for manual assignment
* Only board members appear in the list

**Recommended approach:**

* Leave unassigned for most automations
* Use assignees for urgent or specialized items
* Let team leads manually assign based on expertise

**Example uses:**

* Assign critical bugs to on-call engineer
* Assign feature requests to product manager
* Leave general issues unassigned for triage

{% hint style="info" %} **Multiple Assignees**

Trello supports multiple assignees per card. Add team members to distribute work:

* Bug triage: Assign QA and developer
* Feature requests: Assign product and design
* Critical issues: Assign on-call engineer and team lead {% endhint %} {% endstep %}

{% step %}

#### Configure card position

Control where new cards appear in the list:

**Position options:**

* **Top** — New cards appear at top of list (newest first)
* **Bottom** — New cards appear at bottom (oldest first)

**Recommendation:** Choose **Top** so new items are immediately visible at the top of your list.

{% endstep %}

{% step %}

#### Configure due date (optional)

Set automatic due dates on cards:

**Due date options:**

| Option   | Result         |
| -------- | -------------- |
| None     | No due date    |
| +1 day   | Due tomorrow   |
| +3 days  | Due in 3 days  |
| +1 week  | Due next week  |
| +2 weeks | Due in 2 weeks |

**When to use:**

* Set for support cards (due in 2 days)
* Set for urgent bugs (due tomorrow)
* Leave empty for backlog items

{% hint style="info" %} **Due Date Reminders**

Trello sends due date reminders to assignees. This keeps team members aware of approaching deadlines. {% endhint %} {% endstep %}

{% step %}

#### Test the automation

Before activating, create a test card:

1. Click **Create Test Card** button
2. Check your Trello board for the new card
3. Verify all fields populated correctly:
   * [ ] Title matches template
   * [ ] Description includes all variables
   * [ ] Card is in correct list
   * [ ] Labels are applied
   * [ ] Members are assigned (if configured)
   * [ ] Position is correct
   * [ ] Due date is set (if configured)
   * [ ] Recording link works

**If something looks wrong:**

1. Click **Back**
2. Update the settings
3. Click **Create Test Card** again

**Delete test cards in Trello:** After verifying, you can archive or delete test cards directly in Trello (they won't affect the automation).

{% hint style="success" %} **Ready to Activate**

Once testing passes, proceed to save. {% endhint %} {% endstep %}

{% step %}

#### Save and activate

Finalize the automation:

1. Click **Save Automation**
2. The automation is **enabled by default**
3. You'll see it listed in the folder's **Automations** tab

**Status indicators:**

* ✅ Green toggle — Automation is active
* ⚫ Gray toggle — Automation is disabled

You can disable/enable the automation anytime without deleting it.

From now on, every recording or capture added to this folder will automatically create a card on your Trello board.

{% hint style="info" %} **Automation Activity**

View execution history:

1. Go to **Account Settings → Automations → Execution Log**
2. Filter by folder or automation type
3. See success/failure details for each execution {% endhint %} {% endstep %} {% endstepper %}

***

### Template Variables

Use these variables in card title and description templates:

#### Item Information

| Variable              | Description                | Example                  |
| --------------------- | -------------------------- | ------------------------ |
| `{{item.title}}`      | Recording or capture title | "Checkout crashes"       |
| `{{item.url}}`        | Link to recording/capture  | Full HTTPS URL           |
| `{{item.type}}`       | Item type                  | "recording" or "capture" |
| `{{item.duration}}`   | Length in seconds          | "45"                     |
| `{{item.created_at}}` | Submission timestamp       | "Feb 6, 2026 at 2:30 PM" |

#### Creator Information

| Variable            | Description          | Example                |
| ------------------- | -------------------- | ---------------------- |
| `{{creator.name}}`  | Person who submitted | "Alice Johnson"        |
| `{{creator.email}}` | Creator's email      | "<alice@customer.com>" |

#### Recording-Specific (if applicable)

| Variable                       | Description          | Example               |
| ------------------------------ | -------------------- | --------------------- |
| `{{recording.title}}`          | Recording title      | "Checkout page error" |
| `{{recording.url}}`            | Recording link       | Full HTTPS URL        |
| `{{recording.browser}}`        | Browser info         | "Chrome 121.0.6167"   |
| `{{recording.os}}`             | Operating system     | "macOS 14.3"          |
| `{{recording.resolution}}`     | Screen resolution    | "2560x1440"           |
| `{{recording.country}}`        | Geographic location  | "United States"       |
| `{{recording.console_errors}}` | JavaScript errors    | Formatted list        |
| `{{recording.network_errors}}` | Failed HTTP requests | Formatted list        |

#### Capture-Specific (if applicable)

| Variable            | Description   | Example                     |
| ------------------- | ------------- | --------------------------- |
| `{{capture.title}}` | Capture title | "Bug description"           |
| `{{capture.url}}`   | Capture link  | Full HTTPS URL              |
| `{{capture.type}}`  | Capture type  | Screenshot or document type |

#### Folder & Account

| Variable           | Description    | Example       |
| ------------------ | -------------- | ------------- |
| `{{folder.name}}`  | Folder name    | "Bug Reports" |
| `{{account.name}}` | Workspace name | "Acme Corp"   |

View complete variable reference →

***

### Example Configurations

#### Example 1: Bug Tracking Board

**Folder:** Bug Reports **Target:** Create bug cards in development workflow

**Configuration:**

| Setting  | Value                                                  |
| -------- | ------------------------------------------------------ |
| Board    | Development                                            |
| List     | Bugs                                                   |
| Labels   | `from-screendesk`, `customer-reported`, `needs-triage` |
| Members  | (Unassigned)                                           |
| Position | Top                                                    |

**Card Title Template:**

```

🐛 {{item.title}}
```

**Card Description Template:**

```markdown
## Bug Report

A customer submitted a recording describing this issue.

**Reported by:** {{creator.email}} ({{creator.name}})
**Folder:** {{folder.name}}

### Description
{{item.title}}

### Watch Recording
[View on Screendesk]({{item.url}})

---

### System Information
- **Browser:** {{recording.browser}}
- **OS:** {{recording.os}}
- **Resolution:** {{recording.resolution}}
- **Location:** {{recording.country}}
- **Duration:** {{recording.duration}} seconds

### Technical Details

**Console Errors:**
{{recording.console_errors}}

**Network Errors:**
{{recording.network_errors}}

---

This card was automatically created from a customer recording on Screendesk.
```

**Result:** Bug cards created in Bugs list, ready to be investigated and moved through your development workflow.

***

#### Example 2: Support Queue

**Folder:** Customer Support **Target:** Track customer support requests visually

**Configuration:**

| Setting  | Value                                 |
| -------- | ------------------------------------- |
| Board    | Customer Support                      |
| List     | New Tickets                           |
| Labels   | `from-screendesk`, `customer-request` |
| Members  | Support Lead                          |
| Due Date | +2 days                               |
| Position | Top                                   |

**Card Title Template:**

```
[Support] {{item.title}} - {{creator.email}}
```

**Card Description Template:**

```markdown
## Customer Support Request

**Customer:** {{creator.name}} ({{creator.email}})
**Submitted:** {{item.created_at}}

### Issue
{{item.title}}

### Recording
[View on Screendesk]({{item.url}})

**Duration:** {{recording.duration}} seconds

---

**Environment:**
- Browser: {{recording.browser}}
- OS: {{recording.os}}
```

**Result:** Support tickets created at top of New Tickets list with 2-day due date, ready for triage and assignment.

***

#### Example 3: Feature Request Board

**Folder:** Feature Requests **Target:** Track customer feature suggestions for product team

**Configuration:**

| Setting  | Value                                                 |
| -------- | ----------------------------------------------------- |
| Board    | Product Roadmap                                       |
| List     | Ideas                                                 |
| Labels   | `from-screendesk`, `enhancement`, `customer-feedback` |
| Members  | Product Manager                                       |
| Position | Top                                                   |

**Card Title Template:**

```
💡 Feature Request: {{item.title}}
```

**Card Description Template:**

```markdown
## Customer Feature Request

A customer has requested the following feature.

**Suggested by:** {{creator.name}} ({{creator.email}})

### Feature Description
{{item.title}}

### Customer Recording
[View request on Screendesk]({{item.url}})

**Recording Duration:** {{recording.duration}} seconds

---

This feature request was automatically created from a customer recording.
```

**Result:** Feature requests flow into Ideas list for product manager to review and prioritize.

***

#### Example 4: Critical Issues

**Folder:** Critical Incidents **Target:** Escalate urgent problems immediately

**Configuration:**

| Setting  | Value                             |
| -------- | --------------------------------- |
| Board    | Production Incidents              |
| List     | Critical                          |
| Labels   | `from-screendesk`, `urgent`, `p0` |
| Members  | On-Call Engineer                  |
| Due Date | +1 day                            |
| Position | Top                               |

**Card Title Template:**

```
🚨 CRITICAL: {{item.title}}
```

**Card Description Template:**

```markdown
## CRITICAL INCIDENT ALERT

A critical production issue has been reported.

**Reported by:** {{creator.email}}
**Severity:** CRITICAL (P0)

### Issue Details
{{item.title}}

### Watch Recording
[View on Screendesk]({{item.url}})

---

**IMMEDIATE ACTION REQUIRED**

**Timeline:**
- Submitted: {{item.created_at}}
- Due: Tomorrow

**Environment:**
- Browser: {{recording.browser}}
- OS: {{recording.os}}
- Location: {{recording.country}}

---

Assigned to: On-Call Engineer
```

**Result:** Critical cards created at top of Critical list with immediate due date and on-call engineer assignment.

***

### Card Features

#### Checklists

Add a default checklist to every card:

1. Edit the automation
2. Enable **Add Checklist**
3. Name the checklist (e.g., "Resolution Steps")
4. Add checklist items:
   * Watch recording
   * Reproduce issue
   * Identify root cause
   * Implement fix
   * Test solution
   * Follow up with customer

Team members can check off items as they work through the card.

#### Cover Images

Use recording thumbnail as card cover:

1. Edit the automation
2. Enable **Set Cover Image**
3. Recording thumbnail becomes the card cover
4. Makes cards visually identifiable in the board

#### Attachments

Automatically attach to cards:

| Attachment     | Description                            |
| -------------- | -------------------------------------- |
| Recording Link | Clickable link to Screendesk recording |
| Thumbnail      | Preview image of recording             |
| Console Logs   | Text file with full console output     |

***

### Board Workflow Examples

#### Bug Tracking Board

```
Development Board
├── 📥 New (automation target)
│   └── New bug cards created here
├── 🔍 Investigating
│   └── Team reviewing and reproducing
├── 🛠️ In Progress
│   └── Developer actively working
├── 🧪 Testing
│   └── QA verifying fix
└── ✅ Done
    └── Completed bugs
```

#### Support Board

```
Customer Support Board
├── 📨 Incoming (automation target)
│   └── New support requests created here
├── 👀 In Review
│   └── Support team reading and categorizing
├── 💬 Waiting on Customer
│   └── Awaiting customer response
├── 🔧 With Engineering
│   └── Escalated to engineering team
└── ✅ Resolved
    └── Completed support tickets
```

#### Feature Request Board

```
Product Roadmap Board
├── 💡 Ideas (automation target)
│   └── New feature requests created here
├── 📊 Under Review
│   └── Product team evaluating
├── 🎯 Planned
│   └── Approved for future development
├── 🚧 In Development
│   └── Engineering working on feature
└── ✅ Shipped
    └── Released to customers
```

***

### Butler Automation Integration

Combine Screendesk automations with Trello's Butler for advanced workflows:

#### Auto-move on Label

When card is labeled "Urgent":

```
Move card to list "Priority Queue"
```

#### Due Date Reminders

When due date approaches:

```
Add comment "@team This needs attention soon!"
```

#### Archive Completed

When moved to "Done":

```
Archive card after 7 days
```

#### Escalation

When card has specific label:

```
Add @team-lead as member
Add comment with urgent context
```

***

### Managing the Integration

#### View Integration Status

Check Trello connection status:

1. Go to **Account Settings**
2. Select **Integrations & Automations**
3. Find **Trello** in the integrations list
4. See connection status and account information

#### Disconnect Trello

Remove the Trello integration:

1. Go to **Account Settings → Integrations & Automations**
2. Find **Trello**
3. Click **Disconnect**
4. Confirm disconnection

**What happens:**

* All Trello automations are **disabled** (not deleted)
* Existing cards on Trello **remain unchanged**
* Automations can be re-enabled by reconnecting

#### Refresh Boards

If Trello boards aren't loading:

1. Go to **Account Settings → Integrations & Automations**
2. Find **Trello**
3. Click **Refresh**
4. Boards update immediately

**When to refresh:**

* New boards created in Trello
* Board access changed
* New lists added to board
* Labels added to board

#### Change Board or List

To update an existing automation:

1. Edit the automation
2. Select new board
3. Select new list (will reset to the new board's lists)
4. Reconfigure labels (they're board-specific)
5. Verify members are available on new board
6. Save

***

### Troubleshooting

#### Cards Not Creating

**Symptom:** Automations enabled but no cards appear on Trello board

**Solutions:**

{% stepper %} {% step %}

#### Verify Trello is connected

1. Go to **Account Settings → Integrations & Automations**
2. Check Trello status shows "Connected"
3. If disconnected, click **Connect Trello** to re-authorize {% endstep %}

{% step %}

#### Check board and list access

1. In Trello, verify you're a member of the selected board
2. Verify the list exists and isn't archived
3. Try selecting a different list to test {% endstep %}

{% step %}

#### Verify automation is enabled

1. Open folder **Settings → Automations**
2. Find the Trello automation
3. Toggle should be **green** (on)
4. If disabled, click to enable {% endstep %}

{% step %}

#### Check execution logs

1. Go to **Account Settings → Automations → Execution Log**
2. Filter by the folder or automation
3. Look for error messages explaining why card creation failed
4. Recent failures show detailed error information {% endstep %}

{% step %}

#### Test with a test card

1. Open the automation
2. Click **Create Test Card**
3. If test fails, error message explains why
4. Fix the issue and test again

{% hint style="info" %} Test cards show specific error messages that help diagnose problems. {% endhint %} {% endstep %} {% endstepper %}

#### Missing or Incorrect Fields

**Symptom:** Trello card created but fields are empty or wrong

**Solutions:**

{% stepper %} {% step %}

#### Verify template syntax

Check title and description templates:

* Variables must be enclosed in double braces: `{{variable}}`
* Variable names must be spelled exactly
* No extra spaces or special characters

**Correct:** `{{item.title}}` **Incorrect:** `{{ item.title }}` or `{{item.Title}}` {% endstep %}

{% step %}

#### Check Markdown formatting

1. Verify Markdown syntax is correct
2. Common issues:
   * Missing line breaks between sections
   * Unescaped special characters
   * Incorrect link syntax
3. Test formatting in Trello card directly {% endstep %}

{% step %}

#### Test with sample data

Create a test recording/capture with the data you're referencing:

1. Add test item to folder
2. Create test card
3. View the result
4. Adjust templates based on what's missing {% endstep %} {% endstepper %}

#### Wrong Board or List

**Symptom:** Card created on wrong board or in wrong list

**Solutions:**

1. Open the automation settings
2. Verify **Board** dropdown shows correct board
3. Verify **List** dropdown shows correct list
4. Click **Save** to update
5. Create a test card to verify

**Note:** Changes only affect new cards, not previously created ones.

#### Labels Not Applied

**Symptom:** Card created but labels are missing

**Solutions:**

{% stepper %} {% step %}

#### Verify labels exist on board

1. Open Trello board
2. Open any card and check available labels
3. Labels must be created on the board first
4. They're board-specific, not shared across boards {% endstep %}

{% step %}

#### Refresh label list in Screendesk

1. Go to **Account Settings → Integrations & Automations**
2. Find Trello
3. Click **Refresh**
4. Wait for labels to update
5. Edit automation and verify labels appear {% endstep %}

{% step %}

#### Re-add labels to automation

1. Open the automation settings
2. Remove old labels
3. Click **+ Add Label** to re-select
4. Choose labels from the refreshed list
5. Save and test {% endstep %} {% endstepper %}

#### Members Not Assigned

**Symptom:** Card not assigned to selected team member

**Solutions:**

1. Verify the selected person is **a member of the board** in Trello
2. Non-members can't be assigned to cards
3. Go to Trello board settings → Members
4. Check if the person is listed
5. If not, invite them to the board first
6. Select a different assignee in automation and test again

#### Formatting Issues

**Symptom:** Card description formatting looks wrong on Trello

**Solutions:**

1. Test your Markdown template in a Trello card directly
2. Verify Markdown syntax is correct
3. Common issues:
   * Inline HTML not supported (use Markdown instead)
   * Emoji may render differently on different devices
   * Very long text may wrap unexpectedly
4. Test with a test card to verify before activating

***

### Best Practices

#### Use Consistent Card Naming

Keep naming conventions consistent:

{% columns %} {% column %} **❌ Inconsistent:**

```

bug: checkout error
BUG - login failing
customer says: password reset broken
[SEV-1] database timeout
```

{% endcolumn %}

{% column %} **✅ Consistent:**

```

🐛 Checkout page error
🐛 Login failing
🐛 Password reset broken
🐛 Database timeout
```

{% endcolumn %} {% endcolumns %}

Consistent naming makes cards easier to scan in lists.

***

#### Use Meaningful Labels

Create labels for quick identification:

**Organizational labels:**

* `from-screendesk` — Track all automated cards
* `customer-reported` — Issues from customers
* `internal-report` — Issues from your team

**Type labels:**

* `bug`, `enhancement`, `documentation`
* `performance`, `security`, `ui`, `backend`

**Priority labels:**

* `urgent`, `high-priority`, `low-priority`
* `critical`, `p0`, `p1`

Apply 2-4 labels per card for effective organization.

***

#### Include Recording Links Prominently

Make accessing customer evidence easy:

{% columns %} {% column %} **❌ Buried:**

```

This is a bug report.
See details below.
...lots of text...
Link: {{item.url}}
```

{% endcolumn %}

{% column %} **✅ Prominent:**

```

[View Recording]({{item.url}})

**Description:**
{{item.title}}
```

{% endcolumn %} {% endcolumns %}

Put the recording link near the top where team members will see it first.

***

#### Set Due Dates for Accountability

Use due dates to keep items moving:

* **Support cards** — Due in 2 days
* **Urgent bugs** — Due in 1 day
* **Feature requests** — No due date (backlog)
* **Critical issues** — Due today or tomorrow

Due dates create accountability and prevent items from stalling.

***

#### Add Checklists for Process Consistency

Create standard checklists for different card types:

**For bug cards:**

* Watch recording
* Reproduce issue
* Debug and identify root cause
* Implement fix
* Test thoroughly
* Follow up with customer

**For support cards:**

* Read and understand issue
* Attempt to reproduce
* Test workaround
* Provide solution or escalate
* Follow up with customer

**For feature cards:**

* Review request
* Discuss with team
* Estimate effort
* Plan for sprint
* Implement and test

***

#### Position Cards at Top

Create new cards at the top of lists:

* New items are immediately visible
* Team doesn't miss new submissions
* Encourages processing inbox-style (top to bottom)

***

#### Create Dedicated Automation Lists

Separate automation target from manual cards:

```
Development Board
├── 📥 New [from Screendesk automations]
├── 🔍 Investigating
├── 🛠️ In Progress
└── ✅ Done
```

Keep automated cards separate to track what came from Screendesk vs. manual input.

***

#### Monitor Automation Success Rate

Regularly check execution logs:

1. Go to **Account Settings → Automations → Execution Log**
2. Filter by Trello automations
3. Look for patterns in failures
4. Address common issues

**Target success rate:** 99%+

***

#### Test Before Large Deployment

Before creating many automations:

1. Create one automation
2. Add a test recording
3. Verify card appears on Trello
4. Check title, description, labels, members
5. Adjust templates as needed
6. Then create additional automations

Testing first saves time fixing issues later.

***

#### Document Your Workflow

Keep notes on your automation setup:

* Why each automation exists
* What folder triggers it
* What board and list it targets
* How cards flow through your workflow
* Who manages the board

This helps new team members understand the system.

***

* Template Variables Reference — Complete list of available variables
* Linear Automation — More advanced issue tracking alternative
* Jira Automation — Another issue tracker option
* GitHub Automation — Code-focused issue tracking
* Slack Integration — Send notifications to Slack
* Troubleshooting Guide — Common issues and solutions
* [Trello API Documentation](https://developer.atlassian.com/cloud/trello/rest/api-group-actions/) — Trello developer reference
* [Trello Best Practices](https://trello.com/guide) — Trello official guide
* [Butler for Trello](https://support.atlassian.com/trello/docs/about-butler-for-trello/) — Trello automation capabilities


# Github

Automatically create GitHub issues from folder submissions using templates, labels, and assignees.

GitHub automations automatically create issues in your repositories when recordings or captures are added to a folder. Convert customer bug reports, feature requests, and support tickets into actionable GitHub issues with video evidence and console logs.

<figure><img src="/files/TyJASEm0d1j0UrskOVG9" alt=""><figcaption></figcaption></figure>

***

### When to Use GitHub Automations

GitHub automations are ideal for:

* **Bug Report Tracking** — Convert customer-reported bugs into GitHub issues with video evidence
* **Feature Request Management** — Automatically create enhancement issues from customer feedback
* **Support Escalations** — Create high-priority issues when critical problems are reported
* **Cross-Team Collaboration** — Link customer recordings directly to development work
* **Engineering Visibility** — Ensure engineers see customer context immediately
* **Issue Triage Workflow** — Route issues to specific repositories and projects automatically

{% hint style="info" %}
**GitHub vs. Email/Webhook**

Use GitHub when:

* Your engineering team uses GitHub for issue tracking
* You want automatic issue creation with full context
* You need to organize issues by repository
* You want to assign issues to team members
* You need bi-directional sync with status updates

Use Email when:

* Recipients don't use GitHub
* You just need notifications
* You want simpler setup without OAuth

Use Webhooks when:

* You need integration with a different tool
* You want custom payload formatting
* You're building custom automation
  {% endhint %}

***

### Prerequisites

Before setting up GitHub automations:

1. **GitHub Account** — With repository write access
2. **Repository Access** — Admin or write access to target repositories
3. **Screendesk Plan** — Pro or Enterprise plan to enable automations
4. **Folder** — Created in Screendesk to trigger the automation

***

### Setup

#### Connect GitHub to Screendesk (First-time only)

Navigate to your integrations:

1. Click your avatar in the top right corner
2. Select **Account Settings**
3. Go to **Integrations & Automations → Integrations**
4. Find **GitHub** in the list
5. Click **Connect GitHub**

You'll be redirected to GitHub to authorize access. You'll see a dialog showing the permissions Screendesk requires:

* Create and read issues
* Read repository metadata
* Read organization members (for assignees)

Click **Install & Authorize** to proceed.

{% hint style="warning" %}
**GitHub App Installation**

You'll need to select installation scope:

* **All repositories** — Screendesk can access all current and future repos
* **Select repositories** — Choose specific repos you want to allow

You can change this anytime in GitHub settings.
{% endhint %}

#### Review GitHub connection status

After authorization completes, you'll return to **Account Settings → Integrations**.

You should see:

* ✅ **GitHub Connected** with your account name
* List of accessible repositories
* **Disconnect** button (if you need to remove the integration)

{% hint style="success" %}
**Connection Verified**

If you see your username and repositories list, GitHub is successfully connected. You can now create automations in any folder.
{% endhint %}

#### Open folder automations

Create an automation in any folder:

1. Navigate to the folder you want to automate
2. Click **Settings** (gear icon) in the top right
3. Select the **Automations** tab
4. Click **+ Add Automation**
5. Select **GitHub** from the integration list

#### Select target repository

Configure where issues will be created:

**Repository (required):**

* Select the GitHub repository where issues will be created
* Only repositories with write access appear in the dropdown
* Can't find your repo? Verify GitHub App installation includes it
* Click **Refresh** to reload the repository list

**Note:** Each automation targets one repository. Create multiple automations for multiple repositories.

{% hint style="info" %}
**Repository Selection**

If you don't see expected repositories:

1. Ensure GitHub App installation includes them
2. Verify you have write access to the repo
3. Click **Refresh** in the GitHub integration settings
4. Re-save your automation
   {% endhint %}

#### Configure issue title

Customize how issue titles appear in GitHub:

**Default title template:**

```
{{item.title}}
```

**Example outputs:**

```
Checkout page crashes on iOS
User can't reset password
Feature request: Dark mode toggle
```

**Other title examples:**

For bug reports:

```
🐛 {{item.title}}
```

For feature requests:

```
💡 Feature: {{item.title}}
```

Including customer context:

```
[{{creator.email}}] {{item.title}}
```

For folder-specific routing:

```
[{{folder.name}}] {{item.title}}
```

{% hint style="warning" %}
**Title Length**

Keep titles under 100 characters for clarity. GitHub will display full titles but very long titles may be truncated in lists.
{% endhint %}

View all available template variables →

#### Configure issue description

Create a rich issue description with recording context:

**Default description template:**

```markdown
## Recording from Screendesk

**Title:** {{item.title}}
**From:** {{creator.name}} ({{creator.email}})
**Folder:** {{folder.name}}

**View recording:** {{item.url}}

---

This issue was automatically created from a recording uploaded to Screendesk.
```

**Example: Detailed bug report description**

```markdown
## Bug Report

A customer submitted a recording that describes this issue.

**Reported by:** {{creator.email}} ({{creator.name}})
**Folder:** {{folder.name}}

### Description
{{item.title}}

### Watch Recording
[View on Screendesk]({{item.url}})

---

### Recording Details
| Property | Value |
|----------|-------|
| Duration | {{item.duration}} seconds |
| Browser | {{item.browser}} |
| OS | {{item.os}} |
| Resolution | {{item.resolution}} |
| Location | {{item.country}} |
| Recorded | {{item.created_at}} |

### Technical Information

**Console Errors:**
\`\`\`
{{item.console_errors}}
\`\`\`

**Network Errors:**
\`\`\`
{{item.network_errors}}
\`\`\`

---

This issue was automatically created from a customer recording on Screendesk.
```

**Example: Feature request description**

```markdown
## Feature Request

A customer requested the following feature.

**Suggested by:** {{creator.email}} ({{creator.name}})

### Feature Description
{{item.title}}

### Customer Recording
[View request on Screendesk]({{item.url}})

**Recording Duration:** {{item.duration}} seconds

---

This feature request was automatically created from a customer recording.
```

**GitHub Markdown Support**

GitHub descriptions support GitHub-Flavored Markdown:

* **Bold** — `**text**`
* *Italic* — `*text*`
* Code blocks — ` ``` `
* Links — `[text](url)`
* Headers — `## Heading`
* Lists — `* item`
* Task lists — `- [ ] item`
* Collapsible sections — `<details>`

Use markdown to format important information effectively. {% endhint %}

View all available variables → {% endstep %}

{% step %}

#### Apply labels automatically

Organize issues with GitHub labels:

**To add labels:**

1. Click **+ Add Label**
2. Select from your repository's available labels
3. Add multiple labels as needed

**Suggested labels:**

* `from-screendesk` — Track all automated issues
* `customer-reported` — Mark customer submissions
* `needs-triage` — Flag for manual review
* `bug` or `enhancement` — Categorize issue type
* `critical` — For urgent folders
* `customer-feedback` — Specific to feature requests

**Example configurations:**

For bug reports folder:

```

from-screendesk, customer-reported, bug, needs-triage
```

For feature requests folder:

```
from-screendesk, enhancement, customer-feedback
```

For critical issues folder:

```
from-screendesk, critical, urgent
```

{% hint style="warning" %} **Label Availability**

Only labels that exist in your repository appear in the dropdown. If you don't see a label you want:

1. Create it in GitHub first
2. Return to Screendesk
3. Click **Refresh** in the GitHub integration settings
4. The new label will appear in the dropdown {% endhint %} {% endstep %}

{% step %}

#### Assign team members (optional)

Auto-assign issues to team members:

**Assignee dropdown:**

* Select specific team members
* Multiple assignees supported
* Or leave unassigned for manual assignment
* Only active repository members appear in the list

**Recommended approach:**

* Leave unassigned for most automations
* Use assignee for on-call or urgent issues
* Let team leads manually assign based on expertise

**Example uses:**

* Assign critical bugs to on-call engineer
* Assign feature requests to product manager
* Leave general issues unassigned for triage

{% hint style="info" %} **Multiple Assignees**

GitHub supports multiple assignees per issue. Add team members to distribute work:

* Bug triage: Add QA and backend leads
* Feature requests: Add product and design
* Critical issues: Add on-call engineer and team lead {% endhint %} {% endstep %}

{% step %}

#### Test the automation

Before activating, create a test issue:

1. Click **Create Test Issue** button
2. Check your GitHub repository for the new issue
3. Verify all fields populated correctly:
   * [ ] Title matches template
   * [ ] Description includes all variables
   * [ ] Repository is correct
   * [ ] Labels are applied
   * [ ] Assignees are set (if configured)
   * [ ] Recording link works
   * [ ] Markdown renders properly

**If something looks wrong:**

1. Click **Back**
2. Update the settings
3. Click **Create Test Issue** again

**Delete test issues in GitHub:** After verifying, you can delete test issues directly in GitHub (they won't affect the automation).

{% hint style="success" %} **Ready to Activate**

Once testing passes, proceed to save. {% endhint %} {% endstep %}

{% step %}

#### Save and activate

Finalize the automation:

1. Click **Save Automation**
2. The automation is **enabled by default**
3. You'll see it listed in the folder's **Automations** tab

**Status indicators:**

* ✅ Green toggle — Automation is active
* ⚫ Gray toggle — Automation is disabled

You can disable/enable the automation anytime without deleting it.

From now on, every recording or capture added to this folder will automatically create an issue in GitHub.

{% hint style="info" %} **Automation Activity**

View execution history:

1. Go to **Account Settings → Automations → Execution Log**
2. Filter by folder or automation type
3. See success/failure details for each execution {% endhint %} {% endstep %} {% endstepper %}

***

### Template Variables

Use these variables in title and description templates:

#### Item Information

| Variable              | Description                | Example                  |
| --------------------- | -------------------------- | ------------------------ |
| `{{item.title}}`      | Recording or capture title | "Checkout crashes"       |
| `{{item.url}}`        | Link to recording/capture  | Full HTTPS URL           |
| `{{item.type}}`       | Item type                  | "recording" or "capture" |
| `{{item.duration}}`   | Length in seconds          | "45"                     |
| `{{item.created_at}}` | Submission timestamp       | "Feb 6, 2026 at 2:30 PM" |

#### Creator Information

| Variable            | Description          | Example                |
| ------------------- | -------------------- | ---------------------- |
| `{{creator.name}}`  | Person who submitted | "Alice Johnson"        |
| `{{creator.email}}` | Creator's email      | "<alice@customer.com>" |

#### Recording-Specific (if applicable)

| Variable                       | Description          | Example               |
| ------------------------------ | -------------------- | --------------------- |
| `{{recording.title}}`          | Recording title      | "Checkout page error" |
| `{{recording.url}}`            | Recording link       | Full HTTPS URL        |
| `{{recording.browser}}`        | Browser info         | "Chrome 121.0.6167"   |
| `{{recording.os}}`             | Operating system     | "macOS 14.3"          |
| `{{recording.resolution}}`     | Screen resolution    | "2560x1440"           |
| `{{recording.country}}`        | Geographic location  | "United States"       |
| `{{recording.console_errors}}` | JavaScript errors    | Formatted list        |
| `{{recording.network_errors}}` | Failed HTTP requests | Formatted list        |

#### Capture-Specific (if applicable)

| Variable            | Description   | Example                     |
| ------------------- | ------------- | --------------------------- |
| `{{capture.title}}` | Capture title | "Bug description"           |
| `{{capture.url}}`   | Capture link  | Full HTTPS URL              |
| `{{capture.type}}`  | Capture type  | Screenshot or document type |

#### Folder & Account

| Variable           | Description    | Example       |
| ------------------ | -------------- | ------------- |
| `{{folder.name}}`  | Folder name    | "Bug Reports" |
| `{{account.name}}` | Workspace name | "Acme Corp"   |

View complete variable reference →

***

### Example Configurations

#### Example 1: Bug Report Automation

**Folder:** Bug Reports **Target:** Report customer bugs to engineering team

**Configuration:**

| Setting    | Value                                         |
| ---------- | --------------------------------------------- |
| Repository | `acme/frontend`                               |
| Labels     | `from-screendesk`, `bug`, `customer-reported` |
| Assignees  | Unassigned (for triage)                       |

**Title Template:**

```

🐛 {{item.title}}
```

**Description Template:**

```markdown
## Customer Bug Report

A customer submitted a recording describing this issue.

**Reported by:** {{creator.email}} ({{creator.name}})
**Folder:** {{folder.name}}

### Description
{{item.title}}

### Watch Recording
[View on Screendesk]({{item.url}})

---

### System Information
| Property | Value |
|----------|-------|
| Browser | {{recording.browser}} |
| Operating System | {{recording.os}} |
| Resolution | {{recording.resolution}} |
| Location | {{recording.country}} |
| Duration | {{recording.duration}} seconds |
| Submitted | {{recording.created_at}} |

### Technical Details

**Console Errors:**
\`\`\`
{{recording.console_errors}}
\`\`\`

**Network Errors:**
\`\`\`
{{recording.network_errors}}
\`\`\`

---

This issue was automatically created from a customer recording on Screendesk.
```

**Result:** Issues created with full bug context, ready for engineer triage and investigation.

***

#### Example 2: Feature Request Automation

**Folder:** Feature Requests **Target:** Track customer feature suggestions for product team

**Configuration:**

| Setting    | Value                                                 |
| ---------- | ----------------------------------------------------- |
| Repository | `acme/product-feedback`                               |
| Labels     | `from-screendesk`, `enhancement`, `customer-feedback` |
| Assignees  | (Unassigned)                                          |

**Title Template:**

```
💡 Feature Request: {{item.title}}
```

**Description Template:**

```markdown
## Customer Feature Request

A customer has requested the following feature.

**Suggested by:** {{creator.name}} ({{creator.email}})
**Folder:** {{folder.name}}

### Feature Description
{{item.title}}

### Customer Recording
[View feature request on Screendesk]({{item.url}})

**Recording Duration:** {{recording.duration}} seconds

---

This feature request was automatically created from a customer recording.
```

**Result:** Feature requests flow directly to product team for evaluation and roadmap planning.

***

#### Example 3: Critical Issue Automation (High Priority)

**Folder:** Critical Issues **Target:** Escalate urgent problems to on-call engineer immediately

**Configuration:**

| Setting    | Value                                                         |
| ---------- | ------------------------------------------------------------- |
| Repository | `acme/frontend`                                               |
| Labels     | `from-screendesk`, `critical`, `urgent`, `customer-impacting` |
| Assignees  | On-Call Engineer                                              |

**Title Template:**

```
🚨 CRITICAL: {{item.title}}
```

**Description Template:**

```markdown
## CRITICAL ISSUE ALERT

A critical production issue has been reported.

**Reported by:** {{creator.email}} ({{creator.name}})

### Issue Details
{{item.title}}

### Watch Recording
[View Screendesk Recording]({{item.url}})

---

**IMMEDIATE ACTION REQUIRED**

This issue requires investigation as soon as possible.

**Timeline:**
* Submitted: {{recording.created_at}}
* Severity: CRITICAL

**Environment:**
* Browser: {{recording.browser}}
* OS: {{recording.os}}
* Location: {{recording.country}}

---

[Assigned to: On-Call Engineer]
```

**Result:** Critical issues immediately become high-visibility tickets assigned to on-call engineers.

***

#### Example 4: Support Escalation Automation

**Folder:** Escalations **Target:** Create tickets when support team escalates customer issues

**Configuration:**

| Setting    | Value                                                   |
| ---------- | ------------------------------------------------------- |
| Repository | `acme/support-issues`                                   |
| Labels     | `from-screendesk`, `support-escalation`, `needs-triage` |
| Assignees  | Support Lead                                            |

**Title Template:**

```
[ESCALATED] {{item.title}} - {{creator.email}}
```

**Description Template:**

```markdown
## Support Escalation

The support team has escalated this issue from a customer.

**Customer:** {{creator.name}} ({{creator.email}})
**Escalated at:** {{item.created_at}}

### Customer Issue
{{item.title}}

### Supporting Evidence
[View Recording]({{item.url}})

**Duration:** {{recording.duration}} seconds
**Browser:** {{recording.browser}}
**OS:** {{recording.os}}

---

This customer has been waiting for resolution. Please prioritize.
```

**Result:** Support escalations create visible tickets that go directly to support leads.

***

### Managing the Integration

#### View Integration Status

Check GitHub connection status:

1. Go to **Account Settings**
2. Select **Integrations & Automations**
3. Find **GitHub** in the integrations list
4. See connection status and account information

**Displayed information:**

* Connection status (Connected/Disconnected)
* Account name
* Number of accessible repositories
* Last sync status

#### Configure Repository Access

Modify which repositories Screendesk can access:

1. Go to **Account Settings → Integrations & Automations**
2. Find **GitHub**
3. Click **Configure GitHub App**
4. Add or remove repositories from installation
5. Return to Screendesk

#### Disconnect GitHub

Remove the GitHub integration:

1. Go to **Account Settings → Integrations & Automations**
2. Find **GitHub**
3. Click **Disconnect**
4. Confirm disconnection

**What happens:**

* All GitHub automations are **disabled** (not deleted)
* Existing issues in GitHub **remain unchanged**
* Sync stops immediately
* Automations can be re-enabled by reconnecting

#### Refresh Repositories

If GitHub resources aren't loading:

1. Go to **Account Settings → Integrations & Automations**
2. Find **GitHub**
3. Click **Refresh**
4. Repositories update immediately

**When to refresh:**

* New repositories created in GitHub
* Repository access changed
* Permissions modified

***

### Troubleshooting

#### Issues Not Creating

**Symptom:** Automations enabled but no issues appear in GitHub

**Solutions:**

{% stepper %} {% step %}

#### Verify GitHub is connected

1. Go to **Account Settings → Integrations & Automations**
2. Check GitHub status shows "Connected"
3. If disconnected, click **Connect GitHub** to re-authorize {% endstep %}

{% step %}

#### Check repository permissions

1. Verify you have write access to the selected repository
2. Check that the GitHub App installation includes the repository
3. Try selecting a different repository to test {% endstep %}

{% step %}

#### Verify automation is enabled

1. Open folder **Settings → Automations**
2. Find the GitHub automation
3. Toggle should be **green** (on)
4. If disabled, click to enable {% endstep %}

{% step %}

#### Check execution logs

1. Go to **Account Settings → Automations → Execution Log**
2. Filter by the folder or automation
3. Look for error messages explaining why issue creation failed
4. Recent failures show detailed error information {% endstep %}

{% step %}

#### Test with a test issue

1. Open the automation
2. Click **Create Test Issue**
3. If test fails, error message explains why
4. Fix the issue and test again

{% hint style="info" %} Test issues show specific error messages that help diagnose problems. {% endhint %} {% endstep %} {% endstepper %}

#### Missing or Incorrect Fields

**Symptom:** GitHub issue created but fields are empty or wrong

**Solutions:**

{% stepper %} {% step %}

#### Verify template syntax

Check title and description templates:

* Variables must be enclosed in double braces: `{{variable}}`
* Variable names must be spelled exactly
* No extra spaces or special characters

**Correct:** `{{item.title}}` **Incorrect:** `{{ item.title }}` or `{{item.Title}}` {% endstep %}

{% step %}

#### Check data availability

Some variables only exist for certain item types:

* `{{recording.*}}` — Only for recordings
* `{{capture.*}}` — Only for captures
* `{{creator.*}}` — Available for all items

If a recording doesn't have console errors, `{{recording.console_errors}}` will be empty. {% endstep %}

{% step %}

#### Test with sample data

Create a test recording/capture with the data you're referencing:

1. Add test item to folder
2. Create test issue
3. View the result
4. Adjust templates based on what's missing {% endstep %} {% endstepper %}

#### Wrong Repository

**Symptom:** Issue created in wrong repository

**Solutions:**

1. Open the automation settings
2. Verify **Repository** dropdown shows correct repo
3. Click **Save** to update
4. Create a test issue to verify

**Note:** Changes only affect new issues, not previously created ones.

#### Labels Not Applied

**Symptom:** Issue created but labels are missing

**Solutions:**

{% stepper %} {% step %}

#### Verify labels exist in GitHub

1. Open GitHub repository
2. Go to **Issues → Labels**
3. Check that your configured labels exist
4. Labels must be created in GitHub before using in Screendesk {% endstep %}

{% step %}

#### Refresh label list in Screendesk

1. Go to **Account Settings → Integrations & Automations**
2. Find GitHub
3. Click **Refresh**
4. Wait for labels to update
5. Edit automation and verify labels appear {% endstep %}

{% step %}

#### Re-add labels to automation

1. Open the automation settings
2. Remove old labels
3. Click **+ Add Label** to re-select
4. Choose labels from the refreshed list
5. Save and test {% endstep %} {% endstepper %}

#### Assignee Not Applied

**Symptom:** Issue not assigned to selected team member

**Solutions:**

1. Verify the selected person has **write access** to the repository
2. Person must be a collaborator on the repo
3. Go to GitHub repository settings → Manage access
4. Check if the person is listed
5. If not, add them as a collaborator
6. Select a different assignee in automation and test again

#### Rate Limiting

**Symptom:** "API rate limit exceeded" error

**Solutions:**

1. **Wait before retrying** — GitHub enforces rate limits; wait a few minutes
2. **Space out automations** — Don't trigger many automations simultaneously
3. **Check rate limit status** — View your GitHub API rate limit at github.com/settings/tokens
4. **Contact GitHub support** — If limits are too restrictive for your use case

#### Markdown Rendering Issues

**Symptom:** Description formatting looks wrong in GitHub

**Solutions:**

1. Test your Markdown template in a GitHub issue directly
2. Verify GitHub-Flavored Markdown syntax is correct
3. Common issues:
   * Missing line breaks between sections
   * Incorrect code block syntax (use triple backticks)
   * Unescaped special characters
4. Test with a test issue to verify before activating

#### OAuth Authorization Failed

**Symptom:** "GitHub authorization failed" error during connection

**Solutions:**

1. **Verify GitHub account** — Ensure you're logged into the correct account
2. **Check OAuth permissions** — Screendesk requires write access to issues
3. **Try again** — Click **Connect GitHub** to retry
4. **Clear browser cache** — OAuth may fail due to cached credentials

If issues persist, contact Screendesk support.

***

### Best Practices

#### Use Consistent Naming

Keep naming conventions consistent:

{% columns %} {% column %} **❌ Inconsistent:**

```

bug: checkout error
BUG - login failing
Customer says: password reset broken
[SEV-1] database timeout
```

{% endcolumn %}

{% column %} **✅ Consistent:**

```

🐛 Checkout page error
🐛 Login failing
🐛 Password reset broken
🐛 Database timeout
```

{% endcolumn %} {% endcolumns %}

Consistent naming makes issues easier to scan and search in GitHub.

***

#### Use Meaningful Labels

Create labels for quick filtering:

**Organizational labels:**

* `from-screendesk` — Track all automated issues
* `customer-reported` — Issues from customers
* `internal-report` — Issues from your team

**Type labels:**

* `bug`, `enhancement`, `documentation`
* `performance`, `security`, `ui`, `backend`

**Status labels:**

* `needs-triage`, `blocked`, `duplicate`
* `critical`, `high-priority`, `low-priority`

Apply 2-4 labels per issue for effective organization.

***

#### Include Recording Links Prominently

Make accessing customer evidence easy:

{% columns %} {% column %} **❌ Buried:**

```

This is a bug report.
See details below.
...lots of text...
Link: {{item.url}}
```

{% endcolumn %}

{% column %} **✅ Prominent:**

```

[View Recording]({{item.url}})

**Description:**
{{item.title}}
```

{% endcolumn %} {% endcolumns %}

Put the recording link near the top where developers will see it first.

***

#### Add Environment Context

Include technical details for debugging:

```markdown
**System Information**
| Property | Value |
|----------|-------|
| Browser | {{recording.browser}} |
| OS | {{recording.os}} |
| Resolution | {{recording.resolution}} |
| Location | {{recording.country}} |
```

This helps developers reproduce issues and understand scope.

***

#### Test Before Large Deployment

Before creating many automations:

1. Create one automation
2. Add a test recording
3. Verify in GitHub
4. Check title, description, labels, assignees
5. Adjust templates as needed
6. Then create additional automations

Testing first saves time fixing issues later.

***

#### Create Repository-Specific Automations

Organize automations by repository:

For bug reports:

* Create separate automations for `frontend`, `backend`, `mobile`
* Target appropriate teams automatically
* Makes triage more efficient

For feature requests:

* Route to `product-feedback` repository
* Assign to product manager

For support:

* Route to `support-issues` repository
* Assign to support team lead

***

#### Monitor Automation Success Rate

Regularly check execution logs:

1. Go to **Account Settings → Automations → Execution Log**
2. Filter by GitHub automations
3. Look for patterns in failures
4. Address common issues

**Target success rate:** 99%+

***

#### Document Your Setup

Keep notes on your automations:

* Why each automation exists
* What folder triggers it
* What repository it targets
* Who manages it
* When to update templates

This helps new team members understand the system.


# Jira

Automatically create Jira issues from folder submissions using templates, labels, priorities, and custom fields.

Jira automations automatically create issues in your Jira workspace when recordings or captures are added to a folder. Convert customer bug reports, support tickets, and feature requests into trackable Jira issues with full technical context and attachments.

<figure><img src="/files/WSBu2GzSZeRzoTia8orH" alt=""><figcaption></figcaption></figure>

***

### When to Use Jira Automations

Jira automations are ideal for:

* **Bug Report Tracking** — Convert customer-reported bugs into Jira tickets with video evidence
* **Feature Request Management** — Automatically create stories from customer feedback
* **Support Ticket Creation** — Turn customer recordings into support issues
* **Cross-Team Collaboration** — Link customer recordings to development and support workflows
* **Multi-Project Workflows** — Route issues to specific projects and issue types
* **Custom Field Mapping** — Populate Jira custom fields with recording data
* **Epic and Sprint Planning** — Organize issues with epics and sprints

{% hint style="info" %}
**Jira vs. Linear/GitHub/Email**

Use Jira when:

* Your organization uses Jira for project management
* You want automatic issue creation with full context
* You need to organize issues by project and issue type
* You want to use custom fields for tracking metadata
* You need complex workflows and approvals
* You're using Jira Service Management (JSM) for support

Use Linear when:

* You prefer a faster, simpler issue tracker
* You want cleaner UI and better performance

Use GitHub when:

* Your team works in GitHub repositories
* You want tight integration with code

Use Email when:

* Recipients don't use Jira
* You just need notifications
  {% endhint %}

***

### Prerequisites

Before setting up Jira automations:

1. **Jira Account** — Jira Cloud or Server instance with project access
2. **Project Access** — Admin or issue creation permissions in target projects
3. **Screendesk Plan** — Pro or Enterprise plan to enable automations
4. **Folder** — Created in Screendesk to trigger the automation

***

### Authentication Methods

Screendesk supports two Jira authentication methods:

| Method        | Best For          | Setup Complexity   | Security |
| ------------- | ----------------- | ------------------ | -------- |
| **OAuth 2.0** | Jira Cloud        | Easy (recommended) | Higher   |
| **API Token** | Jira Cloud/Server | Moderate           | Good     |

***

### Setup with OAuth (Recommended)

OAuth is the easiest and most secure method for Jira Cloud.

{% stepper %}
{% step %}

#### Connect Jira to Screendesk (First-time only)

Navigate to your integrations:

1. Click your avatar in the top right corner
2. Select **Account Settings**
3. Go to **Integrations & Automations → Integrations**
4. Find **Jira** in the list
5. Click **Connect Jira**

You'll be redirected to Atlassian to authorize access. You'll see the permissions Screendesk requires:

* Create and read issues
* Read projects and issue types
* Manage attachments
* Read users and assignees
* Read workflows

Click **Accept** to proceed.

{% hint style="warning" %}
**Atlassian Account Required**

You must be logged into your Atlassian account with access to the Jira instance. If you don't see your instance, verify your account has the necessary permissions.
{% endhint %}
{% endstep %}

{% step %}

#### Review Jira connection status

After authorization completes, you'll return to **Account Settings → Integrations**.

You should see:

* ✅ **Jira Connected** with your Jira workspace URL
* Your Jira instance name
* **Disconnect** button (if you need to remove the integration)

{% hint style="success" %}
**Connection Verified**

If you see your Jira instance URL, Jira is successfully connected. You can now create automations in any folder.
{% endhint %}
{% endstep %}

{% step %}

#### Open folder automations

Create an automation in any folder:

1. Navigate to the folder you want to automate
2. Click **Settings** (gear icon) in the top right
3. Select the **Automations** tab
4. Click **+ Add Automation**
5. Select **Jira** from the integration list
   {% endstep %}

{% step %}

#### Select target project

Configure where issues will be created:

**Project (required):**

* Select the Jira project where issues will be created
* Only projects with issue creation access appear in the dropdown
* If you can't find your project, verify you have access to it in Jira
* Click **Refresh** to reload the project list

**Note:** Each automation targets one project. Create multiple automations for multiple projects.

{% hint style="info" %}
**Project Selection**

If you don't see expected projects:

1. Ensure you have access to the project in Jira
2. Verify the project is active (not archived)
3. Click **Refresh** in the Jira integration settings
4. Re-save your automation
   {% endhint %}
   {% endstep %}

{% step %}

#### Select issue type

Configure what type of issue will be created:

**Issue Type (required):**

* Select the issue type for new tickets: Bug, Task, Story, Support, or custom types
* Available issue types depend on your selected project
* Each issue type can have different required fields

**Common issue types:**

| Issue Type | Typical Use                    |
| ---------- | ------------------------------ |
| Bug        | Technical issues and defects   |
| Task       | General work items             |
| Story      | Feature-related submissions    |
| Support    | Customer support tickets (JSM) |
| Subtask    | Child issues under a parent    |
| Custom     | Your configured issue types    |

For support tickets, select **Support** if using Jira Service Management.

{% hint style="info" %}
**Issue Type Fields**

Different issue types may require different fields to be filled. The automation will automatically request all required fields for your chosen issue type.
{% endhint %}
{% endstep %}

{% step %}

#### Configure issue summary (title)

Customize how issue summaries appear in Jira:

**Default title template:**

```
{{item.title}}
```

**Example outputs:**

```
Checkout page crashes on iOS
User can't reset password
Feature request: Dark mode toggle
```

**Other title examples:**

For bug reports:

```
🐛 {{item.title}}
```

For feature requests:

```
💡 Feature: {{item.title}}
```

Including customer context:

```
[{{creator.email}}] {{item.title}}
```

For support tickets:

```
[Support] {{item.title}} - {{creator.email}}
```

{% hint style="warning" %}
**Title Length**

Keep titles under 150 characters for clarity. Jira will truncate very long titles in list views.
{% endhint %}

View all available template variables →
{% endstep %}

{% step %}

#### Configure issue description

Create a rich issue description with recording context:

Jira uses wiki-style markup for formatting (not standard Markdown).

**Default description template:**

```
h2. Recording from Screendesk

*Title:* {{item.title}}
*From:* {{creator.name}} ({{creator.email}})
*Folder:* {{folder.name}}

*View recording:* {{item.url}}

----

This issue was automatically created from a recording uploaded to Screendesk.
```

**Example: Detailed bug report description**

```
h2. Customer Bug Report

A customer submitted a recording describing this issue.

*Reported by:* {{creator.email}} ({{creator.name}})
*Folder:* {{folder.name}}

h3. Description
{{item.title}}

h3. Watch Recording
[View on Screendesk|{{item.url}}]

----

h3. Recording Details
||Property||Value||
|Duration|{{item.duration}} seconds|
|Browser|{{recording.browser}}|
|OS|{{recording.os}}|
|Resolution|{{recording.resolution}}|
|Location|{{recording.country}}|
|Recorded|{{item.created_at}}|

h3. Technical Information

*Console Errors:*
{code}
{{item.console_errors}}
{code}

*Network Errors:*
{code}
{{item.network_errors}}
{code}

----

This issue was automatically created from a customer recording on Screendesk.
```

**Example: Feature request description**

```
h2. Customer Feature Request

A customer requested the following feature.

*Suggested by:* {{creator.email}} ({{creator.name}})

h3. Feature Description
{{item.title}}

h3. Customer Recording
[View request on Screendesk|{{item.url}}]

*Recording Duration:* {{item.duration}} seconds

----

This feature request was automatically created from a customer recording.
```

{% hint style="info" %}
**Jira Text Formatting**

Jira uses wiki-style markup:

* *Bold* — `*text*`
* *Italic* — `_text_`
* Heading — `h2. Title`
* Link — `[text|url]`
* Code — `{code}...{code}`
* Table — `||header||`
* List — `* item`

Use wiki notation to format important information.
{% endhint %}

View all available variables →
{% endstep %}

{% step %}

#### Set priority level

Assign automatic priority to new issues:

| Priority    | Jira Value | Use For                         |
| ----------- | ---------- | ------------------------------- |
| No Priority | None       | General items, low urgency      |
| Lowest      | Lowest     | Minor improvements              |
| Low         | Low        | Nice-to-have features           |
| Medium      | Medium     | Standard bugs, regular features |
| High        | High       | Important bugs, urgent features |
| Highest     | Highest    | Critical bugs, blocking issues  |

**Recommendations:**

* **Bug Reports folder** — Set to Medium or High
* **Feature Requests folder** — Set to No Priority (triage later)
* **Critical Issues folder** — Set to Highest
* **Support Tickets folder** — Set to Medium

Issues can be re-prioritized in Jira after creation.

{% hint style="info" %}
**Avoid Over-Prioritization**

Set automations to Medium or No Priority by default. Let your team manually adjust based on actual impact and customer tier.
{% endhint %}
{% endstep %}

{% step %}

#### Apply labels automatically

Organize issues with Jira labels:

**To add labels:**

1. Click **+ Add Label**
2. Enter label text (create labels as needed)
3. Add multiple labels as needed

**Suggested labels:**

* `from-screendesk` — Track all automated issues
* `customer-reported` — Mark customer submissions
* `needs-triage` — Flag for manual review
* `bug` or `feature-request` — Categorize issue type
* `critical` — For urgent folders
* `customer-feedback` — Specific to feature requests

**Example configurations:**

For bug reports folder:

```
from-screendesk customer-reported bug needs-triage
```

For feature requests folder:

```
from-screendesk feature-request customer-feedback
```

For critical issues folder:

```
from-screendesk critical urgent customer-impacting
```

{% hint style="info" %}
**Label Creation**

Jira automatically creates labels when you add them. You don't need to create them in advance.
{% endhint %}
{% endstep %}

{% step %}

#### Configure components (optional)

Assign issues to Jira components:

**Components:**

* Click **+ Add Component**
* Select from your project's components
* Multiple components supported
* Helps organize issues by team or area

**Example uses:**

* Assign to "Frontend" component
* Assign to "Backend" component
* Assign to "Mobile" component
  {% endstep %}

{% step %}

#### Assign team members (optional)

Auto-assign issues to team members:

**Assignee dropdown:**

* Select specific team member
* Or leave unassigned for manual assignment
* Only active project members appear in the list

**Assignee options:**

* Specific user
* Unassigned (for triage)
* Project lead
* Component lead (if applicable)

**Recommended approach:**

* Leave unassigned for most automations
* Use assignee for on-call or urgent issues
* Let team leads manually assign based on expertise

**Example uses:**

* Assign critical bugs to on-call engineer
* Assign feature requests to product manager
* Leave general issues unassigned for triage

{% hint style="info" %}
**Rotating Assignees**

Create multiple automations to rotate assignments:

* Automation 1: Assigns to Engineer A
* Automation 2: Assigns to Engineer B
* Assign recordings to different automations manually
  {% endhint %}
  {% endstep %}

{% step %}

#### Configure custom fields (optional)

Map Screendesk data to Jira custom fields:

**To add custom fields:**

1. Click **+ Add Custom Field**
2. Select the Jira custom field
3. Enter value or template variable
4. Repeat for additional fields

**Example custom fields:**

| Jira Field     | Value                   |
| -------------- | ----------------------- |
| Customer Email | `{{creator.email}}`     |
| Browser        | `{{recording.browser}}` |
| Recording URL  | `{{item.url}}`          |
| OS             | `{{recording.os}}`      |
| Country        | `{{recording.country}}` |

Custom field mapping captures important metadata automatically.

{% hint style="info" %}
**Field Types**

Different custom field types require different values:

* Text fields: Plain text or template variables
* Select fields: Must match one of the configured options
* Date fields: Dates or relative dates
* Number fields: Numbers only

Verify your custom field types before mapping.
{% endhint %}
{% endstep %}

{% step %}

#### Test the automation

Before activating, create a test issue:

1. Click **Create Test Issue** button
2. Check your Jira project for the new issue
3. Verify all fields populated correctly:
   * [ ] Summary matches template
   * [ ] Description includes all variables
   * [ ] Project and issue type are correct
   * [ ] Labels are applied
   * [ ] Assignee is set (if configured)
   * [ ] Priority is correct
   * [ ] Components are assigned (if configured)
   * [ ] Custom fields are populated
   * [ ] Recording link works

**If something looks wrong:**

1. Click **Back**
2. Update the settings
3. Click **Create Test Issue** again

**Delete test issues in Jira:** After verifying, you can delete test issues directly in Jira (they won't affect the automation).

{% hint style="success" %}
**Ready to Activate**

Once testing passes, proceed to save.
{% endhint %}
{% endstep %}

{% step %}

#### Save and activate

Finalize the automation:

1. Click **Save Automation**
2. The automation is **enabled by default**
3. You'll see it listed in the folder's **Automations** tab

**Status indicators:**

* ✅ Green toggle — Automation is active
* ⚫ Gray toggle — Automation is disabled

You can disable/enable the automation anytime without deleting it.

From now on, every recording or capture added to this folder will automatically create an issue in Jira.

{% hint style="info" %}
**Automation Activity**

View execution history:

1. Go to **Account Settings → Automations → Execution Log**
2. Filter by folder or automation type
3. See success/failure details for each execution
   {% endhint %}
   {% endstep %}
   {% endstepper %}

***

### Setup with API Token

For Jira Server or if OAuth isn't available:

{% stepper %}
{% step %}

#### Generate API Token in Jira

**Jira Cloud:**

1. Go to [Atlassian Account Settings](https://id.atlassian.com/manage-profile/security/api-tokens)
2. Click **Create API token**
3. Name it "Screendesk"
4. Copy the token to clipboard
5. Keep this token secure

**Jira Server:**

1. Go to your Jira profile settings
2. Navigate to **Personal Access Tokens**
3. Create a new token named "Screendesk"
4. Copy the token to clipboard

{% hint style="warning" %}
**Token Security**

Never share or commit API tokens to version control. Keep them secure like passwords.
{% endhint %}
{% endstep %}

{% step %}

#### Configure in Screendesk

1. Go to **Account Settings → Integrations & Automations**
2. Find **Jira** in the list
3. Click **Connect Jira**
4. Select **Use API Token** option
5. Enter:
   * **Jira URL:** `https://your-domain.atlassian.net` (Jira Cloud) or your server URL
   * **Email:** Your Jira email address
   * **API Token:** The token you created
6. Click **Connect**

{% hint style="info" %}
**Finding Your Jira URL**

Jira Cloud: <https://your-workspace.atlassian.net> Jira Server: Your organization's Jira server address
{% endhint %}
{% endstep %}

{% step %}

#### Continue with Setup

After connecting with API Token, follow the same setup steps as OAuth:

1. Select target project
2. Choose issue type
3. Configure summary and description
4. Set priority, labels, assignees
5. Add custom fields if needed
6. Test and save

All features work the same whether you use OAuth or API Token.
{% endstep %}
{% endstepper %}

***

### Template Variables

Use these variables in summary and description templates:

#### Item Information

| Variable              | Description                | Example                  |
| --------------------- | -------------------------- | ------------------------ |
| `{{item.title}}`      | Recording or capture title | "Checkout crashes"       |
| `{{item.url}}`        | Link to recording/capture  | Full HTTPS URL           |
| `{{item.type}}`       | Item type                  | "recording" or "capture" |
| `{{item.duration}}`   | Length in seconds          | "45"                     |
| `{{item.created_at}}` | Submission timestamp       | "Feb 6, 2026 at 2:30 PM" |

#### Creator Information

| Variable            | Description          | Example                |
| ------------------- | -------------------- | ---------------------- |
| `{{creator.name}}`  | Person who submitted | "Alice Johnson"        |
| `{{creator.email}}` | Creator's email      | "<alice@customer.com>" |

#### Recording-Specific (if applicable)

| Variable                       | Description          | Example               |
| ------------------------------ | -------------------- | --------------------- |
| `{{recording.title}}`          | Recording title      | "Checkout page error" |
| `{{recording.url}}`            | Recording link       | Full HTTPS URL        |
| `{{recording.browser}}`        | Browser info         | "Chrome 121.0.6167"   |
| `{{recording.os}}`             | Operating system     | "macOS 14.3"          |
| `{{recording.resolution}}`     | Screen resolution    | "2560x1440"           |
| `{{recording.country}}`        | Geographic location  | "United States"       |
| `{{recording.console_errors}}` | JavaScript errors    | Formatted list        |
| `{{recording.network_errors}}` | Failed HTTP requests | Formatted list        |

#### Capture-Specific (if applicable)

| Variable            | Description   | Example                     |
| ------------------- | ------------- | --------------------------- |
| `{{capture.title}}` | Capture title | "Bug description"           |
| `{{capture.url}}`   | Capture link  | Full HTTPS URL              |
| `{{capture.type}}`  | Capture type  | Screenshot or document type |

#### Folder & Account

| Variable           | Description    | Example       |
| ------------------ | -------------- | ------------- |
| `{{folder.name}}`  | Folder name    | "Bug Reports" |
| `{{account.name}}` | Workspace name | "Acme Corp"   |

View complete variable reference →

***

### Example Configurations

#### Example 1: Bug Tracking

**Folder:** Bug Reports **Target:** Report customer bugs to engineering team

**Configuration:**

| Setting    | Value                                         |
| ---------- | --------------------------------------------- |
| Project    | ENGINEERING                                   |
| Issue Type | Bug                                           |
| Priority   | Medium                                        |
| Labels     | `from-screendesk`, `bug`, `customer-reported` |
| Components | Frontend                                      |
| Assignees  | (Unassigned)                                  |

**Summary Template:**

```
🐛 {{item.title}}
```

**Description Template:**

```
h2. Customer Bug Report

A customer submitted a recording describing this issue.

*Reported by:* {{creator.email}} ({{creator.name}})
*Folder:* {{folder.name}}

h3. Description
{{item.title}}

h3. Watch Recording
[View on Screendesk|{{item.url}}]

----

h3. System Information
||Property||Value||
|Browser|{{recording.browser}}|
|OS|{{recording.os}}|
|Resolution|{{recording.resolution}}|
|Location|{{recording.country}}|
|Duration|{{recording.duration}} seconds|
|Submitted|{{item.created_at}}|

h3. Technical Details

*Console Errors:*
{code}
{{recording.console_errors}}
{code}

*Network Errors:*
{code}
{{recording.network_errors}}
{code}

----

This issue was automatically created from a customer recording on Screendesk.
```

**Result:** Issues created with full bug context, ready for engineer triage and investigation.

***

#### Example 2: Support Tickets

**Folder:** Customer Support **Target:** Track customer-reported issues for support team

**Configuration:**

| Setting    | Value                                  |
| ---------- | -------------------------------------- |
| Project    | SUPPORT                                |
| Issue Type | Support                                |
| Priority   | Medium                                 |
| Labels     | `from-screendesk`, `customer-reported` |
| Assignees  | Support Lead                           |

**Summary Template:**

```
[Customer] {{item.title}} - {{creator.email}}
```

**Description Template:**

```
h2. Customer Support Request

A customer submitted a recording requesting support.

*Customer:* {{creator.name}} ({{creator.email}})
*Submitted:* {{item.created_at}}

h3. Issue Description
{{item.title}}

h3. Watch Recording
[View on Screendesk|{{item.url}}]

h3. System Information
||Browser||{{recording.browser}}||
||OS||{{recording.os}}||

----

This support request was automatically created from a customer recording.
```

**Result:** Support tickets created with customer context, ready for support team triage.

***

#### Example 3: Critical Issues

**Folder:** Critical Bugs **Target:** Escalate urgent problems to on-call engineer immediately

**Configuration:**

| Setting    | Value                                   |
| ---------- | --------------------------------------- |
| Project    | ENGINEERING                             |
| Issue Type | Bug                                     |
| Priority   | Highest                                 |
| Labels     | `from-screendesk`, `critical`, `urgent` |
| Assignees  | On-Call Engineer                        |

**Summary Template:**

```
🚨 CRITICAL: {{item.title}}
```

**Description Template:**

```
h2. CRITICAL ISSUE ALERT

A critical production issue has been reported.

*Reported by:* {{creator.email}} ({{creator.name}})
*Severity:* CRITICAL

h3. Issue Details
{{item.title}}

h3. Watch Recording
[View on Screendesk|{{item.url}}]

----

*IMMEDIATE ACTION REQUIRED*

This issue requires investigation as soon as possible.

h3. Timeline
* Submitted: {{item.created_at}}
* Severity: CRITICAL

h3. Environment
* Browser: {{recording.browser}}
* OS: {{recording.os}}
* Location: {{recording.country}}

----

Assigned to: On-Call Engineer
```

**Result:** Critical issues immediately become high-visibility tickets assigned to on-call engineers.

***

#### Example 4: Feature Requests

**Folder:** Feature Requests **Target:** Track customer feature suggestions for product team

**Configuration:**

| Setting    | Value                                                     |
| ---------- | --------------------------------------------------------- |
| Project    | PRODUCT                                                   |
| Issue Type | Story                                                     |
| Priority   | No Priority                                               |
| Labels     | `from-screendesk`, `feature-request`, `customer-feedback` |
| Assignees  | Product Manager                                           |

**Summary Template:**

```
💡 Feature Request: {{item.title}}
```

**Description Template:**

```
h2. Customer Feature Request

A customer has requested the following feature.

*Suggested by:* {{creator.name}} ({{creator.email}})

h3. Feature Description
{{item.title}}

h3. Customer Recording
[View request on Screendesk|{{item.url}}]

*Recording Duration:* {{item.duration}} seconds

----

This feature request was automatically created from a customer recording.
```

**Result:** Feature requests flow directly to product team for evaluation and roadmap planning.

***

### Attachments

#### Auto-attach Recording Link

Enable automatic attachment:

1. Edit the automation
2. Enable **Attach Recording Link**
3. Recording URL added as web link attachment

#### Attach Thumbnail

Attach recording preview image:

1. Enable **Attach Thumbnail**
2. Video preview image attached to issue

#### Attach Console Logs

Attach full console output:

1. Enable **Attach Console Logs**
2. Full console log attached as .txt file

These attachments help engineers debug issues more effectively.

***

### Managing the Integration

#### View Integration Status

Check Jira connection status:

1. Go to **Account Settings**
2. Select **Integrations & Automations**
3. Find **Jira** in the integrations list
4. See connection status and instance information

**Displayed information:**

* Connection status (Connected/Disconnected)
* Jira instance URL
* Authentication method (OAuth or API Token)

#### Disconnect Jira

Remove the Jira integration:

1. Go to **Account Settings → Integrations & Automations**
2. Find **Jira**
3. Click **Disconnect**
4. Confirm disconnection

**What happens:**

* All Jira automations are **disabled** (not deleted)
* Existing issues in Jira **remain unchanged**
* Automations can be re-enabled by reconnecting

#### Update API Token

If using API Token authentication:

1. Go to **Account Settings → Integrations & Automations**
2. Find **Jira**
3. Click **Update Token**
4. Enter new token
5. Save

**When to update:**

* Token expiration approaching
* Token was revoked
* Security best practices (rotate tokens periodically)

#### Refresh Projects

If Jira resources aren't loading:

1. Go to **Account Settings → Integrations & Automations**
2. Find **Jira**
3. Click **Refresh**
4. Projects and fields update immediately

**When to refresh:**

* New projects created in Jira
* Project access changed
* Custom fields added
* Issue types modified

***

### Troubleshooting

#### Issues Not Creating

**Symptom:** Automations enabled but no issues appear in Jira

**Solutions:**

{% stepper %}
{% step %}

#### Verify Jira is connected

1. Go to **Account Settings → Integrations & Automations**
2. Check Jira status shows "Connected"
3. If disconnected, click **Connect Jira** to re-authorize
   {% endstep %}

{% step %}

#### Check project permissions

1. In Jira, verify your user has issue creation permissions
2. Verify you have access to the selected project
3. Try selecting a different project to test
   {% endstep %}

{% step %}

#### Verify automation is enabled

1. Open folder **Settings → Automations**
2. Find the Jira automation
3. Toggle should be **green** (on)
4. If disabled, click to enable
   {% endstep %}

{% step %}

#### Check execution logs

1. Go to **Account Settings → Automations → Execution Log**
2. Filter by the folder or automation
3. Look for error messages explaining why issue creation failed
4. Recent failures show detailed error information
   {% endstep %}

{% step %}

#### Test with a test issue

1. Open the automation
2. Click **Create Test Issue**
3. If test fails, error message explains why
4. Fix the issue and test again

{% hint style="info" %}
Test issues show specific error messages that help diagnose problems.
{% endhint %}
{% endstep %}
{% endstepper %}

#### Missing or Incorrect Fields

**Symptom:** Jira issue created but fields are empty or wrong

**Solutions:**

{% stepper %}
{% step %}

#### Verify template syntax

Check summary and description templates:

* Variables must be enclosed in double braces: `{{variable}}`
* Variable names must be spelled exactly
* No extra spaces or special characters
* Use wiki markup for Jira formatting, not Markdown

**Correct:** `{{item.title}}` **Incorrect:** `{{ item.title }}` or `{{item.Title}}`
{% endstep %}

{% step %}

#### Check required fields

1. Open the automation
2. Verify all required fields for your issue type are filled
3. Jira marks required fields during issue creation
4. Some issue types have more required fields than others
   {% endstep %}

{% step %}

#### Test with sample data

Create a test recording/capture with the data you're referencing:

1. Add test item to folder
2. Create test issue
3. View the result
4. Adjust templates based on what's missing
   {% endstep %}
   {% endstepper %}

#### Wrong Project or Issue Type

**Symptom:** Issue created in wrong project or with wrong type

**Solutions:**

1. Open the automation settings
2. Verify **Project** dropdown shows correct project
3. Verify **Issue Type** shows correct type
4. Click **Save** to update
5. Create a test issue to verify

**Note:** Changes only affect new issues, not previously created ones.

#### Labels Not Applied

**Symptom:** Issue created but labels are missing

**Solutions:**

1. Verify labels are entered in the automation
2. Labels are created automatically in Jira
3. Check the issue in Jira to see if they were applied
4. Re-save the automation and test again

#### Custom Fields Not Populated

**Symptom:** Custom fields are empty in created issues

**Solutions:**

{% stepper %}
{% step %}

#### Verify custom field mapping

1. Open the automation
2. Check that custom fields are configured
3. Verify field values or template variables
4. Ensure syntax is correct
   {% endstep %}

{% step %}

#### Check field type compatibility

1. Verify custom field type matches the value
2. Select fields need exact option match
3. Date fields need proper date format
4. Number fields need numeric values
   {% endstep %}

{% step %}

#### Verify field is in issue type

1. Go to Jira project settings
2. Check the selected issue type configuration
3. Verify custom field is included in that issue type
4. Some fields are not available for all issue types
   {% endstep %}
   {% endstepper %}

#### Assignee Not Applied

**Symptom:** Issue not assigned to selected team member

**Solutions:**

1. Verify the selected person is **active** in the Jira project
2. Inactive users can't be assigned to
3. Go to Jira project settings → Team members
4. Check if the person is still active
5. If inactive, select a different assignee

#### Unauthorized Error

**Symptom:** "401 Unauthorized" error when creating issues

**Solutions:**

1. **For OAuth:** Re-authorize Jira connection
   * Go to **Account Settings → Integrations → Jira**
   * Click **Disconnect**, then **Connect Jira**
   * Follow OAuth flow again
2. **For API Token:** Update or regenerate token
   * Generate new token in Jira
   * Go to **Account Settings → Integrations → Jira**
   * Click **Update Token**
   * Enter new token

#### Rate Limiting

**Symptom:** "Rate limit exceeded" error

**Solutions:**

1. **Wait before retrying** — Jira enforces rate limits; wait a few minutes
2. **Space out automations** — Don't trigger many automations simultaneously
3. **Check Jira status** — Verify Jira isn't experiencing issues
4. **Contact Jira support** — If limits are too restrictive for your use case

***

### Best Practices

#### Use Consistent Summary Format

Keep naming conventions consistent:

{% columns %}
{% column %}
**❌ Inconsistent:**

```
bug: checkout error
BUG - login failing
Customer says: password reset broken
[SEV-1] database timeout
```

{% endcolumn %}

{% column %}
**✅ Consistent:**

```
🐛 Checkout page error
🐛 Login failing
🐛 Password reset broken
🐛 Database timeout
```

{% endcolumn %}
{% endcolumns %}

Consistent naming makes issues easier to scan and search in Jira.

***

#### Set Appropriate Priority Levels

Match folder urgency to issue priority:

| Folder              | Recommended Priority |
| ------------------- | -------------------- |
| General Feedback    | No Priority          |
| Bug Reports         | Medium               |
| Feature Requests    | No Priority          |
| Critical Issues     | Highest              |
| Support Escalations | High                 |

Don't over-prioritize. Let your team adjust based on actual impact.

***

#### Use Meaningful Labels

Create labels for quick filtering:

**Organizational labels:**

* `from-screendesk` — Track all automated issues
* `customer-reported` — Issues from customers
* `internal-report` — Issues from your team

**Type labels:**

* `bug`, `feature-request`, `enhancement`, `documentation`
* `performance`, `security`, `ui`, `backend`

**Status labels:**

* `needs-triage`, `blocked`, `duplicate`
* `critical`, `high-priority`, `low-priority`

Apply 2-4 labels per issue for effective organization.

***

#### Include Recording Links Prominently

Make accessing customer evidence easy:

{% columns %}
{% column %}
**❌ Buried:**

```
This is a bug report.
See details below.
...lots of text...
Link: {{item.url}}
```

{% endcolumn %}

{% column %}
**✅ Prominent:**

```
h3. Watch Recording
[View on Screendesk|{{item.url}}]

h3. Description
{{item.title}}
```

{% endcolumn %}
{% endcolumns %}

Put the recording link near the top where engineers will see it first.

***

#### Map Important Custom Fields

Capture metadata automatically:

```
Customer Email → Custom field "Customer Email"
Recording URL → Custom field "Recording Link"
Browser → Custom field "Browser"
OS → Custom field "Operating System"
```

This helps with reporting and filtering.

***

#### Use OAuth When Possible

OAuth is more secure and easier to maintain than API tokens:

* Automatic token refresh
* Better security (no token storage)
* Easier to disconnect
* No token rotation needed

Only use API tokens if OAuth isn't available.

***

#### Test Before Large Deployment

Before creating many automations:

1. Create one automation
2. Add a test recording
3. Verify in Jira
4. Check all fields are populated
5. Adjust templates as needed
6. Then create additional automations

Testing first saves time fixing issues later.

***

#### Monitor Automation Success Rate

Regularly check execution logs:

1. Go to **Account Settings → Automations → Execution Log**
2. Filter by Jira automations
3. Look for patterns in failures
4. Address common issues

**Target success rate:** 99%+


# Slack

## Slack Automation

Slack automations send real-time notifications to your team channels when new recordings are added to a folder. Keep your entire team in sync without leaving Slack.

***

### When to Use Slack Automations

Slack automations are ideal for teams that spend their day in Slack. Use them for:

* **Real-time team alerts** — Notify the team instantly when critical issues arrive
* **Bug tracking channels** — Post new bugs to #bugs for engineering visibility
* **Customer support escalations** — Alert support teams about VIP customer recordings
* **Product feedback loops** — Share customer feedback with product managers
* **Cross-functional visibility** — Keep stakeholders updated on specific workflows
* **Threaded discussions** — Group related recordings into conversation threads
* **Quick actions** — Assign, label, and resolve directly from Slack

{% hint style="info" %}
**Slack vs. Email**

Use Slack when:

* Your team actively uses Slack throughout the day
* You want immediate visibility and notifications
* You need threaded discussions and quick collaboration
* Interactive buttons would be useful for your workflow

Use Email when:

* Recipients don't check Slack regularly
* You need a permanent email record
* Routing to ticketing systems via email
* Reaching external stakeholders outside your Slack workspace
  {% endhint %}

***

### Prerequisites

Before setting up Slack automations, ensure you have:

* **Slack workspace** with admin or app installation permissions
* **Screendesk Pro or Enterprise** plan
* **Target folder** for automation
* **Slack channel** where the Screendesk bot will post

{% hint style="warning" %}
**Slack Plan Requirement**

Slack automations require a Pro or Enterprise plan. If you're on a Free or Standard plan, upgrade your account to enable this feature.
{% endhint %}

***

### OAuth Connection Process

#### Step 1: Connect Your Slack Workspace

This is a one-time setup that connects your Screendesk workspace to your Slack workspace.

**First-time setup:**

{% stepper %}
{% step %}

#### Navigate to integrations

1. Go to **Account Settings** (click your avatar in the top right)
2. Select **Integrations** from the sidebar
3. Find **Slack** in the integration list
4. Click **Connect Slack**
   {% endstep %}

{% step %}

#### Select your workspace

A popup appears showing your Slack workspace name.

1. Verify you're connecting to the correct workspace
2. Click **Select Workspace** to continue
3. You'll be redirected to Slack's authorization page
   {% endstep %}

{% step %}

#### Review permissions

Slack shows the permissions Screendesk needs:

* **Post messages to channels** — Required to send notifications
* **Access channel list** — Required to populate channel dropdowns
* **Upload files** — Required for video thumbnails and attachments

These permissions are necessary for Slack automations to function.
{% endstep %}

{% step %}

#### Authorize the app

1. Review the permissions
2. Click **Allow** or **Authorize** in Slack
3. You'll be redirected back to Screendesk
4. You should see a success message: "Slack connected successfully"
   {% endstep %}

{% step %}

#### Verify connection

Confirm the connection is active:

1. In **Account Settings → Integrations → Slack**
2. You should see:
   * Connected workspace name
   * Green status indicator
   * **Disconnect** button (to remove the connection)
   * **Refresh Permissions** button (to re-authorize)

Your Slack workspace is now connected!
{% endstep %}
{% endstepper %}

***

#### Reconnecting or Changing Workspaces

**To connect a different Slack workspace:**

1. Go to **Account Settings → Integrations → Slack**
2. Click **Disconnect** to remove the current connection
3. All Slack automations will be disabled temporarily
4. Click **Connect Slack** to authorize a different workspace
5. Re-enable your automations after connecting the new workspace

**To refresh permissions:**

If channels aren't appearing in dropdowns:

1. Go to **Account Settings → Integrations → Slack**
2. Click **Refresh Permissions**
3. Re-authorize the app if prompted
4. Channel list should now be updated

***

### Setup Steps

#### Step 1: Open Folder Automations

Navigate to the folder where recordings trigger notifications:

{% stepper %}
{% step %}

#### Find your folder

1. Click on the folder from your folders list
2. You should see the folder name in the header
   {% endstep %}

{% step %}

#### Access settings

1. Click the **Settings** (gear) icon in the top right corner
2. You'll see a dropdown menu with options
   {% endstep %}

{% step %}

#### Go to automations

1. Select the **Automations** tab
2. You'll see a list of existing automations (if any)
3. Click **Add Automation** at the top right
   {% endstep %}

{% step %}

#### Select Slack

1. A menu appears showing automation types
2. Click **Slack**
3. The Slack automation form loads
   {% endstep %}
   {% endstepper %}

***

#### Step 2: Select Target Channel

Choose which Slack channel receives notifications from this folder.

{% stepper %}
{% step %}

#### Open channel dropdown

1. Look for the **Channel** field
2. Click the dropdown to see available channels
   {% endstep %}

{% step %}

#### Search or browse channels

**To search:**

* Start typing the channel name (e.g., "bugs" or "support")
* Matching channels appear in the dropdown

**To browse:**

* Scroll through the list of channels
* Channels are sorted alphabetically

**Channel types supported:**

* ✅ Public channels — Everyone can see
* ✅ Private channels — Only invited members can see
* ❌ Direct messages — Not supported
* ⚠️ Slack Connect — Limited support
  {% endstep %}

{% step %}

#### Select your channel

1. Click on the channel name
2. The channel appears in the field (e.g., "#bugs")
3. Screendesk will automatically invite its bot to the channel
   {% endstep %}

{% step %}

#### Verify bot is invited (private channels only)

For private channels, ensure the Screendesk bot is invited:

1. Go to your Slack channel
2. In the message box, type: `/invite @Screendesk`
3. Press Enter
4. You should see "Screendesk has joined the channel"

For public channels, this happens automatically.
{% endstep %}
{% endstepper %}

***

#### Step 3: Configure Message Template

Customize what appears in the Slack message using template variables.

{% stepper %}
{% step %}

#### Message template field

The **Message Template** section lets you design the notification message.

**Default template:**

```
🎥 New recording in *{{folder.name}}*

*{{recording.title}}*
From: {{recording.customer_email}}
Duration: {{recording.duration}}s

<{{recording.url}}|View Recording>
```

**Default output example:**

```
🎥 New recording in Bug Reports

Checkout page crash
From: customer@example.com
Duration: 45s

View Recording
```

{% endstep %}

{% step %}

#### Add template variables

Use these variables to insert dynamic content:

**Recording Information:**

| Variable                       | Description         | Example                  |
| ------------------------------ | ------------------- | ------------------------ |
| `{{recording.title}}`          | Recording title     | "Checkout page crash"    |
| `{{recording.url}}`            | Link to recording   | Full URL                 |
| `{{recording.customer_email}}` | Who submitted it    | "<user@example.com>"     |
| `{{recording.duration}}`       | Duration in seconds | "45"                     |
| `{{recording.created_at}}`     | When submitted      | "Feb 6, 2026 at 2:30 PM" |

**Technical Details:**

| Variable                   | Description         |
| -------------------------- | ------------------- |
| `{{recording.browser}}`    | Browser and version |
| `{{recording.os}}`         | Operating system    |
| `{{recording.resolution}}` | Screen resolution   |
| `{{recording.country}}`    | Geographic location |

**System Information:**

| Variable                       | Description                   |
| ------------------------------ | ----------------------------- |
| `{{recording.console_errors}}` | JavaScript errors (formatted) |
| `{{recording.network_errors}}` | Failed HTTP requests          |

**Context:**

| Variable           | Description         |
| ------------------ | ------------------- |
| `{{folder.name}}`  | Current folder name |
| `{{account.name}}` | Workspace name      |

View complete variable reference →
{% endstep %}

{% step %}

#### Use Slack formatting

Format text using Slack's mrkdwn syntax:

| Format            | Syntax             | Result              |
| ----------------- | ------------------ | ------------------- |
| **Bold**          | `*text*`           | Makes text bold     |
| *Italic*          | `_text_`           | Makes text italic   |
| ~~Strikethrough~~ | `~text~`           | Strikethrough text  |
| `Code`            | `` `code` ``       | Monospace code      |
| Link text         | `<url\|Link text>` | Clickable link      |
| @Username         | `<@U123ABC>`       | Mention a user      |
| #Channel          | `<#C123ABC>`       | Reference a channel |

{% hint style="info" %}
**Line Breaks**

To add blank lines between sections, use an empty line in your template. Slack will render it as space between blocks.
{% endhint %}
{% endstep %}

{% step %}

#### Example templates

**Simple notification:**

```
New recording from {{recording.customer_email}}
<{{recording.url}}|{{recording.title}}>
```

**Bug report with context:**

```
🐛 *Bug Report*

*{{recording.title}}*
Submitted by: {{recording.customer_email}}
Duration: {{recording.duration}} seconds

<{{recording.url}}|View Recording>
```

**Customer feedback:**

```
💬 *Customer Feedback*

From: {{recording.customer_email}}
Recording: *{{recording.title}}*
Duration: {{recording.duration}} seconds

<{{recording.url}}|Watch Recording>
```

**Support escalation:**

```
⚠️ *Support Escalation*

Customer: {{recording.customer_email}}
Issue: *{{recording.title}}*
Folder: {{folder.name}}

<{{recording.url}}|View & Respond>
```

**Technical details:**

```
🔧 *New Issue*

*{{recording.title}}*

*Reported by:* {{recording.customer_email}}
*Browser:* {{recording.browser}}
*OS:* {{recording.os}}
*Resolution:* {{recording.resolution}}

<{{recording.url}}|Debug Recording> | <{{recording.url}}/console|View Console>
```

{% endstep %}
{% endstepper %}

***

#### Step 4: Configure Message Options

Choose additional content to include in the notification.

{% stepper %}
{% step %}

#### Message content options

| Option             | Description                      | Default | Use When                    |
| ------------------ | -------------------------------- | ------- | --------------------------- |
| **Video Preview**  | Thumbnail image of the recording | ✅ On    | You want visual context     |
| **Customer Email** | Submitter's email address        | ✅ On    | Identifying who reported it |
| **Duration**       | Recording length in seconds      | ✅ On    | Understanding scope         |
| **Console Errors** | JavaScript errors from browser   | ❌ Off   | Debugging technical issues  |
| **System Info**    | Browser, OS, resolution details  | ❌ Off   | For technical support teams |
| **Action Buttons** | Quick action buttons in Slack    | ✅ On    | Interactive workflow        |
| {% endstep %}      |                                  |         |                             |

{% step %}

#### Enable video preview

When enabled, shows a thumbnail image of the recording:

1. Look for **Include Video Preview** toggle
2. Turn it **ON** (green)
3. Slack messages will show a preview image
4. Team members can see the issue at a glance

**When to enable:**

* Always recommended for visual context
* Bug reports benefit from seeing what's happening
* Helps with triage and prioritization
  {% endstep %}

{% step %}

#### Include console errors (optional)

Shows JavaScript errors from the recording:

1. Look for **Include Console Errors** toggle
2. Turn it **ON** (green)
3. Error summary appears in the message
4. Engineers can see the exact error immediately

**When to enable:**

* For technical bug reports
* When engineering team needs debugging context
* For urgent production issues
  {% endstep %}

{% step %}

#### Include system info (optional)

Shows browser, OS, and resolution details:

1. Look for **Include System Info** toggle
2. Turn it **ON** (green)
3. Technical details appear in the message
4. Helps with reproduction and debugging

**When to enable:**

* For engineering and QA teams
* When device compatibility matters
* For complex bug reproduction
  {% endstep %}

{% step %}

#### Enable action buttons

Adds interactive buttons directly in Slack:

1. Look for **Action Buttons** toggle
2. Turn it **ON** (green)
3. Buttons appear in the message

**Available buttons:**

* **View Recording** — Opens in Screendesk
* **Copy Link** — Copies URL to clipboard
* **Assign to Me** — Self-assigns the recording (Pro+)

These buttons speed up workflow without leaving Slack.
{% endstep %}
{% endstepper %}

***

#### Step 5: Configure Threading (Optional)

Group related recordings into conversation threads for organized discussions.

{% stepper %}
{% step %}

#### Enable threading

Threading keeps related messages together in a single conversation.

1. Look for **Enable Threading** toggle
2. Turn it **ON** (green)
3. Choose a threading key from the dropdown

**Threading is useful for:**

* Tracking all issues from one customer
* Daily summaries of related issues
* Building threaded conversations in Slack
  {% endstep %}

{% step %}

#### Select threading key

Choose how to group messages into threads:

**By Customer Email:**

* All recordings from the same customer appear in one thread
* Useful for customer support folders
* Shows customer conversation history

**By Folder:**

* All recordings in the folder create a daily thread
* Useful for general bug or feedback folders
* Keeps all issues from one day together

**By Recording Type:**

* Group by content type if your folder has mixed content
* Useful for diverse workflows
  {% endstep %}

{% step %}

#### Threading example

**With threading disabled:**

```
Channel: #bugs
Message 1: Bug from customer@example.com - Checkout crash
Message 2: Bug from customer@example.com - Login slow
Message 3: Bug from other@example.com - Search broken
```

All messages appear separately in the channel.

**With threading by customer:**

```
Channel: #bugs
Message 1 (parent): Bug from customer@example.com - Checkout crash
├── Reply 1: Bug from customer@example.com - Login slow
├── Reply 2: (More issues from this customer in thread)

Message 2 (parent): Bug from other@example.com - Search broken
```

Related issues are grouped together.
{% endstep %}
{% endstepper %}

***

#### Step 6: Test the Automation

Verify everything works before activating.

{% stepper %}
{% step %}

#### Send test message

1. Click **Send Test Message** at the bottom of the form
2. The test message is sent to your selected channel immediately
3. Check your Slack channel for the test message
4. It appears as a regular notification with sample data

**What to verify in the test:**

* ☐ Message posted to correct channel
* ☐ Template variables populated (no `{{}}` showing)
* ☐ Video preview loads (if enabled)
* ☐ Action buttons appear and work
* ☐ Formatting looks good
* ☐ Links are clickable
* ☐ No error messages
  {% endstep %}

{% step %}

#### Review formatting

1. Look at the test message in Slack
2. Check that:
   * Bold formatting displays correctly (`*text*`)
   * Links are clickable (`<url|text>`)
   * Line breaks appear properly
   * Emoji render correctly
   * Preview image displays (if enabled)

If something looks wrong, edit the template and test again.
{% endstep %}

{% step %}

#### Verify links work

1. Click the "View Recording" link in the test message
2. It should open the Screendesk app in a new tab
3. Verify you're viewing the correct recording

If links don't work, check that `{{recording.url}}` is in your template.
{% endstep %}

{% step %}

#### Verify buttons (if enabled)

If you enabled action buttons:

1. Click each button in the test message
2. **View** button should open the recording
3. **Copy Link** button should copy the URL
4. **Assign** button should self-assign (if visible)

Test on desktop and mobile if your team uses both.
{% endstep %}
{% endstepper %}

***

#### Step 7: Save and Activate

Once testing is complete, save your automation.

{% stepper %}
{% step %}

#### Save the automation

1. Click **Save** at the bottom of the form
2. You'll see a success message
3. The automation is created and enabled by default
4. You're returned to the Automations tab
   {% endstep %}

{% step %}

#### Verify in automations list

1. You should see the new automation in the Automations tab
2. It shows:
   * Automation type: "Slack"
   * Target channel: "#channel-name"
   * Status toggle: ON (green)
   * Edit and delete options

The automation is now **live**. Every recording added to this folder will send a message to the selected Slack channel.
{% endstep %}

{% step %}

#### Manage the automation

**To edit:**

1. Click the automation in the list
2. Make your changes
3. Click **Save**

**To disable temporarily:**

1. Toggle the status to OFF (gray)
2. No messages will be sent
3. Toggle back ON to re-enable

**To delete:**

1. Click the automation
2. Click **Delete**
3. Confirm deletion
4. Messages will no longer be sent
   {% endstep %}
   {% endstepper %}

***

### Message Formatting Examples

Here are ready-to-use message templates for common scenarios:

#### Example 1: Simple Team Alert

**Use case:** Basic notification for any folder

**Configuration:**

```
New recording in *{{folder.name}}*

*{{recording.title}}*
From: {{recording.customer_email}}

<{{recording.url}}|View Recording>
```

**Renders as:**

```
New recording in Bug Reports

Checkout page crash
From: customer@example.com

View Recording
```

***

#### Example 2: Engineering Bug Alert

**Use case:** Notify engineers with debugging context

**Configuration:**

````
🐛 *Bug Report*

*{{recording.title}}*

Reported by: {{recording.customer_email}}
Duration: {{recording.duration}} seconds
Browser: {{recording.browser}}
OS: {{recording.os}}

_Console Errors:_
```{{recording.console_errors}}```

<{{recording.url}}|View Recording> • <{{recording.url}}/console|Debug Console>
````

**Best for:**

* Engineering teams
* Technical support
* Production issues
* Debugging context needed

***

#### Example 3: VIP Customer Escalation

**Use case:** Alert leadership about important customers

**Configuration:**

```
⭐ *VIP Customer Issue*

*{{recording.title}}*

Customer: {{recording.customer_email}}
Folder: {{folder.name}}
Duration: {{recording.duration}}s

🔴 *Requires Immediate Attention*

<{{recording.url}}|Open in Screendesk>
```

**Best for:**

* Enterprise customers
* High-priority accounts
* Leadership visibility
* Escalation channels

***

#### Example 4: Customer Support Intake

**Use case:** Support team triage and routing

**Configuration:**

```
📥 *New Customer Report*

From: `{{recording.customer_email}}`
Title: *{{recording.title}}*
Duration: {{recording.duration}} seconds

<{{recording.url}}|Review & Respond>

_Who should investigate?_
```

**Best for:**

* Support teams
* Customer service
* Intake channels
* Encourages action

***

#### Example 5: Product Feedback Summary

**Use case:** Share customer feedback with product team

**Configuration:**

```
💬 *Customer Feedback*

_From:_ {{recording.customer_email}}
_Topic:_ {{recording.title}}
_Length:_ {{recording.duration}} seconds

<{{recording.url}}|Watch Feedback>

_Please add to product backlog if relevant._
```

**Best for:**

* Product managers
* Feature request channels
* Customer feedback
* Product roadmap input

***

### Multiple Channel Setup

Post the same recordings to multiple channels by creating separate automations.

#### Common Multi-Channel Patterns

**Pattern 1: Team + Leadership**

For the "Bug Reports" folder:

* Automation 1 → #engineering (full details)
* Automation 2 → #exec-updates (summary only)

```
Folder: Bug Reports
├── Slack #engineering → Include console errors & system info
└── Slack #exec-updates → Simple notification only
```

***

**Pattern 2: Functional Silos**

For the "Customer Issues" folder:

* Automation 1 → #support-team (all issues)
* Automation 2 → #product-team (only features)
* Automation 3 → #engineering (only bugs)

**Implementation:** Create three identical automations with different channels but same message template. All recordings reach their respective teams.

***

**Pattern 3: Severity-Based Routing**

For the "Production" folder:

* Automation 1 → #incidents (critical bugs)
* Automation 2 → #bugs (standard bugs)
* Automation 3 → #backlog (feature requests)

**Implementation:** Use your folder structure to separate by severity, then create separate automations for each folder.

***

**Setup Steps for Multiple Automations:**

1. Open the folder
2. Go to **Settings → Automations**
3. Click **Add Automation**
4. Select **Slack**
5. Select first channel (e.g., #engineering)
6. Configure message template
7. Click **Save**
8. Click **Add Automation** again
9. Select second channel (e.g., #exec-updates)
10. Use same or different template
11. Click **Save**

Both automations are now active. Each channel receives notifications independently.

***

### Channel-Specific Folder Examples

Create dedicated folder + channel pairs for organized workflows:

| Folder Name             | Slack Channel     | Purpose               | Message Template       |
| ----------------------- | ----------------- | --------------------- | ---------------------- |
| **Bug Reports**         | #bugs             | Engineering triage    | Include console errors |
| **Feature Requests**    | #product-feedback | Product input         | Link to customer email |
| **Urgent Issues**       | #incidents        | On-call alerts        | Emphasize urgency      |
| **Support Tickets**     | #customer-support | Team intake           | Include customer info  |
| **Enterprise Accounts** | #vip-customers    | Leadership visibility | Highlight importance   |
| **QA Test Results**     | #qa-reports       | Testing team          | Include system info    |
| **Customer Complaints** | #escalations      | Management review     | Detailed context       |

**Setup approach:**

1. Create folders matching your business workflow
2. Create corresponding Slack channels
3. Set up one automation per folder → channel pair
4. Customize templates for each channel's audience

This creates a clean, organized notification system where teams only see relevant content.

***

### Interactive Features

#### Action Buttons

When enabled, messages include buttons for quick actions:

**Available actions:**

| Button             | Action                    | Use Case          |
| ------------------ | ------------------------- | ----------------- |
| **View Recording** | Opens in Screendesk app   | Review the issue  |
| **Copy Link**      | Copies URL to clipboard   | Share with others |
| **Assign to Me**   | Self-assign the recording | Take ownership    |

**Button workflow:**

```
Slack Message appears in #bugs

Team member reads message and clicks button

↓ View → Opens Screendesk in new tab
↓ Copy Link → URL copied to clipboard
↓ Assign → Shows "Assigned to [name]"
```

**Pro tip:** Action buttons reduce friction. Team members don't need to leave Slack to engage with recordings.

***

#### Threading Conversations

Keep related recordings grouped together.

**Thread behavior:**

| Setting               | Result                             | Example                             |
| --------------------- | ---------------------------------- | ----------------------------------- |
| Threading OFF         | Each recording is separate message | New message every time              |
| Threading by Customer | Same customer = same thread        | All messages from one user together |
| Threading by Folder   | Daily thread per folder            | All day's issues in one thread      |

**Thread advantage:**

* Related issues are easy to find
* Reduces channel clutter
* Enables discussion threads
* Shows conversation history

**Example thread:**

```
#support-channel

Main Message: Bug from jane@acme.com - Login page broken
├── Reply: Bug from jane@acme.com - Password reset not working
├── Reply: Comment from team-lead - We're investigating
├── Reply: Update - Fixed in v2.1
└── Reply: Resolution - Jane has been notified
```

***

### Managing Slack Integration

#### View Connected Workspace

See your current Slack connection:

1. Go to **Account Settings → Integrations**
2. Find **Slack** integration
3. You should see:
   * Workspace name: "My Company Slack"
   * Status: "Connected" (green indicator)
   * Last synchronized: timestamp
   * **Disconnect** button
   * **Refresh Permissions** button

***

#### Refresh Channel List

If newly created channels don't appear:

1. Go to **Account Settings → Integrations → Slack**
2. Click **Refresh Permissions**
3. Re-authorize if prompted (Slack sign-in)
4. Channel list updates
5. New channels now appear in automation setup

***

#### Disconnect Slack

To remove the Slack integration:

1. Go to **Account Settings → Integrations → Slack**
2. Click **Disconnect**
3. Confirm you want to disconnect
4. **Important:** All Slack automations are disabled
5. To re-enable, reconnect Slack workspace

{% hint style="warning" %}
**Disconnection Impact**

When you disconnect Slack:

* All Slack automations are disabled
* No messages will be sent to Slack
* Your automation configuration is saved
* To restart, reconnect Slack and re-enable automations
  {% endhint %}

***

### Troubleshooting

#### Messages not posting to Slack

**Symptom:** Messages don't appear in the Slack channel

**Solutions:**

{% stepper %}
{% step %}

#### Verify bot is invited

For private channels, the Screendesk bot must be explicitly invited.

In your Slack channel:

```
/invite @Screendesk
```

You should see: "Screendesk has joined the channel"

For public channels, this happens automatically.
{% endstep %}

{% step %}

#### Check automation status

1. Open folder **Settings → Automations**
2. Find the Slack automation
3. Verify toggle is **ON** (green)
4. If OFF, click to enable

Disabled automations won't send messages.
{% endstep %}

{% step %}

#### Verify Slack is connected

1. Go to **Account Settings → Integrations**
2. Check that Slack shows "Connected" (green)
3. If disconnected, click **Connect Slack**
4. Re-authorize in Slack
5. Re-enable the automation
   {% endstep %}

{% step %}

#### Check channel selection

1. Edit the automation
2. Verify the correct channel is selected
3. Channel name appears as `#channel-name`
4. Save if you made changes
   {% endstep %}

{% step %}

#### Test with send test message

1. Edit the automation
2. Click **Send Test Message**
3. Check the Slack channel for the test
4. If test appears, automation works
5. If test doesn't appear, check permissions

Successful test = automation will work for real recordings
{% endstep %}
{% endstepper %}

***

#### Channels not appearing in dropdown

**Symptom:** Channel list is empty or missing channels

**Solutions:**

1. **Refresh permissions:**
   * Go to **Account Settings → Integrations → Slack**
   * Click **Refresh Permissions**
   * Re-authorize if prompted
2. **Check bot permissions in Slack:**
   * Go to your Slack workspace
   * Click **Settings & administration → Manage apps**
   * Find **Screendesk**
   * Verify it has access to view channels
3. **Reconnect Slack:**
   * Disconnect the current workspace
   * Click **Connect Slack** again
   * Re-authorize with fresh permissions
4. **Check channel visibility:**
   * You can only see channels you're a member of
   * Join the private channel first
   * Then refresh and it will appear

***

#### "Not authorized" or permission errors

**Symptom:** Error message saying "Not authorized" or "Slack connection failed"

**Solutions:**

1. **Reconnect Slack:**
   * Go to **Account Settings → Integrations → Slack**
   * Click **Disconnect**
   * Click **Connect Slack**
   * Re-authorize completely
2. **Check Slack admin permissions:**
   * Ensure your Slack account has app installation rights
   * Contact your Slack workspace admin if not
3. **Verify token hasn't expired:**
   * Click **Refresh Permissions**
   * Re-authorize in Slack
   * Tokens refresh automatically

***

#### Video preview not showing

**Symptom:** Messages appear but thumbnail image is missing

**Solutions:**

1. **Enable video preview in automation:**
   * Edit the automation
   * Turn ON **Include Video Preview** toggle
   * Click **Save**
2. **Check Slack file permissions:**
   * Screendesk needs permission to upload files to Slack
   * Go to Slack → App settings → Verify file upload permission
   * Reconnect if needed
3. **Check image generation:**
   * Some recordings may not generate previews
   * Ensure recording completed successfully
   * Test with a different recording

***

#### Delayed messages

**Symptom:** Messages arrive several minutes after recording is uploaded

**Solutions:**

1. **Check Screendesk status:**
   * Visit [status.screendesk.io](https://status.screendesk.io)
   * Look for any ongoing incidents
   * Check maintenance windows
2. **Check Slack status:**
   * Visit Slack status page
   * Ensure Slack APIs are operational
   * Check for rate limiting
3. **Reduce automation frequency:**
   * If folder has many automations, reduce number
   * Slack API has rate limits
   * Space out automations or use threading
4. **Contact support:**
   * If issues persist, contact <support@screendesk.io>
   * Include automation ID and timestamps
   * Provide examples of delayed messages

***

#### Rate limiting errors

**Symptom:** "Rate limited" or "Slack API error" messages

**Solutions:**

1. **Consolidate automations:**
   * Multiple automations to same channel = many messages
   * Combine into one automation if possible
   * Use threading to reduce message count
2. **Space out recordings:**
   * Slack limits message frequency per channel
   * Don't post 100+ messages per minute
   * Batch processing helps
3. **Contact Slack support:**
   * For persistent rate limiting
   * Slack can increase limits for enterprise accounts
   * Work with your workspace admin

***

#### View automation logs

Check detailed execution history:

1. Open folder **Settings → Automations**
2. Click on the Slack automation
3. Select **Execution Log** tab
4. View recent executions

**Log shows:**

* ✅ **Success** — Message posted to Slack
* ⚠️ **Warning** — Posted but flagged or delayed
* ❌ **Failed** — Error with description

Use logs to troubleshoot issues and verify automations are running.

***

### Best Practices

#### Use dedicated channels

Avoid posting to high-traffic channels like #general or #random.

{% columns %}
{% column %}
**❌ Don't do this:**

Post everything to #general

* Creates notification fatigue
* Important messages get lost
* Hard to find old issues
  {% endcolumn %}

{% column %}
**✅ Do this:**

Create dedicated channels:

* \#bugs → Engineering bugs
* \#support → Support issues
* \#feedback → Customer feedback
* \#incidents → Critical issues

Team members can opt in/out of channels
{% endcolumn %}
{% endcolumns %}

***

#### Enable threading for related content

Group related messages to reduce channel clutter.

**Benefits:**

* Easier to scan channel history
* Related messages stay together
* Reduces notification spam
* Encourages discussion threads

**When to use:**

* Customer support (thread by customer)
* Bug tracking (thread by severity)
* Feedback collection (thread by day)

***

#### Include action buttons

Make it easy for team members to engage without leaving Slack.

**Benefits:**

* Quick access to recordings
* Reduces friction
* Self-assignment enables ownership
* Copy link for sharing

**Recommended:** Always enable action buttons unless they're not relevant to your workflow.

***

#### Keep message templates concise

Put important information first. Slack viewers scan quickly.

{% columns %}
{% column %}
**❌ Too long:**

```
A new recording has been
submitted to the support
folder. Please review it.
The title is...
```

{% endcolumn %}

{% column %}
**✅ Concise:**

```
New issue: {{recording.title}}
From: {{recording.customer_email}}

<{{recording.url}}|Review>
```

{% endcolumn %}
{% endcolumns %}

Mobile users and quick scanners appreciate concise messages.

***

#### Tailor templates to audience

Different channels need different information.

| Channel    | Focus            | Include                     |
| ---------- | ---------------- | --------------------------- |
| #bugs      | Debug info       | Console errors, system info |
| #support   | Customer context | Email, duration, category   |
| #feedback  | Customer voice   | Quote, customer email       |
| #incidents | Severity         | Urgency indicators, owner   |

Match your template to what the channel's audience needs.

***

#### Test before going live

Always send a test message before relying on an automation.

**Testing checklist:**

* ☐ Message posts to correct channel
* ☐ All variables populate correctly
* ☐ Formatting renders properly
* ☐ Links are clickable
* ☐ Buttons work (if enabled)
* ☐ Preview image loads (if enabled)
* ☐ No error messages appear

***

#### Monitor execution logs

Regularly check that automations are working:

1. Weekly review of execution logs
2. Watch for failed or delayed messages
3. Alert on > 5% failure rate
4. Fix issues quickly

This ensures reliability for your team.

***

#### Don't over-notify

Reserve Slack automations for important folders.

**Questions to ask:**

* Does the team need instant notification?
* Is the volume manageable (< 50/day)?
* Is the channel relevant?
* Will it drive action?

If unsure, use email instead. You can always add Slack later.

***

#### Use folder-specific templates

Match each folder's automation to its purpose.

**Examples:**

**Bug Reports folder:**

```
🐛 *Bug: {{recording.title}}*
From: {{recording.customer_email}}
Browser: {{recording.browser}}
<{{recording.url}}|Debug>
```

**Feature Requests folder:**

```
💡 *Feature: {{recording.title}}*
Customer: {{recording.customer_email}}
<{{recording.url}}|Review>
```

**Support Tickets folder:**

```
🎫 *Support: {{recording.title}}*
Customer: {{recording.customer_email}}
Duration: {{recording.duration}}s
<{{recording.url}}|Respond>
```


# Apply Label

Automatically apply a label to every new recording or bug report added to a folder.

The Apply Label automation is the simplest way to keep your workspace organized. When a recording or capture lands in a folder, Screendesk instantly applies the label you've configured—no manual tagging needed.

### When to Use Apply Label

Apply Label is ideal for:

* **Folder-based categorization** — Tag all recordings in a folder with a consistent label like `bug`, `feature-request`, or `needs-review`
* **Client or product segmentation** — Automatically label recordings from a dedicated customer folder with their name or account tier
* **Triage workflows** — Mark all incoming recordings as `unreviewed` so your team knows what still needs attention
* **Combining with other automations** — Pair with a Slack or Linear automation so recordings are both labeled and escalated at the same time

{% hint style="warning" %}
**Prerequisites**

Before setting up the Apply Label automation:

1. **At least one label created** — The label must already exist in your workspace. Go to **Organization & Workflows → Labels** to create one if needed.
2. **Screendesk Pro or Enterprise plan** — Automations are not available on Starter plans.
3. **Admin role** — Editors, Members and Watch-Only cannot create automations.
   {% endhint %}

{% stepper %}
{% step %}

### Open folder automations

1/ Navigate to the folder you want to automate

2/ Click on the **Automations** button

<figure><img src="/files/OGOxTDfDYp7vlC6qZB6j" alt=""><figcaption></figcaption></figure>

3/ Select Screendesk > **Apply Label** from the list

<figure><img src="/files/vzCUEmPsVOVCqjWRV7Vw" alt=""><figcaption></figcaption></figure>

{% endstep %}

{% step %}

### Select a label

In the configuration form, click the **Label** dropdown and select the label you want to apply.

> **Only existing labels appear in the dropdown.** If you don't see the label you need, go to **Account settings → Workaspace settings →** [**Labels**](https://app.screendesk.io/settings-labels) to create it first, then come back to set up the automation.

<figure><img src="/files/oCNql0D4yBviT9HoD2He" alt=""><figcaption></figcaption></figure>
{% endstep %}

{% step %}

### Save and activate

Click **Create Automation** to save. The automation is enabled immediately—every new recording or bug report added to this folder will be tagged with the label you selected.
{% endstep %}
{% endstepper %}

### **FAQ**

<details>

<summary>Will existing recordings in the folder be labeled?</summary>

No. The automation only applies to new recordings added after it's been created. Recordings already in the folder are not affected.

</details>


# Template variables reference

Complete list of automation template variables for recordings, folders, and workspaces, with examples.

Template variables allow you to customize automation messages with dynamic data from recordings and captures. This guide provides a complete reference of all available variables, organized by category with usage examples.

***

### Overview

Template variables are placeholders you insert into message templates that get replaced with actual data when automations execute. They use double-brace syntax:

```
{{variable.name}}
```

All variables are optional. If data doesn't exist for a recording, the variable will appear empty but won't cause errors.

***

### Recording Variables

Variables that pull data directly from the recording or capture that triggered the automation.

#### Basic Recording Information

| Variable                       | Description                   | Example                                   | Always Available |
| ------------------------------ | ----------------------------- | ----------------------------------------- | ---------------- |
| `{{recording.title}}`          | Recording title               | "Checkout page crash"                     | Yes              |
| `{{recording.description}}`    | Recording description         | "Getting error when..."                   | No               |
| `{{recording.url}}`            | Direct link to view recording | "<https://app.screendesk.io/r/abc123>..." | Yes              |
| `{{recording.duration}}`       | Length in seconds             | "45"                                      | Yes              |
| `{{recording.created_at}}`     | Submission timestamp          | "Feb 6, 2026 at 2:30 PM"                  | Yes              |
| `{{recording.created_at_iso}}` | ISO 8601 timestamp            | "2026-02-06T14:30:00Z"                    | Yes              |

#### Customer Information

| Variable                       | Description                        | Example               | Always Available |
| ------------------------------ | ---------------------------------- | --------------------- | ---------------- |
| `{{recording.customer_email}}` | Email of person who submitted      | "<user@customer.com>" | No               |
| `{{recording.customer_name}}`  | Name of person who submitted       | "John Smith"          | No               |
| `{{recording.customer_id}}`    | External customer ID               | "cust\_12345"         | No               |
| `{{recording.account_name}}`   | Name of customer's account/company | "Acme Corp"           | No               |

#### Technical Details

| Variable                        | Description              | Example                      | Always Available |
| ------------------------------- | ------------------------ | ---------------------------- | ---------------- |
| `{{recording.browser}}`         | Browser name and version | "Chrome 121.0.6167"          | No               |
| `{{recording.browser_name}}`    | Browser name only        | "Chrome"                     | No               |
| `{{recording.browser_version}}` | Browser version only     | "121.0.6167"                 | No               |
| `{{recording.os}}`              | Operating system         | "macOS 14.3"                 | No               |
| `{{recording.os_name}}`         | OS name only             | "macOS"                      | No               |
| `{{recording.os_version}}`      | OS version only          | "14.3"                       | No               |
| `{{recording.resolution}}`      | Screen resolution        | "2560x1440"                  | No               |
| `{{recording.screen_size}}`     | Device screen size       | "1920x1080"                  | No               |
| `{{recording.viewport}}`        | Viewport dimensions      | "1440x900"                   | No               |
| `{{recording.platform}}`        | Device platform          | "desktop" or "mobile"        | No               |
| `{{recording.device_type}}`     | Device type              | "MacBook Pro" or "iPhone 14" | No               |

#### Geographic Information

| Variable                     | Description      | Example                | Always Available |
| ---------------------------- | ---------------- | ---------------------- | ---------------- |
| `{{recording.country}}`      | Country name     | "United States"        | No               |
| `{{recording.country_code}}` | ISO country code | "US"                   | No               |
| `{{recording.city}}`         | City location    | "San Francisco"        | No               |
| `{{recording.region}}`       | Region/state     | "California"           | No               |
| `{{recording.ip_address}}`   | IP address       | "203.0.113.42"         | No               |
| `{{recording.timezone}}`     | Timezone         | "America/Los\_Angeles" | No               |
| `{{recording.locale}}`       | Browser locale   | "en-US"                | No               |

#### Network Information

| Variable                     | Description               | Example           | Always Available |
| ---------------------------- | ------------------------- | ----------------- | ---------------- |
| `{{recording.network_type}}` | Network type              | "4g" or "wifi"    | No               |
| `{{recording.isp}}`          | Internet service provider | "Comcast"         | No               |
| `{{recording.downlink}}`     | Network speed (Mbps)      | "25"              | No               |
| `{{recording.is_vpn}}`       | VPN detection             | "true" or "false" | No               |

#### Content Analysis

| Variable                       | Description                           | Example                         | Always Available |
| ------------------------------ | ------------------------------------- | ------------------------------- | ---------------- |
| `{{recording.summary}}`        | AI-generated summary                  | "User encountered..."           | No               |
| `{{recording.suggestion}}`     | AI suggestion/analysis                | "This appears to be..."         | No               |
| `{{recording.ai_sentiment}}`   | Sentiment analysis                    | "frustrated" or "neutral"       | No               |
| `{{recording.transcript}}`     | Full audio transcription              | "The user says: hello..."       | No               |
| `{{recording.console_errors}}` | JavaScript console errors (formatted) | "Uncaught TypeError: Cannot..." | No               |
| `{{recording.network_errors}}` | Failed HTTP requests (formatted)      | "POST /api/checkout 500..."     | No               |

#### Recording Metadata

| Variable                          | Description                 | Example                                   | Always Available |
| --------------------------------- | --------------------------- | ----------------------------------------- | ---------------- |
| `{{recording.session_id}}`        | Unique session identifier   | "sess\_abc123xyz"                         | Yes              |
| `{{recording.user_agent}}`        | Full user agent string      | "Mozilla/5.0 (Macintosh..."               | No               |
| `{{recording.source}}`            | How recording was submitted | "feedback\_widget" or "chrome\_extension" | No               |
| `{{recording.vendor}}`            | Recording source vendor     | "screendesk"                              | No               |
| `{{recording.impressions_count}}` | Number of times viewed      | "5"                                       | Yes              |
| `{{recording.views_count}}`       | Total view count            | "12"                                      | Yes              |

#### Engagement Metrics

| Variable                   | Description                   | Example           | Always Available |
| -------------------------- | ----------------------------- | ----------------- | ---------------- |
| `{{recording.first_view}}` | Is first view of recording    | "true" or "false" | Yes              |
| `{{recording.received}}`   | Has recording been viewed     | "true" or "false" | Yes              |
| `{{recording.sent}}`       | Recording sent to third party | "true" or "false" | Yes              |

***

### Folder Variables

Variables that reference the folder the automation is configured on.

| Variable                 | Description           | Example                                      | Always Available |
| ------------------------ | --------------------- | -------------------------------------------- | ---------------- |
| `{{folder.name}}`        | Folder name           | "Bug Reports"                                | Yes              |
| `{{folder.id}}`          | Folder ID             | "folder\_12345"                              | Yes              |
| `{{folder.description}}` | Folder description    | "All customer-reported bugs"                 | No               |
| `{{folder.url}}`         | Direct link to folder | "<https://app.screendesk.io/folders/abc123>" | Yes              |

***

### Account/Workspace Variables

Variables that reference the workspace where the automation runs.

| Variable            | Description             | Example                                 | Always Available |
| ------------------- | ----------------------- | --------------------------------------- | ---------------- |
| `{{account.name}}`  | Workspace name          | "Acme Corp Engineering"                 | Yes              |
| `{{account.id}}`    | Workspace ID            | "acc\_12345"                            | Yes              |
| `{{account.email}}` | Workspace email/domain  | "acme.com"                              | No               |
| `{{account.url}}`   | Workspace dashboard URL | "<https://app.screendesk.io/dashboard>" | Yes              |

***

### User Variables

Variables related to the user who submitted the recording (if available).

| Variable         | Description        | Example               | Always Available |
| ---------------- | ------------------ | --------------------- | ---------------- |
| `{{user.name}}`  | User full name     | "Alice Johnson"       | No               |
| `{{user.email}}` | User email address | "<alice@company.com>" | No               |
| `{{user.id}}`    | User ID            | "user\_12345"         | No               |

***

### System Variables

Variables that provide system-level information.

| Variable              | Description             | Example                  | Always Available |
| --------------------- | ----------------------- | ------------------------ | ---------------- |
| `{{timestamp}}`       | Current execution time  | "Feb 6, 2026 at 2:35 PM" | Yes              |
| `{{timestamp_iso}}`   | ISO 8601 execution time | "2026-02-06T14:35:00Z"   | Yes              |
| `{{automation.name}}` | Automation name         | "Email to Engineering"   | Yes              |
| `{{automation.id}}`   | Automation ID           | "auto\_12345"            | Yes              |

***

### Usage Examples

#### Email Subject Lines

```
# Simple notification
New recording: {{recording.title}}

# Include customer
Bug from {{recording.customer_email}}: {{recording.title}}

# Add urgency
🚨 CRITICAL: {{recording.title}} ({{recording.customer_name}})

# Include folder context
[{{folder.name}}] {{recording.title}} - {{recording.country}}

# Time-based
{{recording.created_at}} - {{recording.title}} from {{recording.customer_email}}
```

#### Slack Message Templates

```
# Simple format
New bug report: *{{recording.title}}* from {{recording.customer_email}}
Folder: {{folder.name}} | Duration: {{recording.duration}}s

# Rich format with emoji
🐛 *{{recording.title}}*
Reported by: {{recording.customer_email}}
Location: {{recording.city}}, {{recording.country}}
Browser: {{recording.browser}}
<{{recording.url}}|View Recording>

# With analysis
*{{recording.title}}*
Sentiment: {{recording.ai_sentiment}}
Summary: {{recording.summary}}
Duration: {{recording.duration}}s
```

#### Webhook Payloads

```json
{
  "event": "recording.created",
  "recording": {
    "title": "{{recording.title}}",
    "url": "{{recording.url}}",
    "duration": {{recording.duration}},
    "customer": {
      "email": "{{recording.customer_email}}",
      "name": "{{recording.customer_name}}"
    },
    "device": {
      "browser": "{{recording.browser}}",
      "os": "{{recording.os}}",
      "resolution": "{{recording.resolution}}"
    },
    "location": {
      "country": "{{recording.country}}",
      "city": "{{recording.city}}"
    }
  },
  "folder": {
    "name": "{{folder.name}}",
    "id": "{{folder.id}}"
  },
  "timestamp": "{{timestamp_iso}}"
}
```

#### Ticket Creation

```
Title: [{{folder.name}}] {{recording.title}}

Description:
Customer: {{recording.customer_email}}
Duration: {{recording.duration}} seconds
Browser: {{recording.browser}} on {{recording.os}}
Location: {{recording.city}}, {{recording.country}}

Summary:
{{recording.summary}}

Link: {{recording.url}}

---
Created automatically by Screendesk automation on {{timestamp}}
```

***

### Variable Placement

#### Valid Placement Locations

Template variables can be used in:

| Feature                   | Supported |
| ------------------------- | --------- |
| Email subject lines       | ✅ Yes     |
| Email body (HTML)         | ✅ Yes     |
| Slack message text        | ✅ Yes     |
| Slack message attachments | ✅ Yes     |
| Webhook JSON payload      | ✅ Yes     |
| Webhook URL path          | ✅ Yes     |
| Webhook headers           | ✅ Yes     |
| Ticket title              | ✅ Yes     |
| Ticket description        | ✅ Yes     |
| Ticket labels             | ✅ Yes     |
| Custom fields             | ✅ Yes     |

#### Invalid Placement

Variables are **not supported** in:

* Automation condition logic (if/when rules)
* Recipient email addresses
* Webhook URLs (base URL portion)
* Channel selection logic

***

### Best Practices

#### 1. Check Variable Availability

Some variables may not be available for all recordings. Use fallback text:

```
# Good - handles missing data
Browser: {{recording.browser}} (if empty, appears blank but doesn't error)

# Risky - assumes data exists
Must use {{recording.summary}} (fails if summary doesn't exist)
```

#### 2. Use Consistent Formatting

Keep template variable spacing consistent:

```
# Good - consistent spacing
{{recording.title}}
{{ recording.title }}

# Bad - inconsistent
{{recording.title }} or {{ recording.title}}
```

#### 3. Escape HTML in Contexts

When using variables in HTML email templates, consider escaping:

```html
<!-- Good - escaped -->
<p>Title: <strong>{{recording.title}}</strong></p>

<!-- Risky - unescaped in attribute -->
<a href="{{recording.url}}">Click here</a>
<!-- Works but URL could break with special characters -->
```

#### 4. Limit Template Nesting

Don't nest variables:

```
# ❌ Invalid - nesting not supported
{{recording.{{dynamic_field}}}}

# ✅ Valid - single variable
{{recording.title}}
```

#### 5. Keep Templates Readable

Format templates for clarity, especially in email bodies:

```html
<!-- Good - clear structure -->
<p><strong>Title:</strong> {{recording.title}}</p>
<p><strong>Customer:</strong> {{recording.customer_email}}</p>
<p><strong>Browser:</strong> {{recording.browser}}</p>

<!-- Less clear - harder to scan -->
{{recording.title}} - {{recording.customer_email}} - {{recording.browser}}
```

#### 6. Test with Sample Data

Always test templates before activating:

1. Send a test email/message
2. Verify all variables populated correctly
3. Check that no `{{}}` brackets appear in output
4. Confirm formatting looks good
5. Test links and buttons work

***

### Troubleshooting Variables

#### Variables Not Populating

**Symptom:** Template shows `{{variable.name}}` instead of actual value

**Solutions:**

1. Check spelling exactly - variables are case-sensitive: `{{recording.title}}` ✓ vs `{{Recording.Title}}` ✗
2. Ensure double braces: `{{ }}` not `{ }` or `[ ]`
3. Verify the data exists (not all recordings have summaries or errors)
4. Check variable is in supported placement location

#### Empty Variables

**Symptom:** Variable appears blank in output

**Possible Causes:**

* Recording doesn't have that data
* Data wasn't captured (e.g., no console errors if page didn't error)
* Field is optional and wasn't filled by customer

**Solution:** This is normal behavior. Use text around variables to add context:

```
# Instead of just: {{recording.summary}}

# Try:
Summary: {{recording.summary}} (or empty if no AI analysis)
```

#### Special Characters Breaking Template

**Symptom:** Email/message formatting breaks when variable contains special characters

**Solution:** If template data might contain quotes, HTML, or special chars:

```html
<!-- Escape in HTML context -->
<p>Title: <strong>{{recording.title | html_escape}}</strong></p>

<!-- Or simpler - use plain text view -->
Title: {{recording.title}}
```

#### URL Parameters with Variables

**Symptom:** URL parameter doesn't work with variable value

**Note:** Variables should not be placed in URL base paths. Always use:

```
# ✅ Correct - variable in query parameter
{{recording.url}}

# ❌ Wrong - would break the URL
/api/webhook?folder={{folder.id}}&recording={{recording.id}}
```

***

### Variable Limits and Constraints

| Aspect                          | Limit             | Notes                                     |
| ------------------------------- | ----------------- | ----------------------------------------- |
| Variables per template          | Unlimited         | Use as many as needed                     |
| Template size                   | 10,000 characters | Applies to full message/template          |
| Variable name length            | 100 characters    | Technical limit, actual vars much shorter |
| Variable replacement depth      | 1 level           | No nested variables                       |
| Special characters in variables | Supported         | Will be replaced with actual values       |


# Recording triage

Auto-route new recordings into the right folder using priority-based rules.

Recording Triage automatically sorts incoming recordings into folders the moment they arrive. You define rules based on properties like source, customer email, or country, and Screendesk handles the rest — no manual sorting required.

This is especially useful for teams that receive recordings from multiple integrations (Zendesk, Intercom, Freshdesk, HubSpot) or serve customers across different regions.

{% hint style="info" %}
Recording Triage is available on the **Pro** plan and above. If you're on a lower plan, you'll see an upgrade prompt when visiting the triage settings page.
{% endhint %}

<figure><img src="/files/RUZJdCKoaNDSHv9YxUMS" alt=""><figcaption></figcaption></figure>

***

### How it works

When a new recording is received, Screendesk evaluates your triage rules automatically:

1. The system checks your rules from top to bottom, in priority order.
2. Each rule's conditions are tested against the recording. All conditions in a rule must match (AND logic).
3. The **first rule that matches** wins — the recording is placed into that rule's target folder.
4. If no rule matches, the recording stays unassigned and appears in your general recordings list.

Triage runs once, at the moment the recording is created. Changing or adding rules later does not retroactively re-sort existing recordings.

{% hint style="warning" %}
Recording Triage only applies to **Received** recordings. Sent, Live, and Library recordings are not evaluated by triage rules.
{% endhint %}

***

### Setting up triage rules

You'll find Recording Triage under **Settings → Recording Triage** in your workspace.

{% stepper %}
{% step %}

#### Open Recording Triage settings

Navigate to **Settings → Recording Triage**. You'll see your existing rules (if any) and a library of quick-start templates at the bottom.
{% endstep %}

{% step %}

#### Click Add Rule (or pick a template)

You can start from scratch by clicking the **Add Rule** button, or select one of the quick-start templates to pre-fill your rule with common conditions. Templates are available for:

* **By Source** — route recordings from a specific integration (Zendesk, Intercom, Freshdesk, HubSpot)
* **By Geography** — route recordings based on customer country (EU, US, APAC)
* **By Data Quality** — route recordings based on whether customer email is present or missing
* **Custom** — build entirely from scratch

{% hint style="info" %}
Source templates only appear if you have the corresponding integration installed. For example, you'll only see the Zendesk template if Zendesk is connected.
{% endhint %}

<figure><img src="/files/UnX7pEmBdq1xoeDAZpPu" alt=""><figcaption></figcaption></figure>
{% endstep %}

{% step %}

#### Name your rule

Give the rule a descriptive name that makes it easy to identify at a glance — for example, "EU Customers" or "Zendesk Support Tickets".
{% endstep %}

{% step %}

#### Add conditions

Each condition consists of three parts: a **field**, an **operator**, and a **value**. You can add multiple conditions to a single rule — all conditions must match for the rule to fire.

Click **Add Condition (AND)** to add more conditions.
{% endstep %}

{% step %}

#### Choose a target folder

Select the folder where matching recordings should be routed. Only **Received** recording folders are available as targets. If you haven't created one yet, you'll need to create a folder first (see Folders).
{% endstep %}

{% step %}

#### Save

Click **Create Rule** and your rule is immediately active. New incoming recordings will be evaluated against it right away.
{% endstep %}
{% endstepper %}

***

### Condition fields and operators

Each condition tests a specific property of the incoming recording. Here's what you can filter on:

#### Source

Match recordings based on which integration they came from.

| Operator  | Meaning                        | Example                                 |
| --------- | ------------------------------ | --------------------------------------- |
| Is        | Exact match on one source      | Source **is** Zendesk                   |
| Is Not    | Excludes one source            | Source **is not** Intercom              |
| Is One Of | Matches any of several sources | Source **is one of** Zendesk, Freshdesk |

#### Customer Email

Route recordings based on the customer's email address.

| Operator     | Meaning                   | Example                          |
| ------------ | ------------------------- | -------------------------------- |
| Is Empty     | No email on the recording | Missing contact info             |
| Is Not Empty | Email is present          | Has contact info                 |
| Contains     | Email includes a string   | Email **contains** "@enterprise" |
| Ends With    | Email ends with a string  | Email **ends with** "@acme.com"  |

#### Country

Route recordings based on the customer's country.

| Operator  | Meaning                          | Example                          |
| --------- | -------------------------------- | -------------------------------- |
| Is        | Exact country match              | Country **is** US                |
| Is Not    | Excludes a country               | Country **is not** US            |
| Is One Of | Matches any of several countries | Country **is one of** DE, FR, IT |

{% hint style="info" %}
For "Is One Of" with countries, enter country codes separated by commas (e.g., DE, FR, IT, ES).
{% endhint %}

***

### Managing rules

#### Reordering rules

Rules are evaluated top to bottom — the order matters. To change priority:

* **Drag and drop** — hover over a rule to reveal the drag handle on the left, then drag it to a new position.

The rule at the top has the highest priority. If two rules could both match a recording, only the first one in the list will apply.

<figure><img src="/files/UznuSpbbgeJh60wAFv4C" alt=""><figcaption></figcaption></figure>

#### Pausing and resuming rules

You don't need to delete a rule to stop it from running. Hover over the rule and click the **pause** icon (green checkmark) to disable it. The rule will show a "Paused" badge and will be skipped during evaluation.

To re-enable, click the same icon again (it appears as a grey pause icon when the rule is disabled).

#### Editing a rule

Hover over any rule and click the **pencil** icon to open the edit form. You can change the rule name, conditions, or target folder. Click **Update Rule** to save.

#### Deleting a rule

Hover over the rule and click the **trash** icon. You'll be asked to confirm before the rule is permanently removed. Deleting a rule does not affect recordings that were already triaged by it.

***

### Quick-start templates

Templates give you a head start by pre-filling conditions for common use cases. When you click a template, it opens the rule creation form with conditions already set — you just need to choose a target folder and save.

<figure><img src="/files/qko7GjtGqZM6DyGqSAcs" alt=""><figcaption></figcaption></figure>

**Popular templates:**

| Template               | What it does                                                                             |
| ---------------------- | ---------------------------------------------------------------------------------------- |
| Zendesk Support        | Routes all recordings from Zendesk                                                       |
| Intercom Conversations | Routes all recordings from Intercom                                                      |
| HubSpot Tickets        | Routes all recordings from HubSpot                                                       |
| Freshdesk Cases        | Routes all recordings from Freshdesk                                                     |
| EU Customers           | Routes recordings from European countries (DE, FR, IT, ES, NL, and more)                 |
| US Customers           | Routes recordings from the United States                                                 |
| APAC Region            | Routes recordings from Asia-Pacific countries (JP, CN, AU, SG, and more)                 |
| Missing Email          | Routes recordings where the customer email is missing — useful for a manual review queue |
| Has Customer Email     | Routes recordings that have contact information                                          |

***

### Example setups

Here are a few common ways teams use Recording Triage:

<details>

<summary>Route by integration</summary>

If your team uses Zendesk for support and Intercom for sales, create two rules:

1. **Rule 1:** Source **is** Zendesk → "Support Recordings" folder
2. **Rule 2:** Source **is one of** Intercom → "Sales Recordings" folder

Each integration's recordings land in the right folder automatically.

</details>

<details>

<summary>Route by region for compliance</summary>

If your EU team needs to handle European customer data separately for GDPR compliance:

1. **Rule 1:** Country **is one of** DE, FR, IT, ES, NL, BE, AT, SE, DK, FI, NO, PL, IE, PT, GR → "EU Customers" folder
2. **Rule 2:** Country **is** US → "US Customers" folder

Recordings from other regions stay unassigned for manual sorting.

</details>

<details>

<summary>Flag recordings missing contact info</summary>

Create a rule to catch recordings without a customer email address so your team can follow up:

1. **Rule 1:** Customer Email **is empty** → "Needs Review" folder

This ensures no recording slips through without proper customer identification.

</details>

***

### Good to know

* Triage rules are evaluated **once** when a recording arrives. Updating or adding rules does not affect recordings that were already processed.
* If a recording already has a folder assignment (for example, it was sent directly to a folder via an integration), triage is skipped — it won't override existing assignments.
* All conditions within a single rule use **AND** logic. A recording must satisfy every condition for the rule to match. There is no OR logic between conditions within the same rule. To create OR-style behavior, use separate rules.
* Target folders must be **Received** recording folders. You cannot route to Sent, Live, or Library folders.
* There is no limit to the number of rules you can create, but keep your list focused — simpler setups are easier to maintain and debug.
* Triage runs silently in the background. There are no notifications or alerts when a recording is triaged — it simply appears in the target folder.

***

### Permissions

| Action               | Owner | Admin | Editor | Member | Watch Only |
| -------------------- | ----- | ----- | ------ | ------ | ---------- |
| View triage rules    | ✅     | ✅     | ✅      | —      | —          |
| Create rules         | ✅     | ✅     | ✅      | —      | —          |
| Edit rules           | ✅     | ✅     | ✅      | —      | —          |
| Delete rules         | ✅     | ✅     | ✅      | —      | —          |
| Enable / pause rules | ✅     | ✅     | ✅      | —      | —          |
| Reorder rules        | ✅     | ✅     | ✅      | —      | —          |

***

### Frequently asked questions

<details>

<summary>Can I apply triage rules to recordings that already exist?</summary>

No. Triage only runs when a new recording is created. Existing recordings are not re-evaluated when you add or change rules. You can manually move existing recordings into folders using the **Move to Folder** option.

</details>

<details>

<summary>What happens if I delete a folder that's used in a triage rule?</summary>

The triage rule will still exist, but it won't be able to route recordings to the deleted folder. It's a good practice to update or remove rules that reference deleted folders.

</details>

<details>

<summary>Can I use OR logic between conditions?</summary>

Not within a single rule — all conditions use AND logic. To achieve OR behavior, create separate rules. For example, instead of one rule for "Source is Zendesk OR Source is Freshdesk," create two rules that each route to the same folder.

</details>

<details>

<summary>Why isn't my rule matching any recordings?</summary>

Check the following: the rule is not paused (no "Paused" badge), the conditions match the properties of incoming recordings, the rule is high enough in the priority list that another rule isn't matching first, and the recording type is "Received."

</details>


# Labels

Tag recordings and assign owners for faster filtering and clean handoffs.

Labels let you tag recordings and bug reports with custom categories so your team can triage, filter, and find items faster. Each workspace defines its own set of labels, and bug report labels and recording labels are managed separately.

***

### Enabling labels

Labels are disabled by default. An Admin or Editor must turn them on before the team can use them.

{% stepper %}
{% step %}

#### Open the Labels settings

Navigate to **Settings → Labels**. You will see two tabs: **Bug Reports** and **Recordings**.
{% endstep %}

{% step %}

#### Toggle the feature on

Select the tab for the type you want to enable and flip the **Enable labels** toggle, then click **Save**.

<figure><img src="/files/s70FRai0rkVVMILif6gS" alt=""><figcaption></figcaption></figure>
{% endstep %}
{% endstepper %}

{% hint style="info" %}
Disabling labels hides the label UI throughout the workspace, but existing label assignments are preserved. Re-enabling the toggle brings everything back.
{% endhint %}

***

### Creating labels

Once labels are enabled, Admins and Editors can create them in two places:

**From Settings** — On the **Settings → Labels** page, click the **+ Label** button next to the existing labels, type a name (up to 50 characters), and press Enter.

**On the fly** — When applying labels to a recording, type a name that doesn't exist yet in the search field and click **Create "\[name]"**. The label is created and applied in one step. This option is only available to Admins and Editors.

<figure><img src="/files/mPf7YeS9sdChD0GKXY7z" alt=""><figcaption></figcaption></figure>

{% hint style="warning" %}
Label names must be unique within each type. You can have a "Bug" label for bug reports and a separate "Bug" label for recordings, but not two "Bug" labels for the same type.
{% endhint %}

***

### Applying labels

<figure><img src="/files/Etc84siVeqSIdXqOMzWx" alt=""><figcaption></figcaption></figure>

Open any recording or bug report and look for the **Add Label** / **Add labels** button. Click it to open a dropdown with all available labels for that type. Check one or more labels to apply them; uncheck to remove.

The dropdown includes a search field to quickly find labels by name.

| Role       | Can apply / remove labels | Can create / delete labels |
| ---------- | ------------------------- | -------------------------- |
| Owner      | Yes                       | Yes                        |
| Admin      | Yes                       | Yes                        |
| Editor     | Yes                       | Yes                        |
| Member     | Yes (own items only)      | No                         |
| Watch Only | No                        | No                         |

***

### Filtering by labels

Both the **Recordings** list and the **Bug Reports** list include a **Labels** filter.

1. Click the filter bar and choose **Labels**.
2. Select one or more labels from the list.
3. Click **Apply**.

The list updates to show only items that match the selected labels. Active label filters are visible as chips that you can remove individually or clear all at once.

{% hint style="info" %}
**Tip for managers:** Combine the labels filter with other filters (date range, assignee, type) to quickly surface what matters — for example, all "Escalated" recordings from the past week.
{% endhint %}

***

### Deleting labels

On the **Settings → Labels** page, each label shows a usage count (how many items it is applied to). Click the **×** button next to a label to delete it. You will be asked to confirm — deleting a label removes it from all associated recordings or bug reports.

<figure><img src="/files/McJOA0ZdfQc0Rs2gJJZ1" alt=""><figcaption></figcaption></figure>

***

### Good to know

* Bug report labels and recording labels are **completely separate**. Creating a label under the Bug Reports tab does not make it available for recordings, and vice versa.
* All label creation, updates, and deletions are recorded in the audit log when audit logs are enabled for your workspace.
* Labels are available on all plans.


# Assignments

Assign owners to recordings and bug reports, manage notifications, and filter by assignee.

Assignments let you indicate who is responsible for a recording or bug report. You can assign one or more team members to any item, and they will be notified automatically.

### How to assign someone

Open a recording or bug report and look at the details panel on the right. Under the assignees section you will see any current assignees (or "No assignees" if none have been added).

<figure><img src="/files/y5V0kgfHAEn5FdSdN9kJ" alt=""><figcaption></figcaption></figure>

{% stepper %}
{% step %}

#### Open the assignee dropdown

Click **Add or remove assignees**. A dropdown appears with a searchable list of everyone in your workspace.
{% endstep %}

{% step %}

#### Select team members

Check the box next to one or more names. Each person you select is assigned immediately — there is no save button.
{% endstep %}

{% step %}

#### Close the dropdown

Click anywhere outside the dropdown to close it. The assigned users now appear as pills with their avatar and name.
{% endstep %}
{% endstepper %}

To **remove** an assignee, either uncheck them in the dropdown or click the **X** on their pill.

{% hint style="info" %}
You can assign multiple people to the same recording or bug report. Each assignee receives their own notification.
{% endhint %}

### Who can assign

Any workspace member with the Admin, Editor, or Member role can add and remove assignees. Watch-Only users cannot assign.

Users can only be assigned within the same workspace — you cannot assign someone from a different workspace.

### Notifications

When you assign someone, they receive two notifications:

* **In-app** — a real-time notification appears in the bell icon menu.
* **Email** — a message with the item title, description, creator, and a direct link to view it.

Assignees can turn off the email by going to **Profile → Notifications** and unchecking **Bug Report Assignments**. In-app notifications cannot be turned off.

{% hint style="warning" %}
The email preference toggle applies to both recording and bug report assignment emails.
{% endhint %}

### Filtering by assignee

Both the Recordings and Bug Reports pages offer two ways to filter by assignment.

#### Assigned to Me

Click the **Assigned to Me** button in the filter bar to show only items assigned to you. Click it again to remove the filter.

On the Recordings page this button appears when viewing **Received** or **Live** recordings. It is not shown on Sent or Library tabs.

<figure><img src="/files/hPFUoR0Vp3CZ4n5EVcm0" alt=""><figcaption></figcaption></figure>

#### Filter by specific users

Click **Add filter → Users** to open the user filter. Search for and select one or more team members, then click **Apply**. A chip showing the number of selected users appears in the filter bar. Click the **X** on the chip to clear it.

{% hint style="info" %}
**Assigned to Me** and the **Users** filter are mutually exclusive. Activating one clears the other.
{% endhint %}

<figure><img src="/files/k890mhM30EajkfQDeEzU" alt=""><figcaption></figcaption></figure>


# Collaboration

Comment on recordings, mention teammates, and share direct links from the timeline.

## Collaboration

Use the activity timeline on a recording to discuss what happened, bring teammates into the conversation, and keep decisions attached to the recording itself.

Collaboration tools are available to workspace members who can access the recording. Watch-only users can read comments and activity, but cannot add comments, edit comments, delete comments, mention teammates, or react.

### In this section

* [Comments](/organization-and-workflows/collaboration/comments) - add feedback, context, and follow-up questions on a recording.
* [Mentions](/organization-and-workflows/collaboration/mentions) - notify teammates by mentioning them in a comment.
* [Comment links](/organization-and-workflows/collaboration/comment-links) - copy a direct link to a specific comment.
* [Reactions](/organization-and-workflows/collaboration/reactions) - acknowledge or triage comments without adding another reply.

Collaboration keeps the discussion attached to the recording timeline.

Use comments, mentions, reactions, and direct links to keep decisions in one place.

### What you can do

* Add comments with feedback, questions, and next steps.
* Mention teammates when they need to review a thread.
* React to acknowledge or triage a comment.
* Share a direct link to a specific comment.

### Permissions

Workspace members who can access a recording can use collaboration tools.

Watch-only users can read comments and activity. They cannot comment, edit, delete, mention, or react.

### Jump to

<table data-view="cards"><thead><tr><th>Topic</th><th data-card-target data-type="content-ref">Read</th></tr></thead><tbody><tr><td>Comments</td><td><a href="/spaces/fW6XSzJSKsNyZnOkSJPt/pages/APi0hw0x1qNQCM6IxChp">/spaces/fW6XSzJSKsNyZnOkSJPt/pages/APi0hw0x1qNQCM6IxChp</a></td></tr><tr><td>Mentions</td><td><a href="/spaces/fW6XSzJSKsNyZnOkSJPt/pages/GjIXsYUBa9WUe8lrOOX0">/spaces/fW6XSzJSKsNyZnOkSJPt/pages/GjIXsYUBa9WUe8lrOOX0</a></td></tr><tr><td>Comment links</td><td><a href="/spaces/fW6XSzJSKsNyZnOkSJPt/pages/TgkckL9qyHLjEX8OCAOX">/spaces/fW6XSzJSKsNyZnOkSJPt/pages/TgkckL9qyHLjEX8OCAOX</a></td></tr><tr><td>Reactions</td><td><a href="/spaces/fW6XSzJSKsNyZnOkSJPt/pages/LmAz11Wy1HqCR1FPFKOr">/spaces/fW6XSzJSKsNyZnOkSJPt/pages/LmAz11Wy1HqCR1FPFKOr</a></td></tr></tbody></table>

### A simple workflow

1. Add a comment with the issue or decision.
2. Mention the teammate who should respond.
3. Share a direct comment link when you need outside context.
4. Use reactions to keep follow-up light.


# Comments

Add, edit, and manage comments in a recording timeline.

Comments keep feedback attached to the recording itself.

Use them to capture what happened, what to check, and what should happen next.

### Add a comment

{% stepper %}
{% step %}

#### Open the timeline

Open the recording and go to the activity timeline below it.
{% endstep %}

{% step %}

#### Write your message

Select **Write a comment or @ to mention**, then enter your message.
{% endstep %}

{% step %}

#### Post the comment

Select **Comment** to add it to the timeline.
{% endstep %}
{% endstepper %}

{% hint style="info" %}
You can attach images to a comment when a screenshot explains the issue faster.
{% endhint %}

### Edit or delete a comment

Comment authors can edit or delete their own comments.

Workspace admins can manage comments when cleanup is needed.

Edited comments stay marked as edited, so the timeline remains clear.

### Who can comment

Logged-in workspace members with access to the recording can comment, unless they are watch-only.

Watch-only users can read comments and activity, but they cannot add, edit, delete, or react to comments.

### Good comment habits

* Start with the issue, outcome, or decision.
* Mention the exact moment or behavior you mean.
* Add an image when one screenshot gives faster context.


# Mentions

Notify teammates from a recording comment by mentioning them.

Use mentions when a teammate should review a specific thread.

They keep the request tied to the exact recording context.

### Mention a teammate

{% stepper %}
{% step %}

#### Start a comment

Open a new comment, or edit an existing one.
{% endstep %}

{% step %}

#### Type `@`

Type `@`, then choose a teammate from the mention list.
{% endstep %}

{% step %}

#### Post the update

Save or post the comment to send the mention.
{% endstep %}
{% endstepper %}

### What happens next

The mention appears in the comment and Screendesk notifies the teammate.

Mentions work in new comments and edited comments.

### Good uses for mentions

* Ask engineering to confirm a bug.
* Bring support into the customer context.
* Ask product to review severity or priority.

### Permissions

Watch-only users can read mention threads, but they cannot create comments or mention teammates.


# Comment links

Copy a direct link to a specific comment in a recording timeline.

Comment links open the exact discussion in the timeline.

Use them when you want to share one decision or question without sending someone through the full recording.

### Copy a comment link

{% stepper %}
{% step %}

#### Hover the comment

Move over the comment you want to share.
{% endstep %}

{% step %}

#### Copy the link

Select the link button on the comment.
{% endstep %}

{% step %}

#### Share it

Send the copied URL in chat, email, or a ticket.
{% endstep %}
{% endstepper %}

### What happens when someone opens it

Screendesk opens the recording and highlights that comment in the activity timeline.

The link does not bypass recording permissions. The recipient still needs access to the recording.

### Common uses

* Share a decision in Slack.
* Reference a question in a bug ticket.
* Send a reviewer to the right thread.


# Reactions

Use reactions to acknowledge or triage comments without replying.

Reactions keep the timeline lighter.

Use them to acknowledge a comment or signal status without adding another reply.

### Add a reaction

{% stepper %}
{% step %}

#### Hover the comment

Move over the comment you want to react to.
{% endstep %}

{% step %}

#### Open reactions

Select the reaction button.
{% endstep %}

{% step %}

#### Choose a reaction

Pick the reaction that matches your response.
{% endstep %}
{% endstepper %}

Reactions appear under the comment and group by reaction type.

This makes it easy to see what was acknowledged or needs attention.

### Good uses for reactions

* Acknowledge that you saw a comment.
* Show agreement on a decision.
* Mark a note as ready for follow-up.

### Permissions

Workspace members who can comment can react to comments.

Watch-only users can see reactions, but they cannot add or remove them.


# AI Suggest

Generate reply suggestions using recording context and your knowledge base.

Screendesk AI Suggestions analyze everything available about a customer's issue — the support ticket, the recording transcript, console logs, system information, and your own product documentation — and produce a ready-to-use response for your support team. Instead of piecing together information from multiple sources, agents get a structured suggestion with a summary of the problem, recommended next steps, and a draft customer email.

{% hint style="info" %}
**Plan Availability:** Pro and Enterprise only
{% endhint %}

***

### What You Get

Each suggestion is structured into three sections:

**Agent Summary** — A brief explanation of the customer's issue in 2–3 sentences. This gives you a quick understanding of the problem without needing to read through the full ticket or watch the entire recording.

**Recommended Action** — Specific, actionable steps for you as the support agent. This may include areas to investigate, questions to ask the customer, troubleshooting steps to walk through, or additional data to request. If Screendesk found a relevant page in your connected documentation, a link is included here.

**Customer Email** — A draft reply you can send to the customer. The email acknowledges the issue, summarizes what you understand so far, outlines next steps, and includes a relevant documentation link if one was found. You can copy and adjust this before sending.

***

### Where to Find Suggestions

<figure><img src="/files/hpPC2QaPFjw2MQpBdOa7" alt=""><figcaption></figcaption></figure>

AI Suggestions are available on **received recordings** (recordings submitted by your customers). Open a received recording and look for the **AI** tab in the Developer Tools panel on the right side of the page. For received recordings, the AI tab opens by default.

If the recording was just submitted and is still being processed, you will see a "Screendesk AI is generating..." message with a brief loading animation. Once processing is complete, the **View Suggestion** button appears.

***

### Generating a Suggestion

{% stepper %}
{% step %}

#### Open a received recording

Navigate to the recording you want to analyze.
{% endstep %}

{% step %}

#### Go to the AI tab

In the Developer Tools panel on the right, click the **AI** tab. This tab is only shown for received recordings.
{% endstep %}

{% step %}

#### Click View Suggestion

Click the **View Suggestion** button. Screendesk begins gathering information from all available sources.

You will see status updates as it works:

1. "Collecting ticket details..."
2. "Collecting system info..."
3. "Looking up product docs..."
4. "Finalizing suggestion..."

The suggestion typically takes 10–15 seconds to generate.
{% endstep %}

{% step %}

#### Review the suggestion

The three-section response (Agent Summary, Recommended Action, Customer Email) appears in the AI panel. The suggestion is saved automatically — if you navigate away and come back, it will still be there.
{% endstep %}
{% endstepper %}

***

### What Information Does It Use?

Screendesk AI gathers context from every available source to produce the most relevant suggestion:

| Source                   | Description                                                                                                                      |
| ------------------------ | -------------------------------------------------------------------------------------------------------------------------------- |
| **Support ticket**       | If the recording came from an integrated helpdesk (Zendesk, Intercom, Freshdesk, HelpScout), the ticket conversation is included |
| **Recording transcript** | The spoken content from the recording, if audio was detected                                                                     |
| **Console logs**         | Browser console output captured during the recording, if the console logs feature is enabled                                     |
| **System information**   | The customer's browser, operating system, and device details                                                                     |
| **Your documentation**   | Pages from knowledge sources you have connected and trained in Data Sources settings                                             |

The more context available, the more specific and actionable the suggestion will be. Recordings that came through a helpdesk integration and have audio tend to produce the best results, since the AI has both the ticket history and the customer's own description of the problem.

***

### Connecting Your Documentation

To get the most out of AI Suggestions, connect your product documentation so Screendesk can reference it when generating responses. When a relevant page is found, the suggestion includes a direct link — both in the recommended action for the agent and in the draft customer email.

<figure><img src="/files/N1MkNjJuPfcOigqkefY6" alt=""><figcaption></figcaption></figure>

{% stepper %}
{% step %}

#### Go to Data Sources settings

Navigate to **Account Settings → Data Sources** (listed under the AI & Intelligence section in the sidebar).
{% endstep %}

{% step %}

#### Add a knowledge source

Click **Add Data Source** and enter the URL of your help center, documentation site, or knowledge base. Screendesk will crawl the site and discover all available pages.
{% endstep %}

{% step %}

#### Wait for crawling to complete

Screendesk automatically discovers pages on your site. You can see the list of discovered pages and their status on the data source detail page.
{% endstep %}

{% step %}

#### Train Screendesk AI

Once crawling is complete, click the **Train Screendesk AI** button. Training processes all discovered pages and may take up to 10 minutes depending on the size of your documentation.

After training completes, the AI can search your documentation when generating suggestions.
{% endstep %}
{% endstepper %}

{% hint style="info" %}
You can connect multiple knowledge sources. If your documentation changes, click **Train Screendesk AI** again to update — Screendesk detects which pages have changed and only reprocesses those.
{% endhint %}

***

### Supported Helpdesk Integrations

AI Suggestions automatically pull ticket data when a recording is linked to a conversation in one of these platforms:

* Zendesk
* Intercom
* Freshdesk
* HelpScout

If the recording was submitted through one of these integrations, the full ticket conversation is included in the context that the AI analyzes. No additional configuration is needed beyond having the integration active.

***

### Frequently Asked Questions

<details>

<summary>Do I need to do anything to enable AI Suggestions?</summary>

No. The feature is available automatically on Pro and Enterprise plans. Just open a received recording and click "View Suggestion" in the AI tab.

</details>

<details>

<summary>How long does it take to generate a suggestion?</summary>

Typically 10–15 seconds. You will see progress updates as Screendesk gathers and analyzes the available information.

</details>

<details>

<summary>Can I edit the suggestion?</summary>

The suggestion itself is not editable within Screendesk. However, you can copy any section — the agent summary, the recommended steps, or the draft email — and modify it as needed before using it.

</details>

<details>

<summary>What if there is no transcript available?</summary>

The AI will still generate a suggestion using whatever other context is available (ticket data, console logs, system info, documentation). The suggestion may be less specific without a transcript, but it will still provide value if other sources contain relevant information.

</details>

<details>

<summary>Do I need to connect my documentation?</summary>

No — suggestions work without documentation. But connecting your knowledge base significantly improves quality, because the AI can reference specific pages and include relevant links in its recommendations.

</details>

<details>

<summary>Is the suggestion visible to the customer?</summary>

No. AI Suggestions are only visible to members of your workspace who have access to view the recording. They are not included in the recording's public share link.

</details>

<details>

<summary>Can multiple agents view the same suggestion?</summary>

Yes. Once generated, the suggestion is saved and visible to any workspace member who opens the recording's AI tab.

</details>


# AI Summary

Screendesk automatically generates AI summaries based on the context of the recording.

## Recording Summaries

Every recording that contains audio is automatically summarized by Screendesk AI.

Instead of watching a full video, your team gets a concise summary within seconds.

Need the word-by-word version? See [AI transcripts](/debug-with-ai/ai-transcripts).

{% hint style="info" %}
**Plan Availability:** Pro and Enterprise only
{% endhint %}

***

### What You Get

When a customer submits a recording with audio, Screendesk produces a summary:

**A summary** — a short paragraph (1–4 sentences) that captures the key points of what was said. The summary appears in the recording's description area, giving you an at-a-glance understanding of the issue before you press play.

<figure><img src="/files/mX1an8ITucPiVbFxtRkf" alt=""><figcaption></figcaption></figure>

***

### Where to Find It

#### Summary

The summary appears directly below the video player in the recording's description area. If the customer did not provide a written description, the AI summary is shown automatically. You can edit it at any time by clicking on the text — your edits are saved as the recording's description and take priority over the generated summary.

#### Transcript

Transcripts are documented separately. See [AI transcripts](/debug-with-ai/ai-transcripts).

***

### How It Works

Summaries are generated automatically — there is nothing you need to configure or enable. The process starts as soon as a recording is submitted:

1. Screendesk detects whether the recording contains audio.
2. If audio is present, the summary is generated.
3. The summary appears on the recording page, typically within a few seconds.

You will see real-time updates as the process completes. If you are viewing the recording while it is being processed, the summary will appear automatically without needing to refresh the page.

{% hint style="info" %}
Summaries work in multiple languages. Screendesk automatically detects the spoken language.
{% endhint %}

***

### Which Recordings Get Summaries

| Recording type                             | Summary generated?                    |
| ------------------------------------------ | ------------------------------------- |
| **Received recordings** (from customers)   | Yes — if the recording contains audio |
| **Sent recordings** (created by your team) | Yes — if the recording contains audio |
| **Live recordings** (video calls)          | No                                    |
| **Library recordings**                     | Yes — if the recording contains audio |

Recordings with no detectable speech will not generate a summary.

***

### Editing the Summary

The AI-generated summary is a starting point. Any team member with editing permissions (Admin, Editor, or the recording owner) can click on the summary text to edit it. Once you save your edit, it becomes the recording's description and takes priority over the AI-generated version.

This is useful when you want to add context that the AI could not infer — for example, a ticket number, the customer's account name, or a note about the resolution.

***

### Frequently Asked Questions

<details>

<summary>How long does it take for the summary to appear?</summary>

Typically a few seconds after the recording is submitted. In rare cases with very long recordings, it may take up to a minute.

</details>

<details>

<summary>Can I regenerate a summary?</summary>

If a recording is edited (for example, trimmed using the video editor), the summary is regenerated automatically based on the edited version.

</details>

<details>

<summary>What if the recording has no audio?</summary>

Recordings without detectable audio (for example, silent screen recordings) will not have a summary.

</details>

<details>

<summary>Does the summary support languages other than English?</summary>

Yes. Screendesk detects the spoken language automatically and generates the summary in that language.

</details>

<details>

<summary>Where can I find the transcript?</summary>

See [AI transcripts](/debug-with-ai/ai-transcripts).

</details>

<details>

<summary>Who can see the summary?</summary>

Anyone who has access to view the recording can also see its summary. Access follows the same rules as the recording itself.

</details>


# AI Transcripts

Automatically generate searchable, timestamped transcripts for recordings with audio.

AI Transcripts automatically generate a searchable, timestamped transcript for recordings with audio.

Use transcripts to skim what happened, jump to key moments, and copy text into tickets.

{% hint style="info" %}
**Plan Availability:** Pro and Enterprise only
{% endhint %}

***

### What You Get

For any recording with detectable speech, Screendesk generates:

* A **timestamped transcript** split into clickable segments
* **Search** across the transcript with highlighted matches
* **Copy** to copy the full transcript
* **Download captions (SRT)** to export an `.srt` file

If you also want a short write-up, see [AI Summary](/debug-with-ai/ai-summary).

***

### Where to Find Transcripts

<figure><img src="/files/L4T6y5uSok8V32rOewhh" alt=""><figcaption></figcaption></figure>

Transcripts live on the recording page.

{% stepper %}
{% step %}

### Open a recording with audio

Open any received or sent recording that contains speech.
{% endstep %}

{% step %}

### Open the Transcript tab

In the Developer Tools panel on the right, click **Transcript**.
{% endstep %}
{% endstepper %}

***

### Working with Transcripts

#### Search

Use the search field to find words or phrases.

Matches are highlighted in the transcript.

#### Click to seek

Click any segment to jump the video player to that timestamp.

#### Copy

Click **Copy** to copy the full transcript to your clipboard.

#### Download captions (SRT)

Click **Download** to export captions as an `.srt` file.

Use the file in other video tools or players that support SRT.

***

### Languages

Transcripts work in multiple languages.

Screendesk detects the spoken language automatically.

***

### Which Recordings Get Transcripts

* Transcripts are generated for any recording with detectable speech.
* Recordings with no speech show **No transcript available**.
* Live session recordings currently do not generate transcripts.

***

### Frequently Asked Questions

<details>

<summary>How long does it take for a transcript to appear?</summary>

Usually a few seconds. Very long recordings can take longer.

</details>

<details>

<summary>What if the recording has no audio?</summary>

No transcript is generated.

</details>

<details>

<summary>Who can see the transcript?</summary>

Anyone who can view the recording can view its transcript.

</details>


---

[Next Page](/llms-full.txt/1)